Most often, the land under the cottage, the man himself does not choose, and are satisfied with what is offered in the architectural Department. And in the process use giving found out that the earth is caught with a high humidity level. Therefore, trees grow not want, and vegetable crops are starting to hurt. And the worst thing is that the close ground water can wash away the basement wall, to cause contraction of cottages and outbuildings, a basement each spring will suffer from flooding. Moreover, excess moisture in winter raises the soil, makes him pechenitsa, causing the pavement, paths and other design elements of the site will begin to crumble. Master only one thing — to equip the drainage area with your hands. This procedure is simple, takes a couple of weeks. But you can avoid many serious troubles and preserve the health of the garden and buildings.
The contents
Depending on the causes of the flooding of the area, making drainage an open or closed types. If the area is dominated by clay soil, which retains on the surface the drop-down precipitation and snow melt, means for bringing the site enough to create an open drainage system, through which excess water would leave the surface of the soil.
The second reason for the stagnation of water – close passing groundwater. They podavlyayut in the spring basement, erode the Foundation will luchinat soil, and get rid of the problem can only thorough system of closed drainage. Consider how to make the drainage at the site of the most simple ways.
Design #1 — outdoor (surface) drainage
Local method
The open drainage network without create the provisional scheme or with her. The simplest option – the local drainage in some places. Create it, if the problem of flooding concerns only certain points of the plot, and in the fall large amount of precipitation.

The inlets are placed in areas of greatest accumulation of water (from drains at the edge of paths etc.) by digging in the ground sealed container or drainage wells
In this case, you first notice the place where water stagnates more often, and dig in there intakes or closed containers, from which later it will be possible to take the liquid for watering the garden. As a rule, most of the water remains:
- in the end the gutter garden;
- shallow areas near the porch and terrace;
- in the recesses of the earth with uneven terrain.
If a place of a congestion of water near the boundary of the site, then using trenches to divert runoff from outside. And in the far positions digged in the ground intakes.
Strip ditches
The second option is drainage, the most favorable for clay soil is the lining of ditches around the area. First sketched out on paper the plan, which mark out the entire network of ditches and drain pit, where it will be water.

The depth of the drainage ditch about half a meter, and the frequency of visit is determined by the level of waterlogged area (the wetter the soil, the greater the need to dig ditches)
To open drainage system worked efficiently, ditches have to do with a bias towards future intakes. If the surface is uneven, dig down the relief, and if smooth, you have to create a gradient artificially, otherwise the water will stagnate in the drainage networks.
The number of ditches is determined by the degree of moisture of the soil. Than it is more clay, the more paving and drainage networks. The depth of the trenches do not less than half a meter, and width is determined by the degree of proximity to the drain well. The widest make a trench that collects water from all the others and sends the well.

To check the quality of runoff should be in the ditches, which have not had time to Refine it, because otherwise you will have to spend extra effort to dismantle design
After the entire drainage system on the site dug, it is necessary to check for the quality of the runoff. To do this using a normal garden hose allowed for ditches, the strong water flow (preferably from several angles) and see how quickly flow out into the drain well. If in some areas the flow is too slow, so we need to do more incline.
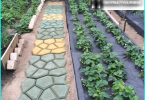
After the validation of the system begin to come up with ways of decorating. Very few people like the look dug ditches on his land, so they try to cover up. The easiest way to do this by using gravel of different factions. The bottom is filled with coarse pebbles, and on top of the spread smaller. The last layer we can even arrange marble chips or colored blue decorative gravel, thus creating a semblance of dry streams. It remains to decorate their shores green plants, and the drainage system will turn into a unique designer item. Ditches along the perimeter of the garden can be closed with decorative grilles.

If you leave the ditch open, it is best to shape them into the water, creating something like a stream. But this option will have to periodically clean out the debris from
Important! Backfilling of trenches with gravel protects the walls from collapsing and thereby prolongs the service time of your drainage system!
Design #2 — closed (deep) drainage
If the problem is not waterlogged clay, and close the groundwater, it is best to plot to create a deep drainage. It is carried out in the following order:
1. Determine the depth of laying of pipes. The denser the soil, the less deeply the pipes are laid. So, for the sandy soil needs a trench at least a meter, loam — 80 cm, for clay soil – 70-75 cm do not forget to take into account the depth of soil freezing in your area. Better if the pipe will be below this level. Then in the winter they will not deform the remaining moisture and increasing soil.
2. Pick up pipe. Today most drainage pipes made of perforated plastic. It is cheaper than ceramic, and is safe, unlike asbestos. But the pipe should be further protected against penetration of small particles of earth and sand, otherwise over time it will become clogged and cease to perform the drainage function. For this purpose, a geotextile, which wrap each pipe with the type of soil.

Sand-gravel cushion plays for drainage pipes as a shock absorber and an additional filter, without missing large particles of earth and debris that bring groundwater
If the ground is clayey, the geotextile can not be used, but the pipe should be laid on the gravel pad (20 cm). On loam gravel filling is not carried out, but the pipe is wrapped in filter cloth. On sandy soils you need and wrap with geotextile, and backfill the pipe with gravel on top and bottom.

Ready drainage pipes are created from perforated corrugated plastic, which is already wrapped by the filter cloth, therefore do not require additional work when laying
3. Prepare a space for receiving water. Before excavation work is necessary to determine where your water will drain out. This may be just the outlet pipe outside the station, where then it will fall into the ditch. But it is better to make a drainage pit. He’ll help in a dry year, because this water can be used for vegetable needs. And you don’t always have the opportunity to bring the drainage system off-site.
4. Excavation work. Dig a ditch below grade to place the water intake. Roughly – meter ditches must have 7 cm of the slope. Be sure to check the slope the building level. The best layout of trenches – tree in which all side branches flock to one Central, created from wider tubing. And from it water flows into the well.
5. Preparation of the bottom of trenches for laying pipes. When the network of trenches dug, it is necessary to prepare the seabed for pipe-laying. There should not be differences, because the ground breaks the plastic will start to break under the weight of the soil. It is most convenient to create a cushion. On the bottom is filled with 10 cm of coarse sand, and on top – a layer of gravel. And have him lay pipe. If the crust for some reason cannot be produced, then the whole ditch is additionally lined with a geotextile to prevent siltation of pipes.
Important! Pick the filter cloth of low density, otherwise the water will not be able to quickly break through its walls.
6. Laying of drainage system. All the pipes are laid in trenches and collected into a single network using tees and crosses.

For connecting drainage pipes in a single network using such additional elements as crosses, and tees, selecting the size of pipe diameter
The system then backfilled the top layer of sand, and then gravel (10-15 cm on each layer). The remaining space score the usual earth, forming above the ground level rollers. Over time, the layer will settle, and mounds razed with the ground surface.
After drainage on the site is done, it is advisable not to drive with it heavy machinery to flatten the system. Better than all the complex construction work to complete before the creation of the drainage network because fix it is more complicated than creating a new.