Today in our country not rarely appear constructions, which are not very functional. What is their purpose? Turns out our countrymen are increasingly coming to the cottage to rest and not to change one kind of work to another. But for recreation we need to have something pleasing to the eye. For example, a graceful pavilion, artificial pond with fishes, fabulously beautiful flowerbed, Russian Banya, or at least the carved bench. One of the most popular with gardeners products – mill garden with his own hands made of wood.
The contents
Before you start making decorative wooden windmill, divide its design into three parts: platform, frame and roof. To facilitate workflow, you can separately make each of the parts, and then just collect the design together. So what we’ll do.

These wooden mills is a real work of art: how much work and effort invested in their creation. You’ll likely want to do something like that. Choose your model
Step #1 — mounting of platform-base
Platform – the lower part of the mill, its basis. It must be sufficiently strong and stable to support the weight of the entire product. Installation of the bottom part should start with making a square frame of size 60×60 cm For this purpose we use a Board with a width of 15-20 cm, with a thickness of about 2 cm is Ideal for this kind of work will approach 20 mm decorative Board, often referred to as «lining».

This base is made in a log. The photo clearly shows how you want to draw a sample cuttings from shovels, which made this original design
Platform settings should be checked periodically, measuring tape measure the distance diagonally. Properly constructed basis without bias will allow the product to be durable and reliable.
Decorative windmill will be installed on lawn or earth, which will inevitably lead to the contact of the wood with a wet soil. To avoid rotting, you can install it on legs, pre-insulated from undesirable contacts. Excellent insulation for the legs can come out of PVC pipe. Will pick up the pipe with a suitable diameter and cut from it pieces of 20 cm.
Now all we need is four bars that it will fit in sections of tube. The fastening of the segments with pieces of timber with screws. Ready legs fastened to the four inner corners of the platform. You need to check the level that the legs were the same length from the beginning of the platform and to the ground.

And in these photos, is the design, the construction of which we describe. By the way, instead of PVC pipes under the base of the mill to use of a worn car tire
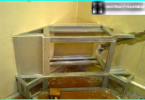
Left lower part of the structure from the top to close the boards, carefully adjusting them to one another. To seal the design better screws. The resulting platform should be similar on the stool. We should not forget about the need for ventilation facilities. For this purpose it is possible to drill a horizontal platform with a dozen holes. Incidentally, they are useful for removal of water construction, which inevitably builds up after rain.
Another option is the construction of the platform simulation framework. As the material for him is perfect cuttings for shovels. You can do this «frame» with four walls, but will look spectacular five walls.
Stage #2 — production of frame and roof
Frame decorative windmills for your garden we will build with four foot wooden sticks. Four bars should be used for the base and for the top-mount design. In appearance the building should be in the form of a truncated pyramid with a base of 40×40 cm and a top of a 25×25 cm Frame sheathed with clapboard. How neat will be done the middle part of the structure depends on its overall appearance.

Here’s a truncated pyramid we will use as the middle part of our design. Sheathing her best all the same paneling, do not forget about the Windows and the door
The mill will look very elegant and beautiful, if done in the middle part of the decorative Windows, doors or even balconies. These and other decoration will give the construction of individual, unique look. The finished pyramid can be strengthened on a prepared Foundation by means of bolts and nuts. Of course, you can seal the design with screws or nails, but then the design will be sealed and in winter it will be difficult to find a place to store it.

Mill, made on the basis in the form of a five-wall log house, also looks very attractive. Choose from different options the one that you most likable
Have to build the roof of the mill, which, like the cap, will give the design a finished appearance. For the roof you need two of an isosceles triangle with dimensions 30х30х35 cm, which are connected to the bases of three wide boards, and the top – timbers (60 cm).
That the design was stable, it is possible the base and roof frame to interconnect with the vertical axis, embedded in two bearings. This addition will allow the roof of the mill to rotate freely. To upholster the roof is galvanized iron and the same lining.
Stage #3 — horizontal and vertical axis sail
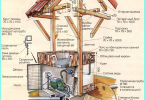
To operate a metal rod. Fit pin length of 1.5 meters and a diameter of 14 mm. Vertical axis, having a thread along the whole length of the frame (about 1 meter) must be secured top and bottom with nuts and washers. Is attached to the axis in the middle of the base of the roof and in the bottom center of the frame. Vertical axis mill is needed in order for her «head» could turn «the wind». How this rotation looks like from the outside, you can see in the video.
The horizontal axis is fixed the same way as the vertical. She would need a rod about 40 cm long. Is the horizontal axis over the vertical center. The axis must go through two boards with bearings: it pierces through the roof, paralleling the slope. The bearings themselves must be mounted in the Central part of the Board. For this purpose, through-bolts, which pass through the Board and pulled the hole for the bearings. On the axle you will attach the blades.
To construct the mill was similar to the present, can make the wheel for the wings. It will catch the wind direction. Such a wheel-sail is made from two wooden trapezoids, a Board between the base and the Central axis. The sail should not be heavy, so to unjam it better plastic or galvanized sheet. The steering axis is attached to the base of the roof by screws on the side opposite from the propeller.

It looks like a windmill with a sail that balances the wing structure and is used to search the wind in the event you do rotating model
Watch the video and you will understand, for what purpose was needed in some elements of the design. In principle, many can be waived, if you are happy with just a decorative windmill that won’t spin, and just decorate with your presence your site. The current model would require more effort, but looks much nicer.
Step #4 — construct an effective chopper
Spinner is a very important design detail that can beautify it or, conversely, to spoil. It should be remembered that the wings of our mill should not be too heavy. Take for the blades of the two boards with a length of 1.5 meters, a width of 5 cm and a thickness of 2 cm Pre-cut in the middle part of these boards is the slots. When you cross overlay billet grooves should be placed one in the other. Fasten the joint with screws.

The wings of the mill is no different from the spinning blades of a child’s pinwheel: they are made in such a way that the directional force of the wind pushing on the wing
Each of the resulting blades is the basis for the wooden boards. They should be nailed to each of the wings is shaped like a trapezoid. The finished spinner-propeller fixed on the horizontal axis. Please note that the turntable and the wheel should balance each other. Now that the roof Assembly with the wheel and blades is complete, you can trim off the excess part of the horizontal axis.
Step #5 — decorating the finished design
As mentioned above, the design can be rotating or stationary. One model will be spectacular, the other simpler, but even the most simple decorative item can be beautiful and worthy of attention and praise.

See how even simple models of mills to make a really beautiful and attractive. Take into consideration embodied in these products ideas

For this mill, blooming Jasmine and a neat lawn create a wonderful background, beautifully set off the decorative elements of this wonderful model
How you can decorate the finished structure?
- Mill paint and cover wood surfaces with varnish. The wood itself is beautiful, but if you want to do something special, you can use paint of different colors.
- Don’t forget window and door. Their presence is interestingly played out, for example, by the use of carved frames or frames in a contrasting color.
- Garden lanterns, placed inside the grinder under the window, make the product more colorful in the dark.
- Lovely flowers around the building also can be a decoration, if they are not too high. It is better to choose ground cover plants. Especially because they’re at the height of fashion. Excellent background for the model will serve as a ornamental shrub.
Decorative windmill with their work made with love and care, with any plot and, unfortunately, able to attract the attention not only of admiring spectators, but also a country of thieves. Think about how exactly you could make its removal from the site impossible. For example, you can dig and concrete the metal tube on which subsequently to build the Foundation of the building. May your wonderful work for many years pleases you and your guests.