You need a trailer for motoblock in the farm economy is difficult to overestimate. It can be useful for many cases: transportation of seedlings and harvested crops, as well as the necessary tools, and even garbage. Spending a few days to make a trailer for motoblock with your hands, you can greatly simplify your work in the future.
The contents
The simplest model of the trailer
Needed for building the farm design, you need to prepare:
- Steel pipes 60×30 mm and 25×25 mm;
- Springs and wheels (available from car «Muscovite»);
- Duraluminium sheet thickness of 2 mm;
- A piece of sheet steel with a thickness of 0.8 mm;
- Channel №5;
- Fasteners;
- Tools (jigsaw, angle grinder, welder and drill).
The frame of the trailer is a one-piece design, placed on a frame grid. For its arrangement it is necessary to make two traverses of the area 25×25 mm, which will act as the front and rear cross members and the side members of the tube 60×30 mm. All the elements are connected by five cross members so that in the formed lattice.
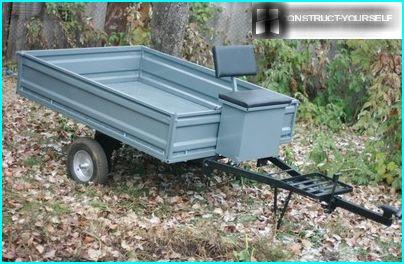
A simple model trailer with drop sides – a very necessary thing in the economy. It can be used not only to carry boxes and bags from the harvest, but any long loads
When building a platform grates need to be placed relative to the spars cross and yoke so that relatively small releases. To them later will be welded longitudinal pipes.
To the longitudinal pipes with the aid of welding attach the four posts, the top of which is welded strapping from the corner 25×25 mm. to equip the trailer with drop sides, construction frame is made separately from the frame. Lattice platform Uralaluminium cover sheet, fixing bolts. For sewing the sides, you can apply a thinner metal sheets, hooking them on the studs and struts by welding.
For the manufacture of two steel channel beams of the same length is inserted in one another, equipping one of the ends of the wheel axles. Finished beam with the help of springs connected with the side members. For this purpose the ends of the springs wear on the axle bracket and the axle earrings and the Central part is welded the ladders to the beam.
The pole is made of rectangular tube 60×30 mm. For the manufacture of double-beam construction, the front ends of the dock pipe and it is welded to the body of the trailer hitch Assembly and the rear with an overlap of 200 mm is welded to the front ends of the side members.
The trailer is ready. Optionally it can be equipped with brake lights, turn signals and marker lights.
Manufacturing of multifunctional trailer
Step #1 — preparing materials for construction
Planning to make a trailer, it is first necessary to develop a drawing in which to calculate the size of the structure and present it in a future appearance.
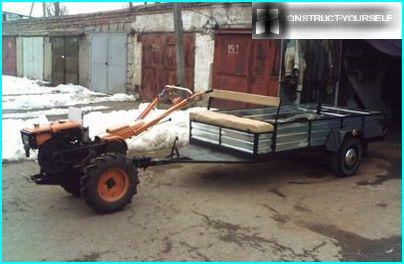
Considering the size and capacity of the design to be calculated, so using the trailer for this one and moved an average of 6-7 bags of vegetables, the total mass of which is about 400-450 kg
Having defined the size of the trailer, you need to calculate the required number of meters of metal. It is also necessary to calculate the number of channels that will act as a frame for the hitch. Giving this enough attention, you can not only save costs, to protect yourself from possible costs for the acquisition of extra screws and parts, but also to ensure the correctness of their actions.
When making homemade trailer can’t do without a welding machine, because the screws functional design will not last long.
For the arrangement of a durable trailer frame will fit steel parts of the section 50х25 mm and 40×40 mm and cutting pipes of rectangular and circular cross-section. To manufacture the body of the trailer will need a Board with a thickness of 20 mm and the beam size 50×50 mm for reference beams.
Step #2 — making basic elements
The basis for the manufacture you can take the finished development of the constructive part.
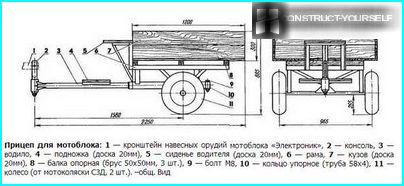
The trailer has an increased margin of safety that allows you to use it on a complex relief surfaces
Design has four main nodes: body, driver, wheels and a frame. All of them are connected by welding.
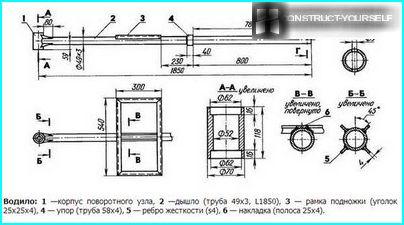
To increase the strength of the structure in the region of intersection of the drawbar with the housing of the rotary unit includes four ribs
The body is a wooden structure that was built from 20 mm boards, the corners of which are equipped with steel corners. The body is attached to the trailer frame using three wooden beams – support beams.
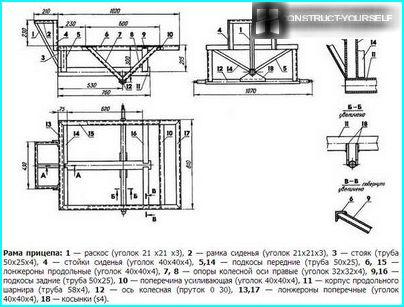
The frame of the trailer is made of set of steel items: pipes, angles and bars
Since this trailer is odnosima design, the load distribution should be in such a way that the center of gravity was shifted to the front part within the axis of the wheels. The only disadvantage of this body is something that is not required of a tailboard. If desired, the design can be slightly improved by adjusting the folding walls. It is also desirable to make the body side hinge straps which will be necessary for fixation of cargo during transportation.
Phase #3 — construction undercarriage
Suspension design is one of the key when making homemade trailer for motoblock.
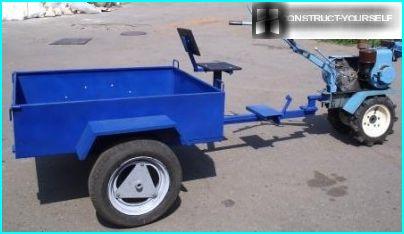
Wheels and springs can be bought new, but it is much easier to use outdated parts domestic car, for example, «Muscovite» or «Lada»
In our case the trailer is equipped with wheels that were removed from the sidecar to the FDD and is used, complete with hub. To match the axial rod with a diameter of hub bearings need to sharpen the ends.
When building a wheel axis, it is sufficient to use a steel rod with a diameter of 30 mm. stem Length should be such that in the assembled condition the design of the wheels do not protrude beyond the rim of the body. The rod is welded to fasten through gusset plate and angle support to the side members and the longitudinal body of the hinge.
To connect the trailer with the tillers you want to make a console. It will be attached to the bracket attachments, so the upper part needs to repeat the contours of the stick of Hiller. The lower part of the console represents the axis around which by means of angular contact bearings in a fixed position rotates freely swivel led.
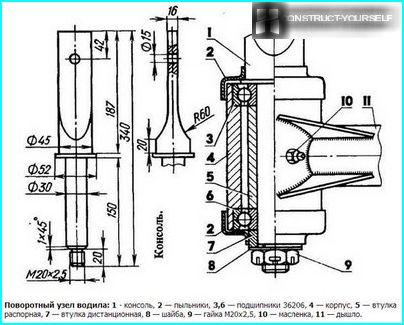
The original version proposed by the author, provides a swivel carrier trailer
The drawbar is inserted into a tubular body the longitudinal joint and secured with snap rings. This structural arrangement facilitates operation on uneven surfaces, because the wheels of the trailer will work independently of the wheels of the cultivator.
The trailer is almost ready for operation. It remains only to place in front of the body a seat for the driver and attach in a special box on drawbar led the bandwagon on which to lean in the riding process. Control unit the driver will carry out from the seat, holding and manipulating the levers. The seat is preferably equipped with a soft pillow so as not to turn work with the trailer in a real test of endurance to shake..


