
Work on the land, whether it’s hoeing, digging or hilling takes a lot of time and effort. So many gardeners to relieve work on the cultivation of land, purchase auxiliary equipment — tillers. Applying this universal unit can perform a number of different operations starting from cleaning the area and tilling the land or in the transport of harvested crops and any cargo. But to weed, hoe or just to clean the snow and debris is impossible without attachment adapter. A specially equipped truck with a seat that turns a walk-behind tractor, mini-tractor, in stores is quite expensive. To make the adapter for walk-behind their hands – quite feasible task to implement which will host, with the technical creativity.
The contents
The design of adapters exist?
With this attachment you can simplify the use of the cultivator. Because it acts as a bridge linking the unit with other functional elements: tips for planting and hilling of potatoes, plows, plow… Mounting hardware you can automate ogorode-horticultural work. For example, when using machinery with attachments can increase the working speed from 5 to 10 km/h.
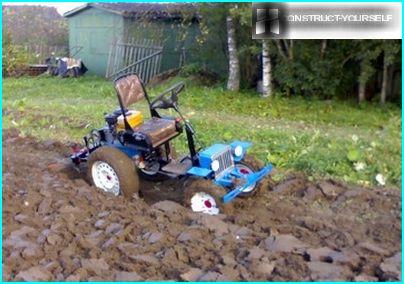
There are several types of adapters. The whole structure is attached to the back of the walk-behind truck equipped with a comfortable seat
Some models have a lever to lift that greatly simplifies the control mechanism and movement of the unit on the site. Other adapters, in addition to agricultural work, can also be used to transport goods. They are equipped with special bodywork. Depending on the functional values of the adapters can have a short or a long drawbar. Models with short posts designed to work with light tillers, and long – with more heavy units.
There are on the market and models with telescopic pole and those in which it is possible to adjust the track width.
The adapters are fixed to the cultivator with a single increased coupling, which consists of two parts: the first part needed to attach the equipment to the unit. And the second acts as an adjustable adapter between the equipment and its lifting mechanism. To increase the number of simultaneously used guns adapters equipped with dual universal hitch.
Build simple design
A simple model of the adapter is a metal frame. It is made of a tube with a rectangular cross-section with a length of 1.7 meters. At one end of the tube is welded perpendicular to the tube length 0.5 meter, which will serve as the basis for fixing the stands under the wheels of the adapter. The height of the stands themselves from the axis of the wheel and to the top of the – 0.3 meter.
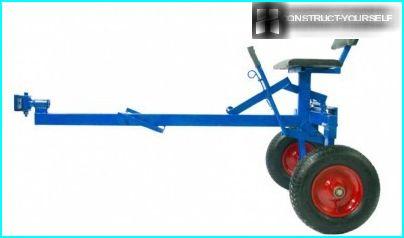
For production designs you can use wheels taken from the garden truck. You can install them on the bushings, which is quite simple on a conventional lathe. Ready to wear of the sleeve bearings of the appropriate size
Then to the Central tube and the sleeve wheel adapter is necessary to attach by welding braces. Length depends on the angle of inclination relative to the structure. Square frame adapter you can also run any size. In our case this is frame 0,4×0,4 m. For arrangement of attachment to the rear end of the frame is welded steel channel No. 10 length of 0.4 meters. Assembly and connecting the side tubes of the structure is performed using bolts.
To the frame also welded a lever to control. It has three «knee» with a length of 20, 30 and 50 cm To increase the efforts on the adjustment lever equipped with additional arm length of 75 cm Coupling node designs can be purchased at the store or make yourself. Regardless of whether the coupling of the production sample or self-made, special attention should be paid to its reliability. From its quality depends on the duration of the attachment operating.
The seat is placed on a metal support which is welded to the Central tube. The adapter is ready for operation.
The arrangement of the multifunctional model
For the manufacture of multifunctional devices, you need to prepare:
- Steel pipes and angles;
- Sheet steel;
- Two wheels;
- Comfortable seat;
- Welding machine and tools.
This adapter is a multifunction model. It can be used for carrying out the main agricultural work and transportation of goods across uneven terrain for short distances. Tooling design can be agricultural implements, as plow, harrow, Hiller, vegapamil potatoes. In the winter months to the adapter, you can attach the scraper for cleaning snow.
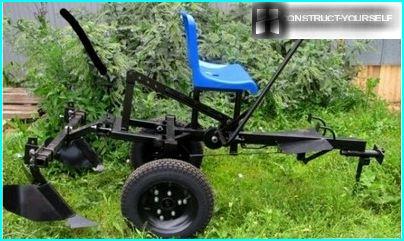
The main elements of the machine are: the frame and the drawbar, and a pair of wheels and seats
The production process of a adapter at home takes place in several stages.
Stage #1 — preparation of the kinematic scheme
To ensure the equilibrium of the structure and prevent additional congestion at the design stage need to create a kinematic scheme. It is possible to make your own or use ready option.
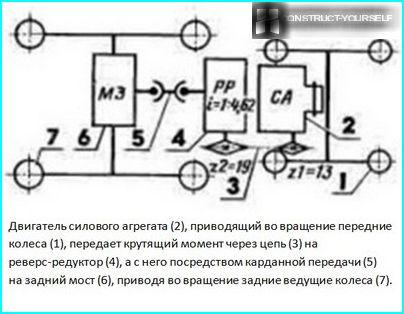
This scheme is designed for the manufacture of the adapter is designed to work on the tillers «Neva»
Step #2 — manufacture of main parts
Making and assembling the frame it is important to provide the arrangement of the plugs with the bushing. It is necessary to ensure free rotation of the trailer.
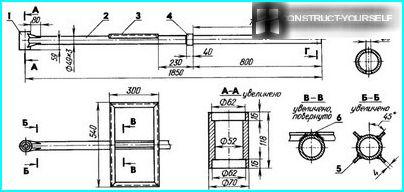
The frame construction is made of metal pipes and parts
The body design is made of a steel sheet. The height of the sides make not less than 30 cm.
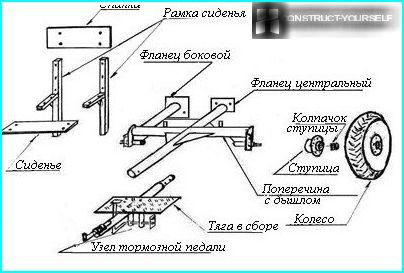
In the manufacture of racks for wheel adapter, you can use the following scheme
The easiest way of making the coupling component, the pin length of 15 cm, which is stuck in the hole of the drawbar is a U-shaped motoblanco «towbar». The disadvantage of this variant is rapid amortization: under the action of freely rotating trailer quickly break holes for the hitch. To reduce wear of the U-shaped tenaciously desirable to extend.
Video master-class workmanship rotary unit for walking tractor:
Step #3 — install seat
On the cap frame I-beam adapter, departing at 80 cm from the front edge, and fix the seat. It is fixed using bolts. The adapter is ready. It only remains to check the operability of multifunction devices.
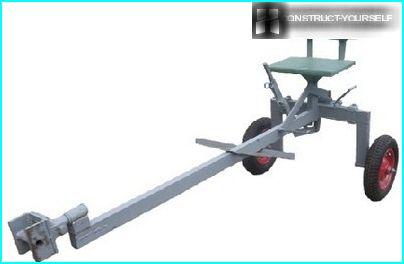
To prolong the life and enhance the attractiveness of the design all metal parts need to be painted


