
Sliding or sliding gates are gaining popularity with private builders, as it appeared on the market all the necessary components for their installation at an affordable price. At cost swing gates, of course, cheaper. Sliding design wins on aesthetics and ease of operation. Reduce costs by saving on services installation companies, installing sliding doors with their hands. To make it not so difficult, if you understand the diagrams, view video tutorials and also consult with experienced home handyman. For completion of works gets ready mounting kit sliding gate cantilever type, which includes two rollers, the bearing beam of the U-shaped profile, a few traps and holders. Assembly and installation design of sliding gates is in sequence.
The contents
This video clearly shows the process of installation of sliding doors with their hands. After watching all the precedent questions on the installation of sliding gates will disappear by themselves. So clear and just shows each individual operation.
Briefly about the device sliding gates
Here’s a diagram and list of main components of ready set of sliding doors on the market, both foreign and domestic manufacturers of this equipment.
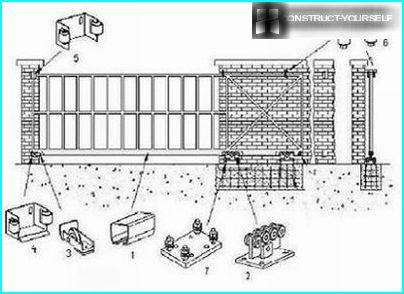
Legend: 1. Guide U-shape beam; 2. A support roller or truck (two pieces); 3. Removable end clip; 4. Lower the catcher; 5. Top catcher; 6. Retainer top with rollers (bracket); 7. Plate fixing castors
Specially prepared for the installation of sliding gates Foundation is fixed at a certain distance from each other carrying a pair of roller bearings. Guide rail U-shaped beam is welded or screwed to the lower edge of the metal frame of the door leaf. The roller bearings can withstand not only falling on them the load of the whole structure, but also ensure its free movement. Mount the supports are produced using cage bolts or a special plate, securely fixed to the Foundation.
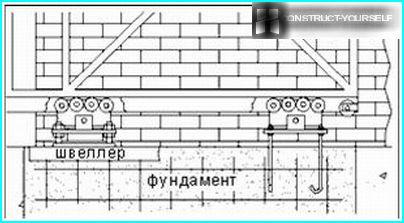
Mount the roller supports to steel channel, laying in Foundation together with cage, produced with the help of bolts or welding
The gate is mounted on a roller cart so that the inside of the U-shaped carrier beam. This arrangement protects the rollers from dirt, which affects the length of their faultless operation. In the end, the gate is easily rolled back in the direction in the manual control mode and automatic by the motor.
Important! The skeleton for door leaf, welded of stainless steel hollow section 60x40x2 mm dimensions (main frame) and 20x20x1,5 mm (jumpers) shall be sufficiently rigid. After all, the door leaf is exposed to wind loads, which can be quite significant. The painting should also not be subjected to any deformation under the pressure of its own weight.
Production of fittings for sliding gates deals with many manufacturers, including in the Russian market the most well known are ROLTEK (Saint Petersburg), CAME Rolling and-Center (Italy), DOORHAN (Moscow).
The inventory of parts required to install the sliding gate, divided by the weight of the structure and width of the opening in the light in three sizes:
- small (up to 400 kg and 4 m);
- medium (up to 600 kg and 6 m);
- large (600 kg and 6 m).
When choosing the right sets focus on the width of the cover openings, the height of the blade and the total weight of the whole structure.
Preparatory stage — pouring the Foundation
Work on foundations for sliding gates starting with the layout of the trench. In this case the edge of the opening side of the roll back gate delay length of the concrete base equal to half the width of the passage. Width of the Foundation base is 40-50 cm When calculating the depth of the pit is based on the level of soil freezing in the area. In the suburbs, laying the Foundation to a depth of 1.7 m, and in Siberia – 2,5-3 m.
Of channel 18 and of the valve (12 d) made of inset element, connecting by welding all the parts together in accordance with the scheme. The channel should be used to enhance the strength and rigidity of the constructed Foundation. Low alloy steel used in the release of channels, are able to withstand low temperatures and does not corrode. Workpiece length of the channel is equal to half the width of the opening. The length of the vertical reinforcing bars is calculated from the condition that they have to go below the freezing depth of soil.
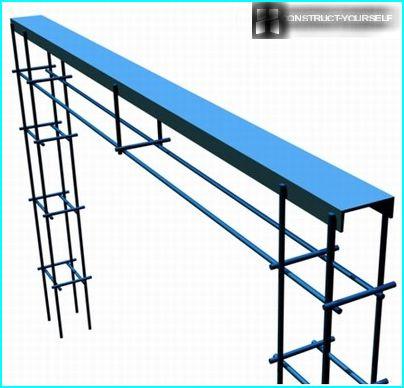
The Foundation welded frame of channel 18 and the reinforcing bar whose diameter is 12 mm. Rebar can replace steel corners
Connecting the vertical rods of the steel lintels, receive strong reinforcement cage that is lowered into the prepared trench to fill the basement. At the bottom of the trench is poured a layer of sand, which is carefully compacted.
Important! Foundation level should match the level of the road. The ground clearance must be higher than 5 cm to avoid any problems during the operation of the gate in the winter.
Before pouring the Foundation it is necessary to check horizontal location of the reinforcement cage, using building level. During alignment also ensure that the longitudinal axis of the steel channel was parallel to the fence line.
If you plan to put the actuator for the automation of sliding gates, it is at the stage of pouring the Foundation, lay the wires, hiding them in a special corrugated tube. The point of the bundle of wires selected on the basis of the planned location of the drive. Usually the equipment is installed in the middle of the Foundation.
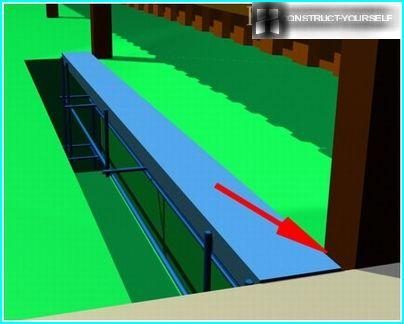
In the trench prepared for the Foundation, reinforcement cage is lowered. The plane is steel channel aligned on the level of the roadway
For the pouring of the Foundation concrete mix a solution of 4-5 bags of cement M400, gravel (0,3 Cuba) sand (0,5 Cuba). Flooded basement left alone for 3-5 days, during which the concrete attains the desired strength. After a specified time, proceed to installing sliding gates.
Step-by-step instruction of the installation work
Indicate the line of movement of the gate with stretched along the opening of the cord, placing it at a height of 200 mm from the surface of the roadway and at a distance of 30 mm from the return post. On the cord you will align the position of the carrier profile (I-beam).
Prepare roller trolley for installation and paste them sequentially inside the carrier profile of the beam. Then move the trolley to the centre of the goal. Put a gate inserted in the profile of roller bearings on the steel channel of a fixing structure. Then position the first and second supports at spaced locations, and adjust the gates so that they are located parallel to the tense cord, and touched his.
Mount the roller trucks to the channel
Weld to the channel control area of the second roller bearing. Having rolled out the gate into the opening until the very end and check the horizontal position of the canvas, tack weld the adjusting the first roller support.
- Remove the fabric sliding doors with roller bearings.
- The pillars themselves remove the adjusting pads.
- After the weld contour, weld the adjusting pad to the steel Foundation element.
- Secure the roller bearing is welded on the adjusting pad.
- Slide on roller bearings, the canvas sliding gate.
- Install the gate in the closed position and adjust the horizontal position of the plane of the carrier profile. This wrench raise or lower the adjusting pad relative to each other.
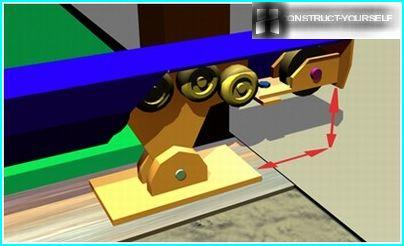
Installation of the front carrier roller truck doing 150 mm from the edge of the opening gates, as to when they are fully open, end roller will rest in the prop
Important! To give a horizontal position the gate is possible only in case of their presence in the closed state.
Regulation of free running
Adjust the position of roller bearings located inside the carrier profile. To do this, loosen the top nut securing the roller bearings to the regulator sites. Close and open the gate, swept them from side to side several times. While roller bearings can take inside of the carrier profile in the correct position in which the gate moves easily and freely. After the adjustment of free travel of the gate, firmly tighten the upper nuts of roller bearings.
Installation of end roller and plugs
Next, install the end clip and the cover support profile. For this purpose inside carrying a U-shaped profile inserted end of the roller, positioning it on the front side of the door leaf, and fix the part mounting bolts.
Plug support profile, supplied in the kit sliding gate is welded on the back side of the canvas. This detail does not give the prole to be clogged with snow in winter, which prevents the possibility of jamming of the gate.
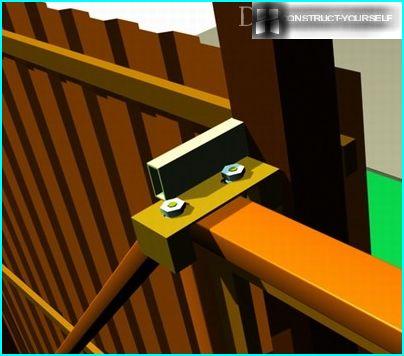
When installing the upper bracket can be used for attachment, as anchors, and welding. The rollers on the bracket after installation of the oil for better sliding
To install the top guide bracket, loosen fasteners commercials. Then place the bracket on the gate panel in such a way that the rollers touched the upper edge of the fabric, and the side with holes provided for fasteners was directed toward the support post. Holding the bracket to the surface of the support post, lock detail fastening elements.
Covering of door leaf steel sheet
After embarking on the casing frame of the gate frame, profiled sheet, cut height and width to the desired size. Installation sheet starting from the front edge of the gate. The bracket cover is made with screws or rivets. Each successive sheet overlaps the previous sheet «on one wave».
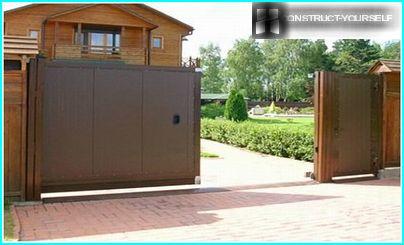
As a material for covering the sliding gate is most often used sheet metal, which is supplemented by wrought-iron elements that give the structure an elegant and special look
Setting traps: why and how?
One of the last steps in the installation of ready set of sliding doors is the installation of traps. Lower the trap to be installed during the fully-loaded gate makes it easy to remove part of the load with roller supports at the closed position of the door leaf. To determine the position of the lower trap, it is necessary to close the gate and align it with end roller.
The top trap allows you to keep the door leaf being in the closed state from swinging during the sailing loads. Installation of the upper trap is performed at the level of the protective corners, and in the closed position, they (the corners) have to touch the clamps of the upper trap.
Rules for self-installation automation
The last step is the installation of automatics, if this option was originally planned. The movement of the sash sliding gates thus occurs by means of toothed strips, sold in metre pieces together with fasteners. The slats are attached to the bearing profile. Installing automatic sliding gate with your hands, you should know that in addition to the racks, you will need electric drive, remote control, lamp-light and the key. Everything is set in full accordance with the instructions provided with the equipment for the automatic control of gate movement. If you have problems you can contact an experienced electrician.
As you can see, to handle the Assembly of the sliding gate can be on their own. However, this process can not be easy. It is necessary not only knowledge but also physical effort. Therefore, many private developers prefer to entrust the installation of the sliding gate professionals.


