The arrangement of any suburban area starts with vozvedenie barn – buildings required for storage of construction materials, firewood and other household equipment. To build a shed with your own hands is a simple and feasible task, realize that any owner who is even slightly versed in construction. Because the shed is not a temporary building and is a multifunctional design that can not only be used to store useful things, but also for keeping of domestic fowl, carefully consider the location of the future building.
The contents
Choose a place for future construction
To facilitate the work you can first make a plan-a diagram indicating the locations of future buildings. For the construction of the shed many owners allocate land away from the front area, so it was hidden from prying eyes. Some are of the opinion that the barn need to be placed closer to the house, that at any time to have access to it. For the purpose of rational use of the territory for arrangement of the barn selects the little sunlit land, which is considered the least suitable for growing crops and carry out other agricultural works.

When deciding on the location of the barn in a hurry is undesirable. After all, the barn, which will serve not one ten years, should complement rather than contrast with the landscape
When selecting a location for placement of the shed should focus on the location of other areas of the site, as well as the size of the constructed structures and its appearance.

Using otechnyh works even unsightly shack to transform in the original design the building, which will be the spectacular decoration of the site
Determine the design and exterior
Before you start building the shed, you should consider the shape, size and appearance of future structures. The appearance of the buildings can be absolutely anyone, from simple little house with no Windows and only one door, and ending with unusual structures, which in addition to the direct appointments can be part of the decor landscape design.

The most simple variant — construction of shed sizes 2х3х2,5 m with a pent roof, which is covered with tar paper or roofing felt
This barn can be built from ordinary unedged boards in just a day or two. The main advantages of the design – the low cost and ease of construction. To transform the unsightly appearance of the buildings can be along the wall to plant climbing plants or to decorate the walls with decorative elements and flower pots.
Sheds with a gable roof from an aesthetic point of view look more attractive. Especially if the roof is not trivial to equip a roofing material, as for example, shingles.

If in addition to the kit, and even the walls are finished with siding, the usual unsightly shed can be transformed into a modern garden house

Possible construction of a combined barn that can be used as storage space for tools and also as a greenhouse or a greenhouse
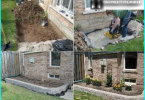
The choice of materials depends on the functional value of buildings. Mainly barns, all built of wood. But to create a more durable and reliable structure, which regularly serve several decades, you can build a shed out of concrete blocks or bricks. Brick barns are well suited for growing domestic birds and animals throughout the year. But such a structure should build on the small sunken Foundation.
Step-by-step example of the construction of frame shed
For starters, we offer you to watch the video, and then read explanations to it:
Step #1 — preparing the base
Any construction begins with the laying of the Foundation. Before you begin construction, you need with a tape measure, pegs and ropes to mark the area for the construction of buildings. It is important to fathom the roulette not only parties, but also diagonal markings.
A shed can be erected on a slab, strip, bar or screw pile-Foundation. On a normal heaving soils with a low groundwater table most often lay pier Foundation.

For the construction of a columnar base is required around the perimeter of the fenced area, as well as at the intersection of the interior walls built to prepare every 1.5 m, a pit depth of about 70 cm for the installation of brick columns or asbestos pipes
Set the columns you need to check the level, and then add a 15 cm layer of sand and gravel and concreted. Then give the Foundation to stand for several days.
Council. To extend the lifetime and improve the waterproofing of the columns, it is possible to process them before refilling with a special mastic. The processing of all Foundation pillars will take no more than a couple of five-pound cans waterproofing material.
Step #2 — mounting frame made of wooden boards
Pre-boards should be treated with a protectant and antiseptic. Purchasing a protective agent, it is better to choose the impregnation with the Kohler, which will be better not treated portions of the surface.

The well-established Foundation laid the Foundation of the timber, the size of which corresponds to the size of the erected frame structure. The boards should be laid on columns, covered with roofing material
On a floor frame to fit Board thickness of 30-40 mm. When putting some boards for a floor important to carefully measure and cut the area around the uprights. Placing gender at this stage of construction, it will be easier to mount the wall.
Planning in the future to adjust the floor plane, when fastening the boards to the joists it is desirable to apply «hidden» method. The number of support pillars is determined based on the number of angles, and the presence of door and window openings. To expose the boards strictly on the level, you can use sticks-slopes. With the help of them you can temporarily fix the boards into position. Nailing stick, the nails should score only halfway to them, it was then easy to pull.

To the lower binding joists, attach the upright with protruding from the base of the pins, screws and steel parts
The variant of the structural frame on brick base, when the perimeter of the Foundation is laid out first, a few rows of bricks, and then they mounted wooden racks.
The boards that will be placed vertically, can with three internal parties to handle the plane and on the sides, looking inside the barn and did a chamfer. Raw leave only parties who in the future will be sheathed in exterior boards.
Step #3 — installation of the rafters and roof arrangement
On completely level and locked the upright attached the upper part of the frame made of beams with notches at the middle and both ends. All connections are fixed with screws and steel parts.
When building a shed roof in advance should provide that timber stands on one side was higher than on the other. Due to such location of the rain water below grade, will not accumulate, and drain.

For the rafters of the roof, you can use a Board thickness of 40 mm. Length of the rafters should be about 500 mm longer than the length of the frame
In the rafters doing cutting down the points of support on the boards. Then they are placed on the secondary frame and fix with screws. The rafters are placed at a distance from each other of about half a meter. Prepared, processed, chemical composition of the frame can be mounted crate.
For covering the roof and walls of the shed will fit boards sizes 25х150 mm. Planked roof needed waterproofing, to ensure that by using the roofing material. Wishing to give the roof more presentable as a final roof covering is good to use shingles, slate or corrugated sheet. Put the first Board on the front part of the structure, and then the side and rear. Place them right next to each other.

Laying out planks of the wall of the shed, you can process it outside the plane. This is required not only for aesthetic appearance, and how to ensure that rain water is easily pushed on a smooth surface boards
To give the finished building a more attractive appearance, you can paint the exterior walls of the barn latex or oil paint.
Finally, we show an example of the construction of the shed from our German friends: