The contents
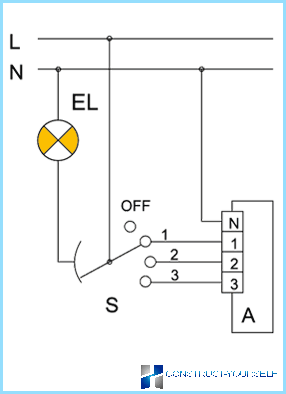
In order to efficiently and reliably carry out the installation of the cooling system, you should thoroughly read the instructions. The figure below shows the wiring diagram of fan.
In it we see a fan that has three speeds.
S is a switch;
EL – para connect ventilation system to room lighting.
The light in the room and the fan operate in parallel, i.e., the illumination is always accompanied by the beginning of the work of ventilation. It is possible to connect the ventilation system with humidity sensor. For this, you need to connect to the system sensor, which will react to environmental conditions and enable the system as needed. You can regulate the entire system, exposing the timer on and off. Is possible to install a ventilation system that will work regardless of the lights or not, what the humidity present in the room. Wiring the fan with a timer is presented below. Such a system is useful in the case when there is no need of constant blowing air.

Set the ventilation system in the bathroom ↑
Ventilation is definitely necessary in every bathroom, as it was in this room the condition for humidity, and ventilation is minimal. Connecting the fan in the bathroom is not a hard task to handle by any person without special knowledge. First, inspect the condition of the vent pipe, perhaps it needs to be cleaned. During the inspection it is necessary to pay attention to the degree of suction air. You can easily determine if placing to the hole of the tube a lighted match. The movement of fire will know how much suction there is in your premises. Do not ignore this survey. Because of its work depends on your health. Humidity is always accompanied by the emergence of pathogenic bacteria and fungus on the walls. If you notice such changes in your bathroom, then urgently take care of the repair of the ventilation system.
The preparatory stage includes:
- the laying of the cable;
- the procedure of extension of the exhaust channel (pipe), if necessary;
- system connection to the mains (it is better that it was done by experienced electricians);
- installation of the fan in the exhaust channel of the system;
- treatment of cracks and holes with foam;
- putty works, if necessary.
Finishing putty will allow you to level the surface and make its appearance more aesthetic. The entire ventilation system in the bathroom requires two holes:
- for air inlet;
- to the air outlet.
The connection of the fan should occur after the completion of all preparatory procedures. Think about what kind of plan you select. It needs to be based on what conditions are present in your bathroom. Blower choose, starting from the humidity and stagnant air. If you do not see the need for regular airing of the bathroom, then use the off timer so that the system did not work constantly, and when it is necessary. In this case, the fan should be equipped with a sensor that will react to the humidity level in the room.
Methods of connecting the fan ↑
There are several ways to connect to the system. You can apply any of them depending on the needs and possibilities of the room. Their klassificeret thus:
- a system in which the switch is attached to the main body, having the form of a cord and serving as an on-off switch;
- automatic systems that are connected to the lighting system.
The first option is not always appropriate, especially in cases where the fan is installed during repair works in the bathroom.
Diagram of the fan with the light source as follows, as shown in the figure below.

In the second case, the lighting and exhaust system work in parallel. Do not use this option if the bathroom is near the living rooms, as night ventilation can create quite a loud noise. It is better to use a system with a timer. So, you can always control the time of ventilation. If the room does not need abundant ventilation, use the series switch. It can be placed next to the lighting switch and use it as needed.
Work with the wiring during installation ↑
To work with electricity in a bathroom it must be made very carefully. Pick up the device for drawing strictly according to the standards of a hole that leads into the shared ventilation shaft. Before starting work, make sure the housing of the communications, including mine. The size of the holes in the shaft, as a rule, correspond to:
- 100 mm;
- 125 mm;
- 150 mm.
If you have not found the right fan under the hole, then you will need to extend it with a hammer or decrease. Choose a blower based on the size of your bathroom, the larger the area – the stronger it is necessary to buy the device. Usually installation takes fifteen minutes.
You will easily be able to handle it, if you have all the necessary tools at hand, among them:
- Polyurethane foam;
- Plaster;
- Drill if necessary;
- Cord for electric wiring;
- Fan;
- Plastic pipe or flute.
Installation of the extraction system in the kitchen ↑
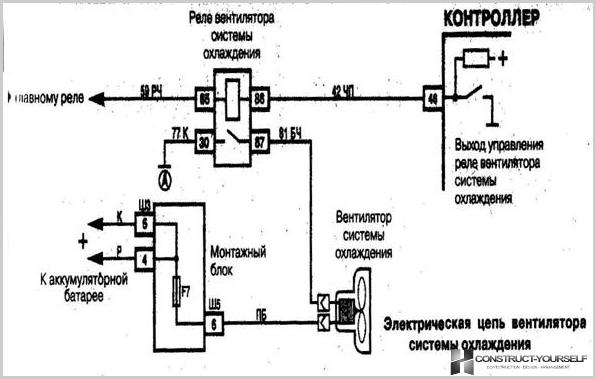
The kitchen extractor fan plays a less important role than in the bathroom. Sometimes the vent hood over the stove or hob is not enough and then you need an additional ventilation of the room. It is needed for cooling, especially in cases when the kitchen is on the Sunny side of the house. Wiring diagram for cooling fan is presented below.

The figure shows a complex system of ventilation. In the sale you can find more simple models. At the same time, if you’re familiar with this – you can set any.
Installation of the fan in the kitchen is little different from the mounting in the bathroom. The difference lies in the intensity of ventilation and in the destination. The intensity and power of the unit choose, guided by the climatic conditions of the kitchen. For small kitchens it is not necessary to choose a powerful cooling fans, intense cooling can affect your health. Do not create favourable conditions for the draft, it can also appear on the health of the occupants.
Following our tips, you can easily install any fan, good luck to you!


