The contents
- Switch: the history and evolution of
- Selection of the dimmer: one or two keys?
- Cunning choice of the controller lighting: connect without problems
- How to establish elements of regulation: the determination of the amount of light, preparatory work, connections and tools
- Installation: installation methods for connection parts of the light
- Wiring diagram
- The beginning of works on creation of the perfect light in the room
- The nuances of: connecting the light
From time to time, each person actively using the lighting in the house, there is a need to replace a failed or out of fashion switch. Not always it can make a qualified master electrician, so you know the basics of self-Assembly is necessary for your own peace of mind. It is important to know how to install light switch to work, made with his own hands, was quality.
Switch: the history and evolution ↑

Habitual breakers appeared in the late 1870s by the invention of Edison. After a few years – in 1893, the world saw the prototype of the modern circuit breaker – the circuit breaker are spring loaded and automatic. In the early twentieth century, the breakers began to slowly regain his usual form. In the late 40’s and early 50-ies of XX century began to appear the product one-button later purchase became possible and the options with 2-3 bedrooms keys. Today, this element of supply is equipped with a backlight, has a different shape and it doesn’t seem like something unusual.
Selection of the dimmer: one or two keys? ↑

The convenience of light control in the room depends on many factors:
- own taste;
- the location of rooms;
- the light intensity.
Single and series items on/off is ideal for domestic purposes as well cope with the load, but will not stand if I have to work with the powerful professional lighting– it is important to consider.
They are suitable for robotical with the old incandescent bulbs and new, modern inventions – luminescent lighting or led lights, ribbons.
The number of keys depends on the set before the product problems – to turn the light on in the bathroom, separate type, it is better to purchase the item with two buttons, to save electricity. In small spaces the ideal one-button option.
Cunning choice of the controller lighting: connect without problems ↑

Before proceeding to the connection, it is important to learn tricks of choice. Today there are many models that allow you to control the level of lighting in the rooms. If the choice fell on the rheostat model, it is important to remember that they allow you to choose the level of light to smoothly adjust the brightness of the bulb. However, this option is the best, but it is suitable only for the simplest of incandescent lamps and installing the controller light will have to use only them.
The housing must be made of durable and fire-resistant plastic be sure. Internal support can be made of ceramics. If you set the backlight, which is very often used in modern models, it is necessary to remember that a switch is always energized.
How to establish elements of regulation: the determination of the amount of light, preparatory work, connections and tools ↑
Before you begin the installation, you must decide where will be located the switches, as it affects the convenience of light control in the room.The connection itself is not difficult, therefore the desired amount of light to reach easily. After that, it is important to check all the necessary tools:
- breaker, and;
- junction box;
- wires for connection;
- duct tape.


Installation: installation methods for connection parts of the light ↑

There are several ways how to connect the controllers of the world. They are not complicated, netresult a lot of time and effort, but some knowledge in this matter is required, then sources of light pleasing to the eye and be able to meet the needs of people.

Sometimes to turn on/off the light in the room you need from different places, especially if the room is large. For this purpose, usually installed with different lamps. Example, a person wants to control the lighting in the room from the hallway and, actually, from the room, the chandelier is 4 – 5 bulbs, for this purpose you need to know how to connect the lights through the switch below «play» with the lighting on their own.
In fact, it is necessary to do so to manage could be different groups of light bulbs in the chandelier, for example, in combination 1, 2, 5-4-5 pieces at a time.
In order to change the number of bulbs in a group and need to know how to connect light switch.
Wiring diagram ↑
To connect need directly controls the single or double – depends on the needs and desires of the people themselves, to make repairs. The use of series connected switches, if we are talking about the hallway.
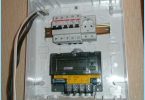
That’s how it looks in a disassembled state, ready for installation:

Have a double or, as it is called, series control the lighting – there is segasist contacts, respectively, two inputs and four outputs. The connection is made based on these features.
Connection diagram looks like this:

In fact – this is two single element, connected in one secure case. Here you can see how to connect a dual switch light to the further operation was as safe for human, comfortable and practical.
The scheme, intended to control lighting at the same time from three locations in the room, not much different from the previous one. The difference lies in the fact that it includes another element of type double – cross which from single and double, as it has four pins, not six as earlier – two inputs and two outputs, respectively. While pressing on the double paired switch immediately work on pereklyucheniya independent from each other contact.
The beginning of works on creation of the perfect light in the room ↑
You need to check all tools in advance, so that the connection went quiet, since then leave the rest to the control is simply dangerous. After this, you should check regularly whether the work of wiring and lighting devices installed in the room.
One-button option built-in type, is usually installed in the corridor or hallway. Tequilacat single and series options:

Using etirazetam easy to create the perfect lighting in the hallway.
Wiring diagram one-button switch – the simplest, because one switch only has 2 wires. To connect light switch for one light bulb can be the housing of the switch Board here, phase wire of red, zero — wire blue. The voltage coming to the switch box, which is located in the hallway.
Phase is connected in the junction box with red wire that goes directly to the switch. With the cable indicated in the diagram in orange, flows back into the junction box where it connects with the wire is also orange, going to a lighting device, which is simultaneously the load in this circuit.
Zero, in turn, is connected in the junction box with wire, marked in blue, which immediately goes to the bulb. For wiring connections in the junction box is convenient to use the terminals with them, the connection will be faster and more reliable.
When replacing the lamp, it will be enough to turn off only the switch in patronize be tension. If to confuse and break the zero, when replacing the lamp, it is in any case will remain under tension. This happens if the switch is equipped with a led light that always glows in the dark. The connection of the new elements in this case will occur under stress.
The nuances of the work: connecting light ↑
There are two types of installation – with open and closed transaction. In that case, if we are talking about the installation with open wiring, you come to the aid of the escutcheon, which is installed in the wall. It has and is attached to the selected switch as above.
Mounts are made with screws, dowels or screws – the choice of fasteners depends on the material of walls and type of switch. Holes will then be spun off switch, pre-drilled, using a drill. After wiring overlaps with the insulating cover, and tightened with the help of special hooks. Key, which will be controlling the amount of light in the room, is placed in the last turn. As you can see the connection light case available for most people, it is only necessary to carefully study the user manual and act according to the scheme.

Here are the escutcheon:
So disassembled the switches, ready to install

In the video you can watch the whole process works and visually see all the features that may await the person during the installation:
To install the switch yourself, even without special education. Complexity can wait for only those who are afraid to work with tension, since they will have to overcome your fear. Otherwise, today we have detailed manuals and video tutorials that allows you to produce any work themselves without the help of artists, which sometimes has to wait several days. However, if a person feels uncertainty or fear – it is better not to take risks and to experiment, and to use the services of a specialist is safer and more reliable. Thus, the connection will not take a lot of effort, time and nerves.