The contents
We reviewed how to wire outlet 220 volts. It was the turn of the story about the unit installation of multiple devices.
Safety ↑
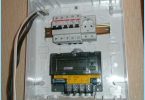
Before proceeding with the installation of the unit (and any other work related to wiring devices) must be switched off in the electrical panel of the machine will be connected to this unit. After turning off the machine need a flat screwdriver you need to ensure that there is no voltage. In residential areas of old construction, where the machines are not installed, you need to turn tube.
The connection of socket unit + switch ↑
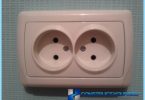
«Staff» place of installation of such modular products– in the corridor on the partition, separating the bathroom and the bathroom. On the same panel contains the switches of lighting in these areas and the outlet for electrical appliances that constantly use the bathroom. The product without moisture protection to use the bathroom is dangerous, so the blocks without moisture protection installed in the corridor.
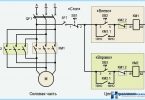
To connect Blokus series switch lighting in the bathroom and in the bathroom you want to build for him five wires from respecatable.

- The ground wire in the diagram are shown in light green, zero blue. These two conductor directly go from respecatable to the socket.
- The phase marked in red. This wire connects to the socket, then jumper to the common contact of the incoming phase switch.
- The remaining two wires connected to two switched contact. Through them phase connected to the lighting devices by pressing a key. These are fixtures in the bathroom and the bathroom. This design provides constant phase, zero and earth on the socket, and the phase at the lower contact of the key switch (zero goes to the lighting device). On the top of the contact phase appears when pressing the keys.
In respecatable made two twisted wires. In the diagram they are marked in beige and yellow. Curl switched the phase switch on the exhaust for the lamps of the phase conductors. Zero and the ground conductor is taken into respecatable with contacts to which are connected the outlet in the block.

If it is planned to install one-button switch from a scheme to avoid beige or yellow conductors.

Use the three buttons of the product requires the use of 6-wire cable. Sixth lived of the cable is connected to the third switching contact on top together with beige and yellow conductors.


Connection ↑
If you want to use a large number of appliances, computer and phone are installing modular products. The special feature of their setup is that all the connections are made in parallel.
They are usually installed in the living room or kitchen. In the living room traditionally hidden behind the TV, for kitchen the last time there was a very interesting decision, sinking into the furniture or in countertop products. Such hiding in colmodel can be used in other rooms of the apartment.


How to connect outlet in a modular product? ↑
Consider the diagram example with three elements.


First of three wires made and infest every escutcheon (in each seat) jumper not very long, so that in future they do not interfere with the installation.
Then disassemble all of the installation device. The wires or cable coming from the junction box, frenched. Stripped and jumper between the mounting boxes.
The first device is connected as a conventional wiring device for 220 volts. The device is installed in the mounting box on the level. Leads of the same color are connected in parallel. Then set the second device. The third summarizes the three wires. Check the reliability of installation of all devices mounted on a common placket and front panel.
When the unit is installed in a common junction box from respecatable connects the first socket, all other devices connect to it via screw terminals.


Ustanovlennogo products will trudoemkost a little harder to connect conventional electrical devices on 220 Volts. Showing attention and accuracy in work, to do the job quite on forces to any person.