Every year more and more people decided to connect the appliance. This is not surprising. Modern technologies used in their creation, can achieve considerable savings.
Imagine that you have already purchased the stove, and you need to connect. In this case, you must first carefully read the user manual. It was there that indicates a working connection diagram.
The algorithm of connection ↑

Before proceeding to the direct connection of electric stoves under the scheme, you must be familiar with a number of documents:
- PUE 7,
- Pteep,
- technical passport.
Only then you will be able to make use of this manual. Otherwise, you risk not only losing the warranty on the stove, but to put yourself in danger.
Step 1. Choose wire ↑
Power wire according to the diagram, should be independent. Simply put, it must be directly to put in a junction box. Otherwise, the transaction can simply burn out, provoking thus, the fire.
If your house does not have a dedicated line, you can use the following types of circuits:
- VVG,
- PVS,
- VVG-ng,
- SHVVP.
In turn, to connect the appliance from the outlet in accordance with the scheme, you must use the cable type PVS. If you can’t find something suitable and KG. Incidentally, the latter has a much greater resistance to fractures. In the process of operation it can be bent many times. The harm in that.
When you select the cable size for connection of electric stoves, the calculation should take three main parameters:
- the number of phases,
- voltage,
- power consumption.
Just look at the table below and choose the right to connect the appliance according to the scheme of the cable. Thus it is better to provide a little extra capacity, since changes in the network, it’s business as usual.

Also when you connect the appliance according to the scheme with your own hands, you need to know about some of the nuances. First, all transactions must hold regardless of the automatic switch. Second, the nominal supply current should be higher per unit than consumption of the apparatus.
Technical characteristics of the appliance you can find in the corresponding documentation that needs to go to the device in the package. All the parameters are specified on the case.
When you connect the appliance according to the scheme you must attend to the presence of the RCD. It will help to protect you and your family from electric shock in the process of operation of the device.
UZO, you need to install near autovalidates. Connection of devices is only possible after the installation of the automatic switch. Pay special attention to the screw terminals. They must be securely fixed.
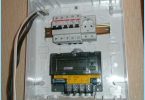
Step 2. Do the socket ↑

Ideally, your kitchen should already be in the socket through which to connect the appliance in accordance with the scheme. But unfortunately, the connectors need power equipped, not all of the apartment, so sometimes we have to take care of yourself.
In most cases the kitchen is installed single-phase outlet. Its more than enough to provide the connection appliance according to the standard scheme. The minimum rated current shall be not less than 32 And. The ideal is 40.
Socket, which you will use to connect electric stoves under the scheme are to be made with quality materials. Provision must also be made an electrical contact.
It is very important that number of cores was the same as the number of wires. Under no circumstances it is impossible to connect the wires together to make it possible to connect to a single contact. This can lead to a fire hazard.
When connection use only copper wire. The wire size must conform to the tabular characteristics. The very outlet should be installed on a level surface. While materials with high Flammability nearby shouldn’t be.

You cannot install an outlet to connect electric scheme near the washstand. It does not conform to safety regulations. The spray can get on the bare cable and cause a short.
Also the socket must not be installed too close to the iron pipes. The same applies to door and window openings. The correct choice of space for the installation depends on the safe operation of the device.
When you finish an install of a socket to connect the appliance at the circuit, check the insulation. Cables must not be damaged. Only then light the stove.
Special attention will be screw terminals, they must be fixed properly. Moreover, when installing the socket for connecting the appliance must each stranded cable is additionally soldered. Soldering should be done there, where they are attached to the contacts.
How correctly have you connected the wires, you will make sure the multimeter. As soon as the preliminary inspection is complete, you can enable automatic switch.
Step 3. The connection to the plate ↑

To connect the hob to the power cable, you will need a diagram. The precise pattern of connections must be in the Datasheet. Once you find it you will need to find on the rear panel of small cap and Unscrew it. Under it you’ll find the wires.
You can now secure the wire to connect the appliance in accordance with the scheme. But before that we need to secure the cables. Otherwise, sloppy movement, you just pull out.
The wiring depends on the number of phases. To pair you need to use a copper jumper. They usually go together with a terminal block. Existing scheme install connection. Then tighten the screws.
Usually in the documentation or on the cover, there is a scheme through which you can connect the stove. In this case color plug-in cables should ideally match each other.
First you need to connect the ground. Usually this wire has a light green color (mixture of yellow and green). You can then connect the neutral. The blue cable is connected the third. Only then can you move on to phase conductors. The sequence is as follows:
- brown,
- black,
- black.
In the process of connecting the need to maintain extreme caution as improper contact can result in failure of the plate or wiring. At the end of the work cover closes.
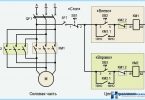
General scheme of network connection ↑

Perhaps this is the most simple circuit connection to single-phase network in order to connect power you will need:
- Set jumpers to terminals L1 and L2, L2 and L3.
- To L2 connect the brown wire under phase.
- Set the jumper on the N1 and N2.
- To N2 to connect the neutral.
- On the grounding pin is output a ground wire.
However, you must remember that this is a General scheme. Many of the schemes that go along with the documentation can be other names of terminals. Moreover, even the number may be different.
If you need to connect the stove to a three-phase network, the circuit will be slightly different. You will have three phases, which you just need to connect to the three terminals L1-L3. In the process of installation, no jumpers are not needed. N1 and N2 together with PE are connected to corresponding contacts.
Two-phase network will need to install a jumper on L1 and L2. You will then be able to connect the phase A. Accordingly, C will come out of L3. All other wires can be connected in analogy with the previous networks.
The results ↑
To connect the hob to the network is not so very difficult. Moreover, it is possible in apartments and houses, where the project was not provided for sockets of this type. But to do this you need to use quality components and take into account important details like the number of phases in the network.