The contents
Almost every room has in its interior an element of the electrical receptacles. Without them anywhere, because it’s an iron or a computer, you need somewhere to turn. Due to the ever increasing number of supposedly necessary appliances, catastrophically began not to suffice these outlets.

In this regard, the following will be considered a particular type of instrument, which has been successfully used not only in closed living spaces, but also outdoors in a wet environment.
We will focus on outlets for outdoor installation. They are also called ? external, for open wiring.
Features sockets for an open transaction ↑
How do they differ from ordinary that you can see much more first. The main difference between them is pretty thick case. It covers the inner part of the ceramic reinforcement and the contact group. In contrast to the inner sockets — which require a mounting box, recessed deep into the wall, the outer do not require such time-consuming work, as the chiselling of concrete, and other types of walls. This greatly simplifies the installation of one or several outlets in home.

Degree of protection ↑
There are external sockets for open wiring with a different protection from moisture and other substances.
Appliances with protection IP 21 do not have sealed on all sides of the body. The back side is open and when mounted it leans against the wall surface.
Basically, wet and other hazardous areas designated external sockets open transaction with a completely closed housing with the protection class from IP 44 to IP 68.
These devices are, as already mentioned, the molded plastic housing cover to isolate live parts and rubber inserts for better sealing. All this should protect people from electric shock and fire, inside and outside the building.

Features of adjustment ↑
Outlet for outdoor installation, generally used in pairs with external wiring: that is, when the wire is not routed in the wall and outside: on ceramic insulators in a metal sleeve, a plastic bead, or plastic box.
Such installation, of course, can spoil the interior, but to do the wiring this way is much easier and faster. Also, for this installation does not require special equipment, for example, angle grinder and a drill with a crown for enclosures.
Installation ↑
Now in practice, consider how to do the wiring and connect the outer socket. The first thing you need to do is choose the socket. So, if you plan to install it in a dry place, select outdoor with little protection class such as IP 21. This will be cheaper and in size will be slightly smaller than with a higher protection.
The use of sockets with a high degree of protection. ↑
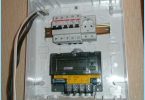
In the case of fully encapsulated power outlet when you removed the top cover, you will see the inner ceramic part on which there are pins and clips for the wires.

The inside can easily be removed, which facilitates connection of wires. The main thing you need to do is to make the case straight to the wall and with a pencil or marker to make a marking in the mounting holes. Now remove the housing and the marking-drill two holes for the dowels. Most of all — it anchors 6*40 mm, Moreover, the plastic part of the plug is inserted into the hole immediately, and the metal — to-fasten the cover. When the cover is held firmly on the wall, we can say half done. Next, attach the wires to the terminals of the inner part and insert it into the already beaten body. Fasten the cover.
Mounting socket with protection class IP 21. ↑
Now, consider the installation of open wiring socket with open rear part. Here it is necessary to plug in the air conditioner. As in the first case, Unscrew the cap. Before you part with inner eyelets for fastening at the sides. As you can see, the installation was carried out boxes and piling it wires. We find a suitable place for mounting and adjusts the inner part to the wall.


Once applied, holding the inner part, gently remove the cover. Make labels in the eyes and drilled holes in the wall. Next, insert the plastic pieces with the dowels in the holes and threading into the eyelet outlet metal part of the plugs, spin it. Now contact part already on the wall.
Move on to the wiring. Here pre dowels were nailed installation box to the wall for routing of cables.
Connected wire and set up them in the box. Firmly placing them in the box, snap the lid.
The box you need to choose such size that the wires easily fit in it, otherwise it will be sheer torture.
In the lid cut out a hole for the output wires. The slot should be sufficient, but not too big to look aesthetically pleasing. Put on the lid and tighten the screw. On the other hand boxes, connected wire.

This can be done by the tester or pozvonki. If the circuit is not zvonnitsa shorted, plug the ends and a voltage is applied. Check his presence.