From year to year, the trend to decorate suburban gardens with amazing lawns, waterfalls, cascades, winding paths and rock gardens is increasingly gaining momentum. Making your site to any host you want not only to transform the territory, but to the so-called effect «that was not like everyone else». To make beautiful and original features it is not necessary to spend fabulous sums. After the repair or construction always remains a small portion of cement and putty. Why not use them? The original figures of cement made with your own hands, will perform «the highlight» landscape design, making the site more attractive and interesting.
The contents
Exhibit #1 — a graceful, sculptural hand
Look at this great garden decoration. Gourmet garden figure easily can be confused with the work of professional masters.

Many figure causes interesting sensations that are hard to put into words. She has a rather philosophical internal content, like the figures for garden style Feng Shui
Hand sculpted in addition to decorative value also performs a practical function. It acts as the original holders for beds with groundcover and low-growing plants.
For the manufacture of the figure we need:
- Cement mortar;
- On the strength of concrete for outdoor use;
- Firming treatment for concrete;
- A fine-grained emery paper;
- Pair latex or rubber gloves;
- A container with high sides.
Make a solution of a mixture of cement and sand, maintaining a ratio of 3:1, which is diluted with cold water until the consistency of thick cream. To give a concrete figure of unusual colors, it is desirable to use special pigments. Dyes are added to the dry mixture at the stage of mixing and then diluted with water.
To make sculpture in the shape of hands, take the gloves and gradually fill them with a solution, trying to avoid the formation of voids with air. Then filled with gloves stacked in the receptacle, giving them the desired position.

While the solution is not frozen, you can safely experiment with the form, choosing the most appropriate option: just closed their hands, folded their Cam or their fingers intertwined between them
To increase the strength of the figure by setting the frame: with solution branches for the fingers to insert the pieces of wire, trying sharp edges do not damage the rubber.
Having defined the form of the sculpture, we leave filled with a solution gloves in the tank for 2-3 days. During this time, the solution will harden and gain enough strength.
When the cement is completely dry, cut gloves and remove them from the surface of the figure. Rubber residues are removed using scissors and tweezers. At this stage you will need a lot of patience because the rubber will be shot parts.

The original figure is ready. It only remains to choose for her a worthy place in the garden and fill with the mixture for the planting of podvorotnya and succulents
Concrete figure covered with a layer of putty, carefully smoothing the surface, and again leave to dry for a few hours. In the final stages remains only to Polish the surface of your palms and cover them impregnating reinforcing.
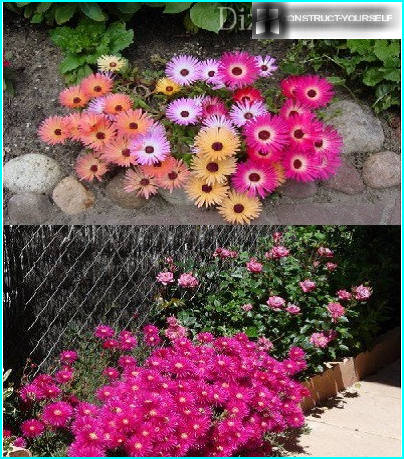
Exhibit #2 — elegant flowers from concrete
Decoration at the front of the house or rest areas there may be cast from concrete flowers. Harmoniously combined with the green plants, they look great as a border along the winding garden paths and on the background of emerald turf.

The main advantage of these garden figures is their resistance to temperature extremes, so they can act the adornment of the plot than one season
Make elegant flowers of concrete is not difficult. It is necessary to prepare the form that you will fill with solution and the filler is cement. It is easiest to use a ready-made silicone molds for baking. Variety range of silicone forms quite extensively.

Silicon blanks, you can make flowers of all shapes and sizes: from a common field of daisies and completing multi-leaf chrysanthemums and dahlias
For concrete colors we need:
- Cement mortar of the same proportions as in the previous example.
- Acrylic or oil paint for exterior works;
- Motor oil or linseed oil;
- Plastic film.
As forms some craftsmen use and cut along the plastic bottles, cut in half rubber balls and other containers of a suitable size.
As a key part in creating colors from concrete is a form to be able to reuse the inner wall is necessary to miss the mark with engine oil or linseed oil. To improve the coupling of ready mix and reduce the weight of the figure itself in solution, it is desirable to add pieces of clay.

Fill in the form with mortar, tamping the contents as filling. Grasp the edge of the form, you should shake it a bit so that on the surface stood out the bubbles with the excess air from the solution
Filled to the brim shape cover with plastic wrap and leave for a couple of days before curing in a dry and hidden from direct sunlight. After the concrete has gained sufficient strength, take out the flower from the workpiece and lay out on a flat surface. On complete drying the figures in the shaded area goes from 4 to 6 days. Released form can fill again, forming the next flower..
To prevent the formation of cracks on the surface of the flower, stiffening figure is recommended once a day to moisten. In the case when the crack is still there, to correct the situation is not difficult, smeary flaw with cement slurry. Wanting to increase the strength of the finished concrete flower, its surface should be treated with a hardening impregnation, which can be purchased at the construction centre.

For the design of the flower concrete is better to use acrylic paint, which are able to preserve the brightness of the flower throughout the season
Choice of colors in the flower arrangement depends on the color palette for the flowers and taste preferences of the master himself.
Exhibit #3 — the turtle of sea pebbles
A speckled turtle, settling in the suburban area, will help to create that special atmosphere of coziness and comfort.

With his presence the turtle tortilla will certainly lighten the mood, much to the delight of children and guests of the site
For the realization of the idea should prepare:
- The stones are medium in size and of any shape;
- Cuts metal rod;
- Cement mortar;
- Impregnation for concrete;
- Acrylic or oil paint.
The sizes of the shapes depend only on ideas the masters and volume of necessary materials. Choosing a place for installation of the figure, align the site for its placement.
Of stones forming a small hill, which resembles the torso of a turtle. For the arrangement of the legs of the figure on the bottom row of stones laid with metal bars, which later will perform the role of the frame of the structure. The same frame can «plant» and the turtle’s head, or lay it on the ground. Once laid the bottom row and inserted metal rods covered it with cement mortar. All voids between rocks must be filled and compacted with cement. The same principle lay subsequent rows, carefully locking stones.
Laying out the body start manufacturing the paws and the head of the animal. Choose stones of small sizes and spread them around the slide bars. To secure the stones and give the desired semicircular shape, the legs and the head of our character is better to use a solution of thicker consistency. Once formed and bonded to the legs of the figure, proceed to decorating. To do this, flatten the surface and zashtukaturivat it more liquid cement mortar. In the not yet hardened layer of cement spread pebbles.

Flat, smooth stones are excellent to simulate plate armor. For fixing pebble in the shell enough of them a little push in «plaster layer»
Ready figure leave for 2-3 days for complete drying. After hardening of the concrete body and the shell can be painted with special pigments, and the flat pebbles acrylic paints.
It’s not so difficult. A little imagination and patience – and your site will be a new memorable character who will become a good addition to a landscape design.