A suburban area is always a little private world, and no matter whether it is a gingerbread house with pink flowers, a big cottage with a swimming pool or a typical country house with three rows of vegetable beds. We love our rural area, trying to keep from prying eyes and intruders, therefore, set around its protected area fence. There are many options of fences, but today we will discuss in detail how to create a fence made of metal profile with your own hands, will touch on all the technological stages and analyze possible errors.
The contents
What is the profile is so good?
Why you should pay attention to the profile? It’s simple: this is a relatively inexpensive material, sturdy, durable, convenient in installation and handling.

With the installation of the fence of metal profile is able to handle any man who can handle a drill, grinder and welding machine
There are several options of material, so by purchasing it, you should consider marking. Mark «With» means «wall». To fence suitable the following varieties:
- «C8» sheets width of 1 m 15 cm with a minimum height of a trapezoid profile; the cheapest option;
- «C20» sheets width of 1 m 10 cm, more rigid, durable and wind-resistant; ideal for anyone who likes literate balance price-quality;
- «C21» sheets width of 1 m, good for making projects and schemes; have a maximum height of the ribs, so the most durable.
In addition to size, you need to pay attention to the type of polymer, which is covered by the profile and thickness of the zinc layer.

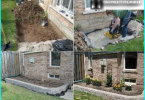
Very popular among owners of country cottages enjoys a combined fence on a Foundation with pillars made of red, yellow or white silicate brick
The modern profile has a wider color gamut, so it can be used for decorating areas. For example, to protect the plot with a red brick cottage suitable fence terracotta, brown or red. Some types of profile sheets have a unique carved top, which makes the fence not so boring.

To increase sales, many manufacturers regularly increase its product range by expanding the color base. When buying be sure to ask a variety of shades
A list of necessary materials and tools
Metalloproteins to build the fence you need:
- Sheets of thickness not less than half a millimeter the height of the rib is 20 mm. the Number is easy to calculate by dividing the total length of the proposed fence to the width of one sheet.
- A support for mounting the cross beams – lag. It can be wooden or brick pillars, but most often used shaped tubes. The optimal parameters of pipes: the cross section is 60mm x 60mm, wall thickness – 2 mm and more. The number of sample tubes may be different, it depends on the distance between them. We should not forget about the additional support for the device gates and the gate.
- The lag – a cross bar for fastening metal sheets. Traditionally also used shaped tubes, but smaller section – 40mm x 20mm. The projected number of bays between the pillars multiplied by two to get the total number of lag or the length of the fence also increase two times.
- Kit for concrete pillars – cement, sand, gravel.
This is the basic material, which necessarily must be supplemented with fasteners, because the installation of a fence made of metal profile is not possible without the fixing elements. As the fasteners ideal roofing screws with colored caps and rubber washers.

Many details for construction metalloproteinase fence can be replaced with the appropriate size, for example, instead of profile LGA 40mm x 20mm you can use the area 40mm x 40mm

Hats roofing screws specially painted in different colors so they contrast not stand out against the background color of metal shingles
The tool kit includes:
- for marking – pegs, string, tape measure;
- for pillar – drill, sledge hammer;
- to fix the lag and leaves the grinder, level, welding machine, drill.
Before starting work you should check the serviceability of tools and all materials to the installation process not to lose time searching.
Phased technology erection of the fence
Breaking the whole process of installation of a fence of metal profile into several stages, you can calculate the approximate time of completion of the work and more effectively plan the working day.
Step #1 — preparation of drawing and markup
Approximate length of fence is easy to calculate based on the size of suburban area, but better to take a tape measure and carefully measure the distance, methodically recording all the numbers on a piece of paper. Usually, fencing is erected around the entire site, but there are exceptions, when, suppose some portion of the scheduled hedge planting. Depth of pits for the supports sometimes reaches five feet, so it is necessary to consider which runs under ground communications.
The location of the poles mark with pegs and twine will help to line them up in neat rows. The distance between the pegs should be equal to two sheets of metal profile, that is a little more than two meters. This is the optimal size in order for the fence to be durable and sustainable. Ideally, after all measurements on the leaf should appear a detailed diagram showing the installation location of the intended fence with all posts and calculations of the material.

As a signal of pegs you can use a long trim boards, planks, sticks — most importantly, to him it was easy to navigate

For convenience, the diagram should indicate the size of all of the materials used: the width of the sheet metal profile, the cross section of the support pipe, cross bars
Step #2 — install the support posts
Signal pegs indicate where you need to dig a hole for each support post, in our case, the profile of a metal pipe with a cross section of 60mm x 60 mm. Pipe is put in the ground in three ways: screw (in this case), a sledgehammer to hammer (also a very questionable method can be used only at the final stage) or to dig a hole under the pole, and then concreted it. The option of concreting is the most successful and easily achievable.

Bur for the device holes can borrow from friends or hire in a construction company for a small fee
To make a hole of the required depth, it is better to use a drill – will be less free space around the pipe. When digging with a shovel, the hole is too wide, and the concrete will have a rather large area.

The drilling result drill deep and accurate holes, optimally suitable for installing the narrow metal pipes and the further pouring concrete solution
The depth of the hole should be approximately 1/3 the height of the support. Concreted base, preparing the formwork from a sheet of roofing felt or sheets of plywood mounted on the level pipe and the concrete will be poured to the full depth. If time allows, it is possible to make concreting in two steps – first to half the hole, then the remaining part.

For the preparation of concrete mortar is traditionally used cement, sand and crushed stone in the proportions indicated on the packaging of cement
Many gardeners along the fence or on some of its sites set lighting. In this case, simultaneously with the device of the fence of metal profile, you can dig a trench for power cable.
Step #3 — installation of cross bars
When the concrete fixing of the support pipe, «ripe», you can begin to mount cross bars – lag, which are the guarantor of the future fence. Shaped tube with a cross section of 40mm x 20mm are the most versatile in this role – not very massive and heavy, both durable and able to hold the weight metalloprofil sheets.
Logs for the fence when clamped, is two parallel rows of profile pipes. The bottom row is fixed at the height of 30-35 cm from the ground, the second – 20-25 from the upper end of the prop. For fixing the lag using bolts or welding. To the attachments and the surface of the metal elements lasts longer, after installation, they should first carefully primed and then painted in a color in keeping with the profile sheet. Two coats – primer and paint protect the metal from moisture, respectively, from corrosion.

All the logs are attached from one side of the support pillars, typically a front side facing the street. Thus, the support can only be seen from the yard

The joists and support poles must be treated with special primer and paint for metal, for example, a Rostiks and Mirandola from the Finnish company Tikkurila
Step #4 — securing sheets of metal profile
The final stage of installation fence – installation of metal sheets. Many make the mistake of starting work from the corner, when it comes to the turn of the last sheet, it appears that there is still one small, empty segment near the gate or gates. Accordingly, it is closed narrow piece that looks like a patch. It is better to plan how to make a fence of metal profile so that it looked holistically and accurately. This work starts from the gate (gates), moving in opposite directions. If the area of the corners and you will have to use scraps of sheet metal, no one will notice.

During the installation of profile sheets must adhere to the technology connections: each following sheet is fixed lapped at 1-2 waves (edges)
Mounting the sheets, it is necessary to use a level and tape measure to the top edge was perfectly smooth. Screws twist drill, the excess material is removed using a grinder or metal shears.

Ready-made fence made of metal profile without decorative elements looks neat and formal, but his height hides almost the entire suburban area
After complete Assembly of sheets hung sash of the door or gate. One of the convenient variants of the gate – sliding, for which it is also possible to use profiled sheets. Painting the fence is not needed, as material is being sold fully finished. Quality installation of a fence ensures long term service.
Videos with examples of installation works
Video #1:
Video #2:
Video #3: