The contents
Today, decorative plaster has a significant share in the total volume of finishing techniques for interiors. Their popularity contributes to the wide range of colors and textures, as well as a splendid aesthetic effect, which gives volume texture. One of the most popular types of decorative finishing of the walls is plaster “rain”.

The texture under the “rain” ↑
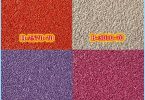
As the name suggests, this technology mimics the water flowing along the wall of raindrops. The band “the falling rain” can be positioned both vertically and at an angle and even horizontally – it all depends on design ideas. But the most popular option is still slanted arrangement of the strips. To create such textures do not need to purchase any special mixture, it is possible to do conventional plaster based on cement. You can also use ordinary plaster – it all depends on application. For example, for baths, kitchens, saunas, and other high humidity areas recommended the use of mixtures of cement-based: they are more resistant to moisture. The photo shows the options for plaster walls under the “rain”.

If necessary, application of plaster, it is best to use a cement mixture, covering them with a layer of waterproof varnish.

Preparation of the working surface ↑
Work on the plaster always begins with proper training walls. Decorative plaster is usually applied at the final stage, when it produced all other finishing works – installation of door and window openings, cement screed floors or floor coverings. By and large, the surface preparation in this case is no different from the preparation of walls for the application of other types of plaster.

In the first place from the wall to remove the remains of old paint, putty, Wallpaper, etc. For this purpose, metal spatulas, scrapers, plastering planes. Especially should pay attention to the different exfoliating elements bubbling and cracked remains of the old materials. These places should be thoroughly clean to prevent subsequent delamination of the new plaster. Usually with great difficulty removed from the walls paint. In this case, you can use with a grinding machine or construction dryer.

Next, the cleaned surface should be primed after removing from it the dust with a damp cloth or cushion. Primer will increase the adhesion (“adhesion”) of the applied plaster to the wall surface. Primer also helps to strengthen the bearing surface to prevent further cracking and exfoliation. Full drying time of the primer depends on its variety, it should be indicated on the packaging. It usually takes from several hours to days.

If the decorative plaster is applied in high humidity areas, then you will also need to treat the wall with antiseptic. It prevent the possible appearance on the walls of the mold and mildew often appear under the influence of dampness. If the surface of the concrete of the walls have deep cracks must be patched with special adhesive formulations in order to avoid their expansion and increase in length.
When the wall surface is fully prepared, you need to evaluate how smooth the wall. If the walls are overly crooked, you’ll have to align them to apply a base layer of putty or plaster. This layer will serve as a base for plaster application “under the rain”. When applying a leveling layer to increase its strength, it is necessary to use reinforcing mesh.

When structural plaster is applied with a relatively thick layer or wall does not have a pronounced curvature and irregularities, the pre-alignment is not advisable.
Upon completion of the alignment of the walls is the final stage of preparation is sanding the surface with fine sand paper. Then from the walls again removes settled dust on them, and the surface is primed again.
Layout lines under plaster “rain” ↑
Before applying the mortar for the plaster, it is necessary to partition, depending on how you will strip located vertically or at an angle. To do this, draw a line from ceiling to floor at intervals of 2.5 – 3 weatherstrip tool. If the width of float is 18 cm, the pitch of the strips should be 45 – 55 cm, This process is quite time-consuming but not worth it to save time on this – the quality produced by the markup is the key to beautiful decorative finishes.
Once the markup is finished, along each line, you need to stick a strip of masking tape. Glue the tape to start with the upper right corner – so if you work you can avoid the probability of splashes and drops of fresh solution on the finished plaster surface. Using masking tape we not only separates the work surface into separate zones. He also plays the role of the visual reference, based on which is produced the correct direction of the slope of a decorative pattern.

The application of decorative plaster ↑
Plaster starting from the top right corner of the wall. This is due to the fact that the solution typically applied in a sweeping motion from right to left. Moreover, its drops will fall to the left and down on the yet treated surface.

Applied decorative plaster with layer thickness of 2 – 5 mm, strip length in feet and width in the trowel. Then, to simulate the “drops” applying the trowel to the freshly applied layer of the solution, and then remove it. You do not need to press hard on the surface of the solution. Fresh plaster will slightly stretch over remove trowel, forming in the end surface, similar to the “hedgehog”. Thus we pass the entire length of the strip, putting her a trowel and removing it. Then the surface of the tool from adhering thereto of a solution and hold them plastered along the strip, pressing it slightly. The result is the needles “hedgehog” smoothed in one direction, forming a stylized band “rain”. Relief texture depends entirely on the thickness of the layer of mortar and the strength of pressing the trowel at him. The thicker the layer and the more stress, the more pronounced will the texture of the decorative surface.

A width of the strip two – and-a-half to three trowels, the third band slightly napolzut for limiting the working area of the tape. After the completion of one section, remove limiting his Scotch and move on to the next phase. The junction between the work areas will be smooth and not require additional alignment. Apply in a similar manner the following layers of plaster, giving them a relief structure. At each successive layer is applied with a slight overlap on the previous.
If apply the solution with a significant break, then after drying will be clearly visible interface between different layers.
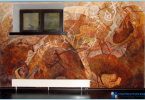
After the plaster under the “rain” is sufficiently dry, the surface must be lightly cleaned with emery paper, or abortively grid. This will help to remove too conspicuous defects in the plaster and give the texture monotony. The photo shows how should look like quality produced by the plaster under the “rain”.
Painting the plaster under the “rain” ↑
The final stage of finishing the walls under the “rain” is her painting. For these purposes, you can use any paint: enamel, acrylic, latex etc. it is only when working to follow a few simple rules to decorative plaster has not lost its embossed texture.

If textured plaster will be painted in a single color, the visual effect of the bump may disappear. Consequently, it is recommended to apply the technology of “dry-brush” in conjunction with the technology blur. However, the plaster under the “rain”, in difference from other decorative plasters can be applied solely to the blur. This is due to the fact that the relief in this case is directed not outside, and inside the base.
To work on the coloring of the plaster under the “rain” should use rollers with a long NAP. For staining the walls are decorated under the “rain”, need resistant to moisture paint. Before you start staining the wall will have more time to treat the surface to improve coupling of a paint with plaster base.

Painting walls with blur is a very difficult technology. The goal is to emphasize the maximum relief texture. This does paint a fairly dark hue and is put on with a roller to the entire surface of the wall. Then you must wait some time to the applied layer of paint has dried. Take a damp cloth or sponge and carefully wipe the painted surface of the wall. The paint coated on the outer surface, partially washed out, is more pale. And the paint in the recesses of the relief remains the same color as before. Thus, we get a visually accentuated the topography of the surface with darker recesses.

After washing the surface of the wall is covered with one or two layers of lacquer. For this you need to take a water-based paint, diluting it in the ratio of one to one, to obtain a more fluid consistency. If the paint is too liquid, it is recommended to cover the wall in two layers. Apply the varnish with a wide brush on the wall, preferably without interruption, for more even color.
As you can see, the application of decorative plaster under the “rain” with their hands – not such a complicated matter. It’s enough to have basic skills of working with plaster tools. The video shows the highlights of the application of decorative textured plaster, simulating rain drops.