In order to create the room’s original design wall, need not apply the plaster. To make the side surface with an interesting texture from the usual putty. Creativity in the design saves money on purchasing expensive materials and to Express their individuality. Familiarization with the sequence of work and methods of finishing will help to select the best option for creating an interior with your own hands.

The preparatory stage ↑
A carefully prepared surface of the walls contributes to the prolongation of operation period of the plaster, made of ordinary putty. The alignment of the walls is not necessary to bring to perfection, textured finish cleverly conceals minor flaws. To eliminate significant differences apply gypsum plaster or sand and cement mixture. Plaster solutions relate to more modern materials to work with them easier.

The whole procedure of surface preparation for applying their hands of the plaster, the basis of which is plaster, consists of the following steps:
- First, the wall is cleaned of dust and various contaminants, the old finishing layers in the form of Wallpaper, paint or plaster removed.
- If there is a predisposition to cracking on the wall must make a reinforcement with plaster mesh. Reliable surface immediately covered with primer deep penetration.
- To improve the quality of the further layer of plaster allows starting pre-applied layer of putty. Handle wall finishing solution is not necessary.
- The duration of drying of a solution depends on its composition and the ambient climate. Go to the formation of plaster after a certain period, which lasts from 4 hours to 2 days.
- Before applying with your hands decorative plaster wall again need to be processed primed surface starting putty. These measures improve the adhesion of adjacent layers.

Before you start creating your own masterpiece, you should choose suitable processing method, to prepare instruments to make calculation of material requirements and purchasing them in the required quantity. One of the options for wall finishing putty which successfully mimics the decorative plaster in the following video:
Ways of decorative walls ↑
Upon completion of the preparatory procedures start shaping with your hands the mixture for the plaster. In the capacity poured an ordinary plaster and grout for joints in proportion 1:1, pour in cold water gradually until a thick solution.
There are several ways of forming a textured pattern:
- with a roller;
- using a notched trowel;
- using ready-made templates;
- brush, trowel or other improvised devices.

The formation of «Fish scales» ↑
Making decorative trim, imitating fish scales, the entire room is not common. Much better to focus on part of the wall, using for this purpose ordinary putty. The thickness of the layer and the thoroughness of the contractor determines the final outcome of the original wall coverings. Procedure when working on a homemade decorative plaster with the following:
- On the surface of the wall plaster is applied with a thickness of 3-5 mm, if you want to do with their hands over the relief image layer can be increased.
- The spatula with the width of 8-10 cm, starting from the corner of cleared land, gradually is applied to the image. This instrument form the recesses forming the checkerboard pattern on the diagonal. Improper application of decorative plaster to the required lines, easily corrected mistake: the putty is smoothed gently, and the furrow is re-created.
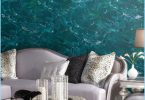
- After complete drying, the surface of the wall is painted. To showcase the prominence of decorative plaster will help Golden hues.
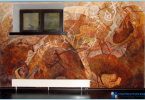
If you wish to add variety to the façade, an imitation of fish scales can be done by using semicircular movements with the trowel, as shown in the photo below:

Friend «coat» in a new way ^ a
A well-known relief decorative plaster called «coat» now you can make a new method. To form with your hands textured surface will require quite a bit: conventional plaster, wide spatula, impressive piece of plastic film or trowel. You first need a layer of putty with a thickness of 2-4 mm should be applied to the decorated surface and evenly distribute it with a spatula. In the final decorative plaster will be lengthy, so aim for the perfect smoothness does not make sense.

To obtain a relief structure in three ways:
- In the first case, the trowel gently pressed into the putty and let go. Thus is formed a rough surface, resembling a decorative plaster. In conclusion, a big relief, you can make circular movements of the tool.
- Instead of float you can make from a piece of plastic film with dimensions of 30×30 cm lump that is applied to freshly applied plaster. The solution is to reach for the polyethylene, creating a bizarre spikes and successfully simulating the application of decorative plaster.
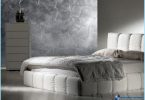
- If you want to have on the wall less volumetric relief processed in the normal putty surface is completely covered with polyethylene, a tracking uniform contact. A day later, remove the film and contemplate moderately structured surface, which is difficult to distinguish from the wall treated with decorative plaster.

The right consistency of putty solution – the key to quality coatings for decorative plaster. It needs to firmly stay on the wall and have a good reach for the film. So first it is better to do an experiment on a small plot. It should be noted that this method of applying the putty is not acceptable for children’s rooms, because outdoor games child can cause scratches on the delicate skin. How to decorate the facade of the building under the coat with your hands, you can see in the following video:
Other methods ↑
There is still a lot of ways as the conventional layer of putty to turn to the original surface with a decorative plaster. Here are some of them:
Various reliefs help to create cushions with special nozzles. Treating them the freshly applied layer of putty on the wall and formed an interesting texture. Some examples are shown in the photo below:


Even the usual fluffy cushion, once on the wall, with plaster, creates an inhomogeneous texture. If you wish to reduce its volume, just gently go over the surface with a spatula.

Exercising with a brush with hard bristles semicircular motion, you can make an exclusive figure like the following photo:


For a kind of pattern «roses» you will need to prepare with his own hands a special tool. With crumpled newspaper ball wrapped in a thin polythene to not soaked. Applying simple adaptation to the newly applied layer of putty, it’s a pattern resembling flowers.

Finishing ↑
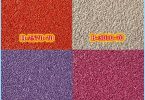
To give a layer of putty finished appearance and to achieve a final similarity with this decorative plaster, the surface is subjected to painting.

For a start a roller with a long NAP paint the entire surface in a solid color. After drying, the starting layer is transferred to the final stage of transformation of the filler in the decorative plaster. Applying with short NAP roller, protruding parts of the relief are painted in a darker or lighter shade. After 30-40 minutes you can add the glaze, which is prepared from the Wallpaper adhesive and panel varnish. Put it on a decorative plaster, sponge method of plugging. In conclusion, the entire surface coated with a filler coated with acrylic lacquer. One of the proposed ways to design the walls for decorative plaster shown in the following video: