There is an area in the woodland, 14 acres until empty. Because the plan – it capital building, the first thing I decided to define the boundaries of their possessions. That is, to build a fence. On one side, you might say, were already ready in the form of a neighbor’s wooden fence. The rest of the border was about 120 m. I decided that my wooden fence will also be so in style it merged with a neighbor’s fence and built one with him design.
Scoring in a search engine query «wooden fence», I found a lot of interesting photos, most of all I liked the following options:

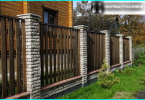
Photo of the fence that inspired me in the construction
Such a fence I tried to build, turned out pretty close to the original sample. Everything else in the plan fencing was added 2 gates and automatic sliding gates.
The contents
The materials used
In the construction process were involved:
- unedged Board (length 3M, width of 0.24 and 0.26 m, thickness 20 mm) – for covering;
- pipe profile (cross-section 60х40х3000 mm), edged Board (length 2 m, width 0.15 m, thickness 30 mm) pieces of rebar (length 20 cm) for the bars;
- edged Board (length 2 m, width 0.1 m, thickness 20 mm) – vertical racks;
- paint black to protect the metal and preservative for wood;
- furniture bolts (diameter 6 mm, length 130 mm), washers, nuts, screws;
- cement, gravel, sand, roofing material for concreting of columns;
- sanding paper grain 40;
- polyurethane foam.
After the purchase of all necessary, I began construction.
Step 1. Preparation of boards
I started with processing boards for spans. The bark on the sides was removed with a shovel, and then, armed with a grinder and grinding attachment, made the edges irregular, wavy lines. Sandpaper used grit sizes 40, if you take less quickly erased and torn. To provide a smooth surface, polished also boards for columns and uprights.
The polished boards were treated with preservative «Loofah», color «teak». Antiseptic water-based, is not very liquid, to mixing like a gel. To achieve saturated colors, it is sufficient to apply the composition in 2 layers, I did it with a broad brush 10 cm Dries quickly, in 1-2 hours forms a sufficiently dense film.

Boards, sanded and coated with antiseptic
Step 2. Build columns
The basis of the columns is shaped tube 3 m, with two sides covered with boards to 2 m. When installing, the lower part 70 cm is immersed in the concrete. To improve the adhesion of metal with the concrete, every pipe I welded 2 pieces of rebar 20 cm – distance from edge 10 cm and 60 cm the length of the reinforcing rods in 20 cm due to the planned diameter of the hole 25 cm And the step of bonding (10 cm and 60 cm) – by the necessity of arrangement of the reinforcing elements at a distance of 10 cm from the edges of the concrete «sleeve» (its height is 70 cm).
The pipes were painted in 2 coats, and their faces painted foam. Of course, foam was temporary waterproofing. As I find the right plugs (in stores have seen sold plastic), put them.
In the pillars drilled with 3 holes on the top – at a distance of 10 cm, 100 cm and 190 cm Through these holes reinforcing trim bars, 2 boards on each tube. For Assembly used furniture bolts. Between the inner sides of the fixed boards at a distance of 6 cm is such a gap is needed to 2 unedged boards (4 cm) and a vertical strap (2 cm).

The columns for the fence — shaped tube, covered with boards
Step 3. Drilling holes
The next step is drilling holes for the installation of the columns. Was first performed the markup. I pulled on the boundary rope, and every 3 m hammered in the ground stakes – this will be the point of drilling sites.
Since the drill I had, but rent was not to hand, I preferred to hire a brigade with the necessary tool. Per day 40 holes with a diameter of 25 cm, was drilled. Periodically the knives of the drill rested on a very solid rock, the depth of the wells were mixed — from 110 cm to 150 cm Then the heterogeneity will be smoothed out gravel dumping.

The process of drilling holes
Was also dug two trenches, connecting previously drilled wells. One of the trenches needed for the cross member of the sliding gate, and another under a mortgage (channel) roller bearings.
Step 4. The installation of the columns and concreting
At the bottom of all holes filled PGS, thanks to this victory evened their depth of 90 cm were Installed in the asphalt liner. Each column, dropping into the sleeve, 20 cm raised above the bottom of the wells. It is necessary that the concrete poured into the hole, was not only the sides but also under the pipe end. Poured concrete, then served shtykovaniem rod of rebar. When you install monitored the verticality of the columns using a level and string. After hardening of the concrete to ground level into holes peppered PGS.

Poles set and concreted
Step 5. The lining span
All 40 columns stood in their places and securely. Then I started lining span.
Trim the vertical boards performed bottom-up as follows:
- First, we measured the length between the posts.
- Chose the Board with the bottom smooth edge, it will be at the bottom.
- Saw off the end so that Board length was 1 cm shorter than the distance between the poles.
- Treated the cut with antiseptic.
- Put a Board between the wooden bars, fixed it with clamps. The distance between the ground and the bottom Board is 5 cm.
- Fixed Board screws, trying them on the inside, at a slight angle. I used 2 screws on each edge of the Board.
- Measured the middle of the Board and installed in the center upright support so that it touched the ground. Fixed rack with two screws, screwed into the top edge of the Board.
- Have established and recorded the second Board over the first Board and the upright. However, the screws which are supported on a vertical plank was closed this second Board.
- In the same way secured a third and the rest of the Board span.
- Subsequent spans are trimmed similarly.
After the third flight began to develop skills. If the first before you fix the Board, I’ve put it horizontally, then stopped doing it. It was enough to move to 3-4 m to see exactly everything is installed or not. Also I did not pull the rope from above to check the verticality of the center column. At the same time, boards were installed quite smoothly, on completion I checked it out.

Bays sheathed with vertical polished boards
Step 6. The Assembly of the wicket
Behind the plot there is a pine forest. To be able to go out there, I decided to make a fence gate. Everything turned out almost by itself. Sheathing spans, I came to the place of the planned gate. After the measurements, made the wooden frame to secure the boards with metal corners.
Stitched the frame boards. Turned out the door. As is often the gate to use it no one will, I hung the door on the overhead loop. Pen decided not to. It is not really needed here. The door can be opened and closed, just taking it in one of the boards.

The lack of handles on the gate, making it almost imperceptible on the General background of the fence
Step 7. The gate and adjacent the gate
Gate I decided to do the sliding. Armed with drawings downloaded from the Internet, I drew a diagram based on the dimensions of your stairs.

Drawing of automatic sliding gates

Drawing of the Foundation under the gate
The columns under the gate I made is more powerful than the regular member. Got 2 tubes of 4 m (2 m below ground, 2 m from the top) with a cross section of 100×100 mm, connected them with cross-beam 4 m Turned h-shaped design, which I installed in a prepared pit. Then ran the wiring for the control gate.
In addition to the pillars, were installed the mortgage to the rollers. Used two-meter channel 20, which is welded to the reinforcement rods 14. In addition, in the center of a steel channel welded to a piece of the same channel with a hole for the output wires to the drive.
The legs of the h-shaped structures were concreted to the crossbar PGS and covered with a further tamper. Rammer I did the usual log, it turned out very tight, still nothing sank.
Installed the pillars I sewed up the boards as the posts of the stairs.

Posts for gates was also sewn boards
The gates were welded according to the diagram from the Internet. For frame used pipe 60×40 mm, welded to the inside of the crossbar 40х20 mm and 20×20 mm Horizontal jumper in the middle I decided not to do.

Diagram frames, metal sliding gates

Frame mounted sliding gate
The next step is to build the gate adjacent to the gate. The pillars were ready, one of them is the post of the gate, the other pole of the span. The gate dimensions of 200 x 100 cm No straps except welded inner profile 20×20 mm, I didn’t do. Before installing the gate, I took strips of wood trim from the pillar, then installed them again with carved grooves for loops.
Metal gates and doors, I sanded, and then painted with black paint, the same that was used for the columns of spans.
Everything was ready for component installation under the sliding door. I stopped at the hardware from the company «Alutech». After delivery rang for Assembly organizations and found a team that agreed to mount the components. Installation fully engaged in them, I only fixed the.

Mounting rail on the frame

Mounting pads and rollers

Install the upper traps

Install the bottom of the trap
Of gates and wickets I’ve sewn boards, on the same principle that spans.

Boarded gates and gate
Here’s a fence I got:

Wood fence in landscape forest
He’s already survived one winter and did well. Maybe the pictures, it looks massive, but this is misleading. The fence is easy enough, but windage is small, due to the gaps between the boards in the stairs. The pillars are well kept in concrete, frost heave is observed. And, most importantly, this fence fits into the landscape of the village in the forest.
Alex