Last summer I was doing a little landscaping suburban area. Slightly reduced allotments for vegetable beds, but has allocated additional space under the Seating area. The freed space enough for a small flower garden, a few shrubs, inflatable pool. But for recreation, it was not enough. Need a gazebo. Its construction and I decided to do while on vacation.
I originally planned to do something very simple, the type of canopy on four columns. But then, after consulting with his fellow builders, I realized that it is feasible to build more complex design. Also on the pillars, but the walls and a full roof.
Had to sit at the drawing table, sketch a project. On the paper were as follows: wooden gazebo 3×4 m, on the pier Foundation with a gable roof covered with slate. The project was approved by the family Council, after which I rolled up his sleeves and went to work. All stages of the work was done alone, although I must admit, at some point the assistant would be nice. To bring, file, trim, hold… Together to work would be easier. But, nevertheless, I managed and independently.
I’ll try to describe the stages of construction details, as detail in this case was very important.
The contents
Step 1. The construction of the Foundation
According to plan, the gazebo needs to be light in weight, built of boards and beams, so the best Foundation — pier. With him I began its construction.
Took this a suitable site near the fence to the dimensions of the gazebo 3×4 m. In the corners set pegs (4 PCs) – there will be Foundation pillars.

Marking corners of the future shed
He took a shovel and a couple of hours dug a 4 square holes at 70 cm in depth. The soil in my area is sandy, not much frozen, so this is enough.

Deepening under the Foundation columns
In the center of each recess I put on the reinforcing rod, diameter 12 mm, length 1 m. It will be the corners of the gazebo, so they need to establish clearly the level. Had to fathom the diagonal, the length of the perimeter and vertical Armaturen.

Marking thread diagonals and perimeter of the base of the gazebo
After dismantling the old buildings on the site, I was left with a heap of broken bricks. I slipped on the bottom of the recesses, and the top filled with liquid concrete. It turned the concrete Foundation under columns.

Pillow of broken brick under a concrete Foundation will promote uniform distribution of pressure between Foundation and soil

The concrete base under brick columns
Two days later, the concrete has stiffened, on the grounds I built 4 brick columns on the level.
Ready 4 columns in the corners, but still the distance between them is too large – 3 m and 4 m. So between them I have 5 of the same columns, but without reinforcement in the center. In total, the supports for the arbor 9 piece.
Each leg I plastered with mortar, and then missed with mastic. For waterproofing over the top of each column is padded with 2 layers of roofing material.

Brick columns support will serve as a solid Foundation for the base of the gazebo
Step 2. Make the floor of the gazebo
I started with the bottom trim, it essentially will hold the entire framework. Purchased timber 100×100 mm, cut it to size. To be able connection vpoldereva, at the ends of the bars I made tunes using saws and chisels. Then, gathered the lower harness, the type designer, stringing timber for the rebar in the corners. The holes for the rebar pre-drilled with a drill (use a drill on a tree with a diameter of 12 mm).

The Assembly of the bars into the design of the bottom trim
The bars were laid on the base bars – 4 pieces around the perimeter of the arbor and 1 piece in the center, along the long side. At the end of the process, wood was treated with onebusaway.

The bottom rail laid on the pillars of the Foundation, will serve as a sheathing for wooden floor
It’s time to cover the floor. In my household for a long time collecting dust oak boards just the right size – 150х40х3000 mm, I decided to use. Since they were not quite straight and a little crumpled, I had to drive them through reymus. The tool was in stock from my neighbor, it was a sin not to take advantage. After the alignment process, the boards turned out to be quite decent. Although the chips were formed as much as 5 bags!
Boards I nailed to bruskam obvjazki nails. Make a smooth plank oak floors.

The floor of the gazebo, recruited from oak planks
Step 3. The device walls
Existing timber 100×100 mm and I cut up the 4 racks to 2 m. They are installed in the corners of the gazebo. The ends of the uprights I drilled holes and put them on Armaturny. Vertical they did not and kept trying to shift at the most inopportune moment. So I fixed alosinae specially trimmed for this case in the mitre box. Strut nailed to the floor boards and racks. Only after that the rack was not falling to the side and swinging from the wind.

Stand in the corners of the future shed
When the corner posts were installed, I hooked another 6 intermediate posts. Also recorded their yosenabe.
Next — cut 4 lumber and, by analogy with the bottom rail, secured on the upper ends of the uprights top rail. The connecting beams were also carried out on vpoldereva.
The turn came the horizontal railing. They will form the walls of the gazebo, without which the whole structure will look like an ordinary shed. The railing I cut of timber 100×100 mm and for the back wall I decided to save a little and took a Board 100х70 mm. Exclusively for crates of this lightweight version will fit.

The frame of the gazebo with racks, rails and harness
To install rails, I did tie racks, they are installed in the horizontal rails and hammered nails. Since it is assumed that the railing will lean to leave such a connection is impossible. Need further details of the bond, for rigidity. In this capacity, I used a spare strut that lined the bottom of the railing. On the rear strut set, they decided to attach railing corners on the bottom.
After all that was done, I began the appearance of the wooden elements of the gazebo. For a start – sanded all the wood with grinder. Another tool I have was not available. So I took the grinder, put the grinding wheel and set to work. While everything cleared, it was a full day. Worked in a respirator and goggles because the dust was formed very much. At the start, she soared into the air, and then settle where she pleases. The whole structure was covered with it. I had to take a rag and a brush and clean all the dusty surfaces.
When the dust is gone, I covered the wood with varnish in 2 layers. Used the lacquer-stain «Rolaks», color «chestnut». Design shone and acquired a noble tint.

The frame of the gazebo, painted-stained in 2 coats
Step 4. Rafter roof design
It’s time to lay the Foundation for future roof, in other words – to put the truss system. The roof is a normal pitched, consisting of 4 triangular trusses. The height from the ridge to the strapping – 1m. After calculations it turned out that this height looks at the gazebo in proportion.
For rafters used Board 100×50 mm. Each farm I made from two boards-rafters connected by a tie. From the top, on two sides — lining of OSB nailed on the perimeter with nails. According to the plan, the rafter feet rest on the top rail, therefore, at their ends, I made the inset for dimensions suitable for timber framing. With sidebars struggled a little bit, but nothing over 2 hours to cope with this.

Roof trusses are assembled from boards and bonded overlays on top of the OSB
Farm I installed every meter. First exhibited, maintaining vertical and then fixed with screws. It turned out that to cope with the rafters not so easy. Then I regretted that I did not take anybody to help me. After an hour, I put them, but I advise all who will follow in my footsteps, still someone to ask for help at this stage. Otherwise you can get skewed, then certainly you will have to redo everything, which obviously will not add you enthusiasm in the work.
As the roof of the gazebo will not be subjected to increased loads, the ridge bar, I decided not to, and to fasten the rafters between the sheathing boards 50х20 mm. the Boards had 5 pieces on both of the slope. And 2 of them I put on both sides of the ridge at a distance of 2 cm from the tops of the trusses. In total, the sheathing for every slope was made up of 2 extreme boards (one «keeps» skate, the second constitutes the removal of the ramp) and 3 intermediate. The design proved strong enough to undermine it no longer happens.

The crate connects roof trusses and will serve as the basis for fixing slate
In the next step, I opened the roof trusses and floor two coats of varnish-stain.
Step 5. Sheathing walls and roof
Then he began plating sides pine paneling. First stuffed under the railing on the perimeter of the 20×20 mm bars, and it’s already small nails nailed battens. The back wall was blocked completely, and the side and front only from the bottom to the railing. At the end of the process, painted the paneling with varnish-stain.
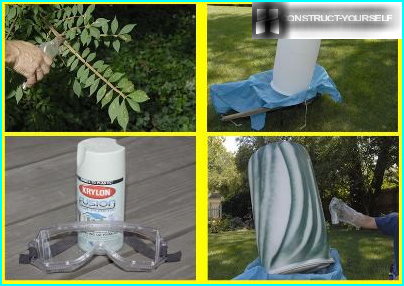
Unfinished remained only the roof. I coated the painted slate with 5 waves of color – «chocolate». The whole roof went 9 sheets of slate on top of the ridged element brown colours (4 m).

Paneling pine paneling will protect the interior of the gazebo from the wind and sun

Color slate looks better than modern roofing materials and durability — far superior to their
Later I plan to make removable Windows in the openings to protect the space of the arbors in winter. They put together a frame, they’ll put some lightweight material (polycarbonate or polyethylene – haven’t decided), and then will install them in the openings and remove as necessary. Perhaps something similar will make and with doors.
And yet, perhaps, everything. I think this option will appeal to those who want to build a gazebo fast, easy and cheap.
Gregory With.