The contents
Man is so constituted that progress on it is usually does not stop. Building on the dacha with his hands the well, he begin to think that the water from this well will make his life in the country more pleasant and easier. If so, then the case. First, briefly recall how to built wells in the area.
First, the method of dowsing was found the place where the aquifer close to the surface. Using two frames of wire was surveyed land and the place where the frames began to spin and crossed, hand drill was drilled test wells. At a depth of 2.7 meters in the bore of the scoring keys. Small, but confirming the proximity of water and sufficient volume to fill the well. The depth of the aquifer can be determined with a ruler and a gold ring on a string – was found in using the framework of place put on the land a ruler and slowly move the ring over it. The ring will begin to swing over the dial, equal to the depth of the layer (assuming 1 cm = 1 m). The old method still works!
Starting to dig a hole, made sure that the walls of intensively crumble. Stopped at a depth of about 1 m and put the first concrete ring with a metal knife and pins at the bottom. Continued to dig, using a ring to strengthen the walls of the pit. Then lowered the second ring. Bought on the advice of experts concrete ring system «the tongue-and-groove». They fit more tightly to each other and there is no displacement in the horizontal plane. Constantly checked with a plumb vertical wall of a trunk of future wells. When I got up the third ring, we stood ankle-deep in water. Dirt and water had to be pumped constantly mud pump. It was the hardest stage of the work.
We got 6 rings. We can say that lucky aquifer was very close to the surface. Between the rings laid the rope of flax, and then closed up the seams with a mixture of cement and liquid glass. Cleaned the sump of the well from dirt and covered with a layer of gravel about 10 cm of the Wall of the column of well bonded brackets and painted with oil paint. Here at the time and had to punch an entry hole for water pipe future water pipe from the well!
Around the well made a clay castle and overlaid clay, turf or decorative stone. Castle ended below the freezing depth of soil and additional insulation Nicky was not required. «House» to tip well bought in the form of the classic log, which is traditionally put in wells in villages.
Sorry, that just did not dare to carry out in house water supply from the well could avoid the extra work. However, after the cost of drilling wells for water, all doubt disappeared. Moreover, to conduct water from the well you can with your hands.
Choose the material for plumbing and tools ↑
The following is a possible diagram of the water supply for the garden from the well:

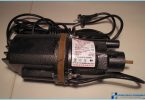
First, determine the type of pump for our water supply. Having listened to the recommendations of a consultant, stopped at the pumping station consisting of self-priming centrifugal pump, accumulator, control unit, sensor and idle protection device against fluctuations in the network. «Jumping» in the network happen all the time. We have enough ability of a surface pump to raise water from depths of 10 m. the pump capacity is determined based on the number of water intake points, including watering of the site, and consumption of about 10 liters per minute for each point. In the accumulator water is injected, after which the pump shuts off. Water intake is performed from the capacity of the accumulator. When the water level in the tank drops to a certain level, the pump automatically turns on.


For the laying of water supply we chose metal pipes. First, because of the ease of installation. Most importantly, they are easy to bend, and they are connected by special fittings – very convenient and fast. These pipes are resistant to mechanical damage and to corrosion. Pipe and all valves and equipment purchased in a specialty store. Us to work on laying a water pipeline from the well it took:
-
Pipes: metal-plastic O32 mm.
-
Pumping station.
-
Fittings.
-
Connecting elements for pipes.
-
Valves.
-
Brackets.
-
Cranes.
-
Faucets.
-
Strainer.
-
The gas key.
-
Punch.
-
Bulgarian.


Install and connect the pump station ↑
The location of the pumping station chose the basement of the house. Easy access for maintenance and quiet noise in the house it is not heard. For the intake pipe had to dig a trench below the depth of soil freezing (we dug about a meter deep) and drilling the wall of the concrete ring hole puncher. A trench dug with a recommended bias towards the well. Plastic pipe we «dressed» in polystyrene insulation shell with the outer cover.

Breaking through the inlet, got the pipe bent and dropped down to the gravel layer remained 30 cm of Water at this time of the well pumped.

The end of the pipe secured to the punched into the bottom of the pin. Another set of input strainer. It was rather difficult to plug the input hole in the concrete ring. We used a homemade mixture of tile adhesive Ceresit with liquid glass and covered the hole inside and outside in two times. In the trench poured concrete block (it’s more for self-complacency) and covered soil. Then restored the clay castle and the top decorative layer. And laying heating cable we refused.
The requirement for the temperature in the room (+2°C), install a pumping station for water from the well, carry was easy – the house is heated in winter, the basement is insulated. Before entering the pump was installed, the coarse filter and check valve. The output is set to filter. The station itself connects to the dashboard. For the fine filter was connected to a pressure gauge and a pressure switch.
Laying of water supply ↑
After the pumping station the pipe is in the manifold and on to the water intake points. Lay water pipes from plastic pipes just. On the grinder is put on a special disk and use it to cut off the pipe. There is a special tool, but for a single work to buy it makes no sense. For joints have fittings, which internal part has a rubber seal. This gasket ensures the tightness of the connection. Fixed connection crimp ring swivel.

The connection points of water intake is also is just. For these purposes, use different type of fittings with threaded part to connect the equipment. The other part to attach the pipe has a rubber gasket. Before the end of the tube is chamfered, so that the fitting came in without displacement of the sealing rings.
The layout of water pipes in the country ↑
To give recommended wiring pipes at an angle to before leaving in the fall was drain water from the system. To do this, lay water pipes, starting from the bottom and move up. The wiring diagram resembles a tree – trunk and from it diverge «branches» pipes to all the water intake points.
Hot water supply is arranged from the storage electric water heater and is also made of plastic pipes.

A missed opportunity to combine work on the construction of a well with a water-pipe from the well to the house made us do extra work. But even with digging new trenches for laying water pipes and drilling in concrete ring inlet openings, labor and financial costs disproportionately lower costs with the device of the water supply from wells on the site. With the same end result.