The contents
Often the owners of country houses or cottages on the land or near it, there is a well, which must have a house, or at least the roof. Currently available for sale, houses for wells of different types, shapes and sizes: from the small wooden roof of the building without ornaments, carved to house, decorated with Lacy designs, images of animals or other elements. But agree that a house for the well, created by your own hands will please much more.

The purpose of the well house ↑
House for the well performs several functions.
First, it protects water from contamination insects, leaves, rain, containing harmful impurities, as well as various kinds of chemicals used for spraying cultivated plants on the plot.
Second, protect from direct sunlight, adversely affecting water quality.
Third, in the cold season, this structure prevents the water in the well from freezing.
Fourth, he plays the role of fences, which is very important if in the house there are children.
Well, of course, house the well can serve as an unusual decoration of the site.
How to build a house for well ↑
Consider the technology of creating different options of houses to the well. Regardless of which option you select for its construction will need to prepare the following tools and materials:
- the plane, better electric;
- the jigsaw;
- screwdriver
- claw hammer;
- a hacksaw;
- the level of construction;
- hammer;
- three-meter tape measure;
- handle;
- cylindrical glued laminated timber;
- eaves;
- details for fasteners (nails, screws, rivets, etc.);
- slate or any other roofing material;
- if you plan to install doors, you should make the necessary hardware: handles, hinges and latches.
?
All details should be given adequate size, clean and treat with antiseptics. This training will increase the service life of wooden material.
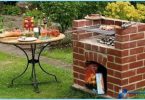
Option # 1. House – a roof with two slopes ↑
The erected frame ↑

To create a frame need edged Board, and timber. No need to take too massive or, conversely, too thin a material. As the first to give designs are ugly, and the second will make it too fragile. So it is better to take the beam having a section of 8 x 10 cm, and edged boards thickness 4 cm.
The first step is the preparation of the four pillars, width 8 cm Next, you need edged Board width of 12 inches and suitable for framing racks, long. Alternately boards nailed to the uprights with nails which length should be not less than 10 cm These nails will allow you to securely connect the parts together. The result of this work should be sustainable and durable frame.

Constructed the roof ↑
The first thing you need to create a truss system, which will subsequently install the crate. The rafters are made of boards of a thickness exceeding 3 cm and a length of 180 cm more Than the length of the boards, the higher will design.
For girders and uasin suitable Board having a thickness of 2.5 cm is all you’ll need six rafters, eight ucoin and three pins.
The upper ends of the rafter pairs are interconnected by pre-cutting them with the angle, and fix with screws. To ensure that the design was more durable, 30 cm below the top mount bolt.
In the place of fastening of the rafters to the tie-up make indentation. Then install the resulting structure on the frame and fix it with nails, a length of 12 cm.

Connection of rafters increase with the installation of ucoin. To strengthen the joints of the rafters you can set the skate.

Further created a truss system is installed crate. It should act on the walls of the house by 10 cm, and the spaces between all its elements must be equal and reach 15 cm.

On top of the crates superimposed roofing material for slate. Obtained of the gusset tuck wind boards.
Door installation ↑
The door of the house is made quite simple. First the boards are cut so that their width was 20 cm and length 85 cm cut boards are placed in a row close to each other, and fix the two bars of wood, section 2, 5 x 3 cm One beam attached to the upper edge of the door, another closer to the bottom. Mount produce screws, four on each Board. To bond the boards stronger and to exclude their movement relative to each other, one block kill diagonally.
The house well is almost ready, it remains to sheathe the Gables, set on the door knob, latch and hung it on loop. In order for the material lasts longer, and the finished design had a nice appearance on the outside it is treated with an antiseptic, cover with waterproof paint and varnish.
Also see the technology of creation of this version of house well you can the following video:
Option # 2. House for the well in the form of a frame of logs ↑
This kind of house for a structure is often found in the villages. He runs out of logs and has a classic rustic style.

To build this version of the house you will need: a log of logs, edged boards, coating for roof, metal pipe or metal rods with a radius of 12 mm.
Let us examine the order of execution of works on building of house for a well in a frame.
First, logs with a diameter of 100 mm, placed in a frame. On the exposed edges of the logs to decorate well do braces tabs.
Next, mount a massive stand with props. These struts serve not only to strengthen the structure, but also to decorate the well.
The next step is the creation of gates to raise the water. The base gate is round logs with a diameter of 20 cm and more. The length of the logs should be less than the interval between the uprights, 6-10 cm, so that when you scroll the gate for them to catch on. To exclude the possibility of deformation of logs, on the sides of his tight wire of metal. Further, in both ends of the logs, as well as in the racks, make holes with a diameter of 3 cm In the collar, these openings shall have a depth of 5 cm, and in the racks pass through. In addition, the holes in the collar and on the racks should be placed opposite each other. You then need to prepare the pipe for mounting the gate on the rack. You can use a water pipe or metal rods with a radius of 12 mm. One tube is inserted through the right rack at the right side gate. This pipe stays straight and can be of any length.

The second pipe is inserted through the left leg in the left-hand end of the gate. Previously the pipe bent in two places under an angle of 90 degrees as shown in the figure below.

This pipe will function as a cranking handle gate.
After the gate is installed go to the installation of the roof of the house to the well. Roof top roofing material. That the house looked attractive material is better to take bright colors.
The roof should have such dimensions that its edges protrude beyond the perimeter of the frame, this will prevent rain water and other precipitation to fall in the well.
The final stage is the processing outside of all wooden surfaces design antiseptic and the subsequent varnishing.
Option # 3. House well with a hexagonal log cabin in the basis ↑
This version of house of the well differs from the previous design because the frame has an unusual hexagon shape.

In addition, the rays, to give it the asymmetry make different lengths and cover obraznymi boards.

This building has a small size, which is especially appreciated in the absence of the free territory in the area. An additional element of decor is the wheel installed on gates to raise the water. The height of the finished house is 2.2 m, and the base has a diameter of 1.2 m.

Decorating the house for the well ↑
There are plenty of options to turn an ordinary house structure in a whole work of art.
The most popular way of decorating the house is a traditional wood carving. Using this method, you can decorate the house with intricate patterns, images of animals, patterns and other decorative elements. A well carved wooden house will be a decoration of any area, especially if the main buildings are also made of wood.

If you do a thread you have not enough time, it is possible to use more simple and quick method for decorating with paints. So, the house can be painted in a contrasting color or portray it the whole picture with an interesting plot.

Another option is the use of decorative bricks, tiles or other facing materials to design well.

Some impose a structure to the roof natural stone.

You can use the theme well, for example, to make it in the form of a fairytale tower or character. This decoration is especially good for children.


House well can become one of the main decorations of your site. Everything depends on your imagination and desire to implement your plans!