The contents
Often the garage is used not only as a place to keep the car, but also as a workshop, utility room, a warehouse of spare parts and tools. To work comfortably, need to consider the wiring diagram in the garage, able to meet the needs of the master. As a rule, it involves the installation of multiple lights, and sockets intended for connection of electrical equipment. Therefore, the layout of wiring in the garage with their hands – not a difficult task, it is important to provide the best quality plug-in connectors and fittings.
Features installation wiring in the garage ↑
The main criteria when wiring the network in any utility room are safety and functionality. Thus, although the aesthetics goes to the third plan, it is advisable to do the wiring hidden, then the cables will be protected from external influences. In some cases this option is difficult, for example, if the design wall is made of sheet metal, and grooves in them to do the impossible. In this case, it is recommended to carry out the wiring in the garage with the use of metal boxes, gofrotruba, sleeveless.
Upon insertion in the distribution Board is mounted earthing device. Then, the circuit wiring in the garage will meet the safety requirements. It is important that the resistance of the grounding system does not exceed 4 Ohms. If the room is planned installation of three-phase power supply system, before starting work, you need to ask for permission mostlyanthony, providing project specifications.
Preparation of schemes of cable laying and installation of devices ↑
The power you will need and the wiring diagram for single-phase electrical wiring in the garage that you need to develop yourself and then adjust in accordance with the requirements of the professionals. If the power supply system will be not three-, and two-phase, prepare the schema is still required – this time for himself. In either case must adhere to the following rules:
- the diagram should accurately depict the location of all outlets, switches, lamps and boxes. It is desirable to allocate the lighting devices so that in the darkness there is not one corner of the room. The same applies to sockets – access to them must be everywhere;
- in the diagram the wiring in the garage is denoted by single straight lines that intersect each other only at right angles. The lines connecting the network elements in a logical sequence: socket – switch – lamp. All the cables diverge from the switchboard;
- it is necessary to consider the location of elements of the power supply. So, the General switch must be placed to the right of the gate of the room at a height of 150 centimetres above the floor. Sockets are installed at a height of 50 centimeters above the floor, and the cable is mounted at a level below 10 inches from the ceiling.
Installation of network ↑
Necessary tools ↑
When manufactured wiring in the garage, it is necessary to take care of required tools and materials. As a rule, you need to have on hand:
- chisel, hammer, screwdriver and pliers. It is important that the handle of the tool were isolated;
- electric measuring devices;
- screws, screws and dowels;
- gypsum and insulation tape;
- drill with a set of several drills;
- the punch – for rooms with concrete walls.
Completing the wiring in the garage, it is best to use cable with copper cores. It is reliable, durable and durability, but expensive. Lower price it has aluminum wire, although less practical – it can carry a current of strength 2.5 times less than copper. Accordingly, the choice of aluminum cable it is necessary to take into account the possible load on the network in the room. In addition to wire, you must purchase podhodyaschuyu together with protective conduits, gofrotruba, adaptors and transformers.
The arrangement of the outer part of the transaction ↑
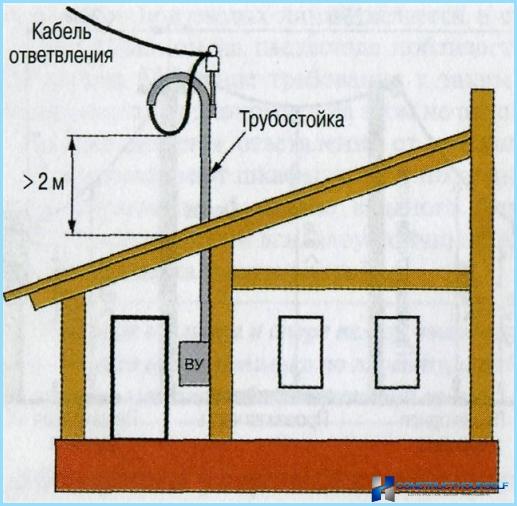
Typically, the wiring in the garage with his hands is performed in two stages: the first supply cable to the building and the second is the arrangement of the internal wiring. The arrangement of the outer part of the electricity network provides a branch wire of a power line to the garage. To do this, align the cable in the air or under the ground. If the first option is selected, the wire is placed at a height of not less than 6 meters above the highway and 3.75 feet above the pedestrian ways. To build the wire must lie at a height greater than 2.75 meters. The connection of the cable to the garage is with the use of insulators. As a variant – wire installation with the help of trubostojki, passed through the roof. The distance between the cable and the roof should be not less than 2 metres.

If the wiring in the garage with his own hands laid underground, the cable is laid to a depth of not less than 80 centimetres and protect boxes from steel. The hole for the cable entry to the premises to prepare in advance. Indoors the cable is connected to the distribution switchboard, where the installed fuse and the meter. This also applies to the case when the transaction allowed through the air.
The installation of wiring indoors ↑
To take care of how to make the wiring in the garage, you need after the cable entry into the room. Method of installation cable – open or hidden – choose depending on the wall material. If the garage is made of steel sheets, wiring allowed by the walls and covered with a box made of metal or plastic. In this case, it is recommended to use non-protected cables and flat wire.
For mounting wiring of the open method used dowels or tin brackets that are spaced apart no more than 40 centimeters. Be sure the electrical wiring in the garage is held in a horizontal position, the distance of the cables from the ceiling in this case is 20 centimeters.
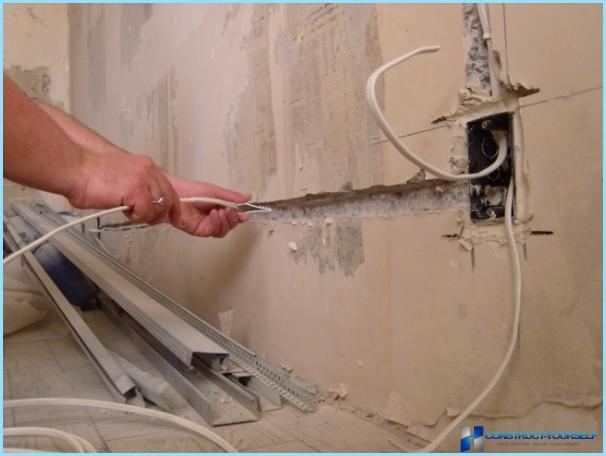
If the building is made of stone or brick, the best option – internal wiring. The walls are grooves with a depth of 0.5-0.6 cm for laying wires. Assembled cables are fixed with nails. After the work is done, grooves are carefully laid plaster.
The correct installation of wiring in the room will allow you to use it for 30 years is the estimated useful life of cables and electrical equipment. If necessary, the defective elements can be easily replaced. We should not forget about safety: work with the transaction only after it is de-energized, and the instrument must be isolated hilt.


