The contents
- The scheme first. Dashora on the chandelier and the two wires on the ceiling
- Pattern for the second. Dashora on the chandelier and three wires on the ceiling
- Scheme of the third. Three or more cord on the chandelier and the two wires on the ceiling
- The scheme is fourth. Three or more wires on the chandelier and three on the ceiling
- The scheme of the fifth. Three or more wires on the chandelier and four on the ceiling
Chandelier is a ceiling lamp that needs to provide shadowless lighting in the room. Evenly distribute light spot lamp located at a certain distance from each other. As light sources currently used incandescent, fluorescent and led.

The acquisition of the chandelier is a nice moment when you arrive to arrange housing and after buying a new piece of furniture, it remains to connect. Build time depends on the complexity of design and type of attachment. Moreover, to cope with this task quickly and easily, just follow the instructions and to have in the Arsenal simple mounting tools, and in order to connect, you need to deal in electrical.

Moolanomy lamp is available in all apartments and houses. For a uniform distribution of light is usually located at the center of the ceiling. Let’s see what knowledge will be needed to connect the chandelier with his hands.

Where to start? ↑
First you need to understand what amount of cords coming out of the ceiling. Usually receive two or three. If the two of them, then the design provides for the simultaneous operation of all bulbs, and the difficulty of connecting the lamps will not occur. And the presence of three cables provides the ability to include the bulbs individually and group them to change the light level. In the end, the difficulty arises that you need pontikaki to providesecurity between them. To ensure that the chandelier is working properly, it is important to connect. Before starting work, be sure to check the device cables. So, let’s act in order.
Observe safety precautions ↑
The basic requirement when connecting chandeliers – breakdown of the wiring harness. Easy turn off light in this case is not enough, trebuetsyasya to turn off the machines in the dashboard.
Then you need to prepare the cables for testing. They should be open to prevent further contact with each other.
According to the label,the cables are designated by Latin letters:
- L – phase;
- N – zero bit;
- PE – earth conductor green yellow.


Neobhodimosti that the markings are not always present, because it was applied not so long ago. In this case you should use are located in the flap machine and put the switch in the position «On». Then a flat screwdriver will take turns to touch the bare ends, if the process inside will light up the led cable under tension, and a phase. After you determine what types propodosoma turn off the power supply and begin to work on connecting.
To connect the cables together in two ways:
- with the help of terminal clips;
- by twisting insulated protective caps.


Installing chandeliers can be found by clicking on the link:
On the connection method of the chandelier can influence the following parameters:
- the number of cords in the chandelier;
- the number of wires in the ceiling;
- the number of keys on the switch.
The scheme first. Dashora on the chandelier and the two wires on the ceiling ↑
This method of connecting the lamps is the simplest, because it does not require much effort. In this case, using twisted joints or terminal blocks simply connect the cables together by first identifying where a phase and where a zero. Moreover, the join order can be any.

Null cable (the blue color scheme) is to connect from the junction box directly to the neutral wire coming from the lighting device. And orange cable, with the phase, should be connected to both the chandelier and the switch.

When you connect a chandelier with lots of bulbs on a switch with a single keystroke, you must first connect all neutral wires of the chandelier, and then connect them to nonevaluable from the junction box. Then combine them with the phase and hold to switch.
Pattern for the second. Dashora on the chandelier and three wires on the ceiling ↑
Today in the construction of houses in the wiring used trichilemmal with wires of different colors. It is logical to assume that the lighting device needs to be three wires. How to connect a chandelier in this situation, if there are only two cables?
To start using the indicator, you need to understand the types of wires that come out of the ceiling. Two of them are phase, and the third conductor. Two phases in this scenario, assume the switch with two keys. However, when you consider the fact that the chandelier has only two cables – just switch with one button.
Scheme of the third. Three or more cord on the chandelier and the two wires on the ceiling ↑
In the case when the ceiling is only two cables – all lamps in a lighting device to illuminate at the same time. To connect, you need to combine the neutral wire, and then to hold them to zero ceiling cable. Next, you should repeat the procedure with the phase.

The scheme is fourth. Three or more wires on the chandelier and three on the ceiling ↑
Such a connection would allow more judicious use of lamps. Can be combined with their work or turn on at a time. In this case, will be used by the series switch.
Marking of ceiling wires the following: phase – L1 (orange), phase – L2 (yellow) and the null N (blue). Due to the fact that manufacturers of cable products do not always indicate designation, and electricians, when wiring may not adhere to the standards of the color scheme prior to their connection better on their own to check their purpose with a screwdriver-indicator.
Connect a chandelier with multiple cords is with a certain sequence of actions. First the wires from the bulbs needs to be divided into two groups. All sections are individually connected to only one wire is phase, and then the sections are combined is zero.

If it is installed with the first key will light up one group of lights and second from the other. This option allows connection of one, two or three bulbs together using only one key switch.

The second method is to connect the chandelier, for example, with six horns, the first key includes 5 bulbs together, and the second – sixth.

With a large number of cones in the lighting device the installation will be the same way. Left to decide what combination of lights you wish to use in the lighting of this room.
The scheme of the fifth. Three or more wires on the chandelier and four on the ceiling ↑
In the case that the connection of the chandelier you need in new building or a private home, most likely the ceiling will leave the cord with the function of protection. As a rule, autokabel yellow-green and are marked with Latin letters PE, which translated literally means grounding conductor. In the end, the ceiling will be provides L1 and L2, the neutral wire and the fourth shamlawi – PE.
Talison, in any case, will not prevent the connection, simply connect it with a yellow-zeleninova side of the chandelier. If the lighting device is not provided the presence of this wire, from the ceiling the cable is isolated.
Installation of several chandeliers on one switch ↑
This case connection is very important for the control of lighting in several rooms, large living rooms, or in a room with a suspended ceiling with a group of led lamps.

In this situation, all lighting devices must be connected in parallel.

Each chandelier can have its own junction box.

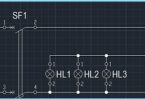
Installation of three chandeliers on three buttons switch
This connection method is used in lighting kitchen, toilet and bathroom, and a switch with three keys it is very comfortable.

Also a switch with three keys used in the corridor for light control in different areas.
Chandelier installation with fan ↑
The connection of this model – a fairly rational decision, especially in hot weather. Before installing this type of lighting device only need to read the instructions, which will detail wiring diagram.
To clarify: the fan in this case, acts as regular lamp, which is attached in a parallel fashion.

At your request, it is possible to make a separate key switch.
As you can see, the connection of a lighting device – the task is simple if you know how to do. Follow the diagrams, follow the rules of installation, and you will easily cope with the connection without help.