The contents
The desire of modern man in whatever was to expand living space generates new technologies and works in the world of the construction industry. So, today you can win a few inches of personal space, increasing its loggia. This can be done by glazing support areas (balconies), having a small takeaway it podokonnike part behind the line of the parapet. This way, you will get a fairly comfortable, wide and functional window sill in the loggia, that can easily play the role of the desktop. And the quality of the glazing obtained space, in turn, will give your apartment more light and visually expand the room.

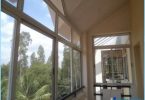
Loggia glazed with removal
If you have any desire to conduct this type of work, below we will provide you with step by step instructions through which you can handle at the highest level. However, without the help of a partner in such kind of repair work you can not do.
The tool necessary for carrying out glazing ↑
For proper repair and construction works on glazing of balconies with removal you will need the following list of tools and materials:
- Metal corners that will act as the main load-bearing brackets.
- Metal profile for Assembly necessary durable construction (frame).
- Roulette;
- Fastening anchor for secure installation of metal rods and brackets.
- Bulgarian.
- Welding machine.
- Cordless drill driver;
- Building level.
- Corrosion-resistant solution for metal processing.
- Paint to give the metal frame, aesthetic appearance.
- Insulation.
- Plastic for internal and external decoration of the loggia.
- Sheet metal for mounting the visor.
- Polyurethane foam.
- And Windows with tint and a window sill included.

Metal profile
Osteklenie loggias with the removal. The stages of work ↑
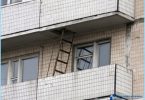
- You first need to make all the necessary measurements. You should clearly determine the distance of removal of the sill (it should not exceed 50 cm) behind the line of the parapet of the loggia.
- According to desired, you need to pick up the metal parts of the proper size and firmly attach them to the parapet of the loggia at a distance of 30-40 cm from each other a right angle to it. To produce fasteners of the carrier frame required by the construction of the anchors and a screwdriver.

Mounting brackets and welding the metal frame
- Secondly, you need to make the roof of the loggia of the future through the installation to the concrete ceiling metal profiles. They must advocate for the alleged ebb loggia 10-15 cm of the Profile are fixed, as the corners (brackets) at a distance of 40-50 cm from each other. Across the mounted transverse profiles, welded metal beam that eventually will hold the glazing. So you get a kind of frame the upper part of the loggia.
- Do not forget to check the evenness of the mounting structure with a level.
- The next step on top of attached angles (perpendicular) also weld metal profile, which will form a kind of lower frame for holding glass.

- Outside the parapet of the loggia need to weld a metal box under the perimeter, which will subsequently sheathed with plastic or other material.

The insulation of the loggia osteolaemus ↑
If you want to use a future loggia as a working or other functional space, it is best to insulate it. This can be done both outside and inside. As insulation can be foam, glass wool or other improvised material. As in the case with insulation plaster Board walls inside, the insulation material is laid between the parapet wall and its lining. Secure the heater using the screws. Then sheathe the perimeter of the loggia any desired material.

Warming of a loggia
Osteklenie loggia ↑
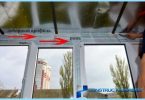
On the frame you can now install Windows. Would ideally aluminum designs because they are relatively light weight, easy to install and have high performance properties.
Window mounted in the window opening is obtained, securely fasten them using the screwdriver and screws. All possible holes and cracks, carefully blow out foam.
A couple of days Windows has settled, you can then start the decoration of the loggia.

Glazed loggia
To do this, cut off the remnants of foam, installed the sill and soffits are sheathed with plastic or drywall.
Once all the dirty work will be performed, you can proceed to the decoration of interior and exterior parts of the loggia with plastic or any other material.
Fasten the canopy or roof on the top frame. Ideally goes with the sheet metal, which is mounted quite easily and is a long time.