The contents
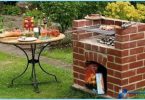
A porch is an extension to the room, which is the adapter between the house and the street. In addition, it provides the perfect opportunity to spend time outdoors in comfortable conditions. Since the porch is not heated, the floor should be made as comfortable as possible and with long life.
The floor on the veranda was exposed to many influences such as:
- significant changes in temperature;
- humidity;
- dryness;
- dirt, dust;
- mechanical impact (walking in the shoes, moving furniture, etc.).
Due to the above reasons, the material for the floor on the verandah shall meet the following requirements:
- frost;
- not exposed to moisture;
- not afraid of mechanical influences;
- durable;
- durable;
- resistant to UV radiation;
- protected from the effects of bacteria, mold and fungi.
Unfortunately, all of the above requirements may not be from the same material, so it is best to combine several tools.
The Foundation ↑
What will be the Foundation depends on the chosen material for the floor on the veranda and capabilities of the owner. But the most frequently used is the Foundation of brick or concrete pillars, to which are attached joists. In the end, for example, if you plan to do the flooring on the veranda of the boards will be ready and attached to these joists.

In any case, the area under the floor should be cleaned from grass, leveled, covered with either sand or gravel, and best of all filled with concrete.
The materials for the floor on the veranda ↑
Consider several types of floor coverings on the outdoor veranda.
Tree ↑
Wood Board for floor deck one of the most convenient and preferred means of cover. Because wood is a sustainable and attractive building material.

For deck use only wood of firm breeds, as it is more resistant to any kind of influences.
Now consider in more detail how to make a wooden floor on the veranda with their hands.
As mentioned earlier, first removed all the topsoil. The platform is leveled and covered with a layer of concrete. After that, at a distance of 1 m from each other installed bollards made of concrete or bricks with a height of 20 cm Then set the joists by means of fastening elements and attached cranial bars, which subsequently are screwed (nailed) Board «draft» floor or chipboard. In the last step to the joists fixed Board of the future of sex.
Also the floor in the open veranda can be used decking (decking). This Board is much more resistant to all influences than ordinary and will serve, respectively, much longer, but the price is much higher.
Another big plus decking – it is not necessary to treat the emulsions. Release it from the surface of two types:
- smooth
- relief
Experts recommend the use of raised decking, since it will have better grip and, therefore, much less chance of slipping.

Another type of decking is a liquid wood (drevoplast). Made from wood waste, sawdust and polymer mass. Resembles wood but is much stronger.
Advantages:
- not afraid of differences of temperatures;
- does not fade under sunlight;
- does not require staining and impregnation.
Installs exactly the same way as ordinary decking.
Linoleum ↑
Linoleum as well as wood, is one of the most popular materials.

Its advantages:
- affordable price;
- excellent appearance quality;
- easy installation;
- easy operation.
Linoleum laid on wooden floors, chipboard and concrete. Importantly, the floor was smooth and clean before mounting.
Some linoleum shrinks (before buying you should consult the manufacturer), so while cutting you need to do it longer, not less than 20 mm. cutting Knife use only very sharp.
The installation of linoleum is conducted as follows:
- bitumen mastic is applied to the floor surface with a notched trowel and allowed to stand at least half an hour;
- laid linoleum with a small overlap of about 20 mm;
- in this case about 10 cm from the edge of the linoleum leave not glued, to the junction then was as tight as possible;
- linoleum smooth to remove burrs and to expel air;
- after 3-4 days the excess is trimmed and the edges are sealed with the same mastic.
Ceramic tile ↑
Tiles can be used to open the verandas as ceramic and stoneware.

Advantages:
- great look;
- easy care.
Disadvantages:
- the floor will always be cold;
- when you drop a heavy object may crack or break the piece of tile;
- not easy installation.
Installation should only be carried out on a perfectly smooth surface and only on one level. The base solution should not exceed 2 cm, and should watch for gaps between the tiles (plastic spacers help to track same thickness).
During the tile installation to use only a rubber mallet.
Self-leveling floor ↑
Screed suitable for floor covering on the porch.

Advantages:
- not afraid of differences of temperatures;
- fireproof and moistureproof;
- no seams and will not crack.
Liquid coating method can be any surface. Most importantly, it well to clean, adjust, repair all the cracks. Next, you need to cover with primer and wait until it dries completely. Flood floor with solution in small portions, which are then carefully align.
Self-leveling floor can be completely dry after one day.
The last step – coating the surface with a protective lacquer. This measure of protection will greatly prolong its service life.
This way you can cover the floor on the veranda and with his own hands, as it does not require certain skills.
How to insulate a floor on a screened porch ↑
Consider a few ways of warming in order to understand how best to insulate the floor on the veranda.
To insulate the floor on the veranda, too, can own hands, without resorting to professional help.
For insulation using the following materials:
- heat insulation material is laid;
- mineral wool;
- foam.
Heat insulation material is laid is the easiest method of insulating. They just punch the places where you need insulation.
Insulate with mineral wool or foam a little harder.

Basically the Foundation of the porches is built from the lag and made the rough floor. That’s just on this subfloor between the joists and fit the heater.
Mineral wool must be wrapped in waterproofing. If where-that still cracks them close up with foam.
The better to paint the floor on the veranda ↑
Paint, varnish or other medium for painting are selected depending on the type of coating. But, before painting any floor on the outdoor veranda, it is necessary to properly prepare.
To protect wooden floors from any kind of stress, it is better to use complex tools:
- Impregnation antiseptic.
- Primer of deep penetration.
- Paint, varnish or other coating.

Choosing an antiseptic, be sure to pay attention to the depth of impregnation into the fibers, the deeper the better.
The primer will protect against moisture and rotting, as well as increase adhesion of the floor coating.
How to paint a wooden floor on the veranda – the issue is quite complicated, but the best options, according to experts, are decking oil and liquid plastic.
If you want to preserve the natural beauty of wood, it is necessary to use a combination of stain and varnish. First floor is impregnated and then coated with a special varnish that will protect the surface from ultraviolet radiation. But remember, lacquer with UV protection is very expensive.
If the wood doesn’t save, then apply a special acrylic paint for the floor on the veranda (a paint used for coating yachts).
Surface preparation ↑
From the correct preparation of the surface and depends on the life cover.
- Definitely need to remove the old coating.
- If the wood is never painted, it is gray, so will need sanded to a light color.
- Badly damaged boards to replace the whole.
- All cracks and crevices to seal.
- Remove all dust and debris.
Apply impregnation and primer, but their methods of application depend on the selected material and manufacturer (need to read manual).
Now apply the base coat, for example, decking oil (the number of layers applying oil or paint also depends on the manufacturer).

All the above materials and paint are not a mandatory rule for floor coverings on the porch, it just depends on your desires and your financial capabilities.