The contents
- The preparatory phase
- The choice of the location of the temperature sensor
- The choice of the location of the temperature controller
- Install a reflective heat transfer substrate
- The installation of the warm infrared film
- Connection infrared film
- The wiring
- How to hide the wiring
- How to connect the temperature controller
Infrared warm floors film was invented in the late XX century, and in Russia appeared in the beginning of this. In this article we will try to understand the structure of the film sex and to understand how the procedure of installation with their own hands.

Warm floors film ↑
Floor structure ↑
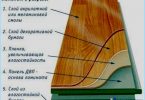
On the structure of the film floor is very simple. So, imagine a long roll of film of a certain width. For example, 1 meter. And here across this film, i.e. in width, paved heating warm strips of carbon fiber. Their main purpose is to be a resistance connected to a warm floor voltage 220 Volts.
Basically one roll of film has a length of from 7 to 13 meters. This length depends on one single factor: the thickness of the copper strips that go along the film. It is for these bands running current, and from their structure (the more, the better) depends on what is the maximum amount of current is passed through the film.
The big drawback of infrared film warm floors is that the developers of this design has to combine copper strips with strips of carbon fiber. Some suffer current and no heat, while others are resistance and from them comes the warmth. Usually they are connected to the substrate made of silver, which gives the smallest value of resistance.
But it is in the case of carrier current of pasta, with silver – and it’s cheap, warm film floors. If You purchase a quality infrared floor, then can be confident that no-fault and delamination due to temperature difference will not be. Such films contain in its structure more and «version-anti-spark» the net.
During the mounting process even easier with the availability of special sections every 25 centimeters, allowing you to trim the tape in this place, not worrying about the fact that it can be damaged. In these places there are no important elements. All the electrical and the heating strips are located between two layers of film of different thickness. So, the total film thickness usually does not exceed 400 microns (or 0.4 mm).
Please note that this film floor requires neat and careful operation, from transportation to installation and subsequent use. It is not necessary to use the installation on the screed, since, as experience shows, the film over the years goes down. Remember that the smallest crack or scratch is a threat to Your safety!
Useful features infrared floor ↑
- since the heat transferred to the floor, goes through a spectrum of infrared wavelengths, the quantity of heat transmitted through the upper surface of the floor depends on the wavelength; thus, the film floor has a wavelength in the limit of 5-20 microns, which allows to transmit more than 90% of the heat through the tiles or screed;
- infrared floor helps to increase negative ions in the room, which is also otherwise known «air vitamins», because they help a person to better absorb oxygen during the breathing process;
- gives freshness and purity;
- virtually no e/m radiation, these floors are absolutely harmless to humans;
- despite a lower temperature than standard housing the heating of the room (about 5 degrees Celsius), the host and his guests will feel no less comfortable and cozy;
- infrared radiation heats the objects in the room, which transmit their heat to the person.

Installation of floor heating – General instructions ↑
The preparatory stage ↑
The first step is to clear the room of unnecessary interior items – furniture, appliances, carpets etc. Next you need to dismantle the floor to get rid of the flooring – be it linoleum, tile or flooring. Then carefully inspect our warm film floor and check it for defects such as cavities, cracks, sharp bumps and irregularities. All of this can cause the destruction of surface film coating! And this is a threat to security. Align the floor. In all kinds of recesses can be placed backing that reflects heat, which is the one you are going to use as «litter» for infrared film sex.
The choice of the location of the temperature sensor ↑
The next step is finding space to install the temperature sensor. I think everything is so simple?
First, understand that the sensor must be installed on the substrate, between her and film the floor. If you install the sensor is under the substrate, then it will touch the cold floor. Temperature film sex goes up, so the sensor will track incorrect readings.
Second, consider the fact that the sensor has an approximate thickness of about 5-7 mm, and its wire is solid and tough, which avoids its deformation. If You have achieved a perfectly smooth floor surface, then take up a chisel (for example), or the bump-and-forth to make a hole for the sensor and extending from the cable. In order to avoid unpleasant surprises, make the hole just a little bigger than the sensor, approximately 3-5 mm in different directions from it.
The choice of the location of the temperature controller ↑
The next step is finding the place where we attach our thermostat that allows you to see all the information on the display indications of the film sex, ask certain conditions of heating, etc. the Difficulty lies in the fact that usually set the thermostat comes with a wire is not more than 3 meters. So, if You install warm floors film at approximately the center of the room, you will have to dopisivati to these other wires to the temperature sensor to peatnut them to the thermostat. The thermostat it is best to hang on the wall under the level of Your growth, and did not need to bend down to the outlet and set the temperature, swipe from any cable outlet in the wall to a height in front of your eyes.

Thermostats come in different versions: one requires a niche in the wall (need to do manually the recess mounting box), others are attached directly to the wall, others require you to install the transition box on the wall, which in the future will be attached to the thermostat.
Install a reflective heat transfer substrate ↑
To install substrate, You will need the substrate itself, as well as double sided tape plus Mylar with a metal coating or plain stationery (for lack of a lavsan).
 So first of all, buy at the hardware store double sided tape. Glue it so that it can be attached to the corners of the first strip of the substrate. Then stick the tape along the length of the substrate about a meter. Remove the protective strip over the tape and stick the backing to the tape. This will help to achieve the desired effect, and the substrate will form smooth evenly. In which case, since You used the minimum amount of tape, you can glue the substrate.
Lay underlay joint to joint, after which the seams between them will need to seal the Mylar tape or stationery usual, if there is no Mylar. This will help to keep warm.
The installation of the warm infrared film ↑
When mounting most of the heating film should consider the following: it is not recommended under heavy furniture, such as Cabinet, sofa, etc. the fact that the furniture will hold the heat, resulting in heat up of the film itself. This can lead to failure of the entire tape or portions of it. Think in advance where You will stand furniture, whether it is a permutation in the apartment.
The convenience lies in the fact that the film manufacturers recommended to lay up to 70% of floor space, enough for effective heating. In this case, you can cut strips the film of any structure: G-shaped, T-shaped, but at least assemble a mosaic under the floor!

When you decide the place of installation of the film, cut out the desired pieces, then proceed to laying it on the surface of the substrate. Copper strips, to pass current, must be directed downwards. Then use Mylar or box tape to secure the film on the substrate. When you do this, stick the tape along the edge of the strips of film at length, stopping in from the end approx 20 cm the fact that you still have to connect the film sex and need access under the film. Tight seal you won’t.
Connection infrared film ↑
To connect the film used special clamps called «crabs». So, one half «crab» inserted between two films, the other part is located on the copper strips on the bottom. Then they are clamped together under the spring pressure.
In order to simplify your task of connection, which play a very important role (because with poor contact the metal «crab» can oxidize and soon warm infrared film sex fails), do this: with a knife, spread two layers of plastic wrap, insert a match, and then put the part «crab», to avoid any kind of breaks from the teeth on «the crab». «Crab» needs to be fixed! Check it out, tugging them to the side.

The wiring ↑
When connecting the strip of film need to consider the fact that each of them should receive the voltage to 220 Volts. Ie they must be connected in parallel rather than sequentially, because then each band will be due to the carbon tape to reduce due to the resistance of the voltage.
Use wire with multiple cores, not hard, with the cross-sectional area chosen depending on the maximum load. So, 1 square meter of floor heating consumes about 220 Watts of power. Count how many you have square meters and multiply that number by 220. Get total power. Basically, 1.5 square millimeters you should cover it in full.
The following is the scheme by which you can connect an infrared warm floor.


How to hide the wiring ↑
To hide the wiring should be between the substrates. Highlight for this place, put back the wires and tape Mylar adhesive tape (if not, then normal).To wiring without overlapping, in parallel. When you cut the groove in the substrate, then seal it completely with duct tape, so parts are not separated. The wires from the strips of film must reach the connection point of the temperature controller.
How to connect the temperature controller ↑
Coming out of the box in the wall, the wires should be along the length, neither short nor long, around 10-15 centimeters. If your regulator is mounted through the box adapter, you should cut back a rectangular hole, so to open all ports.
Mounting infrared warm floor Caleo ↑
When installing Caleo everything is done the same way as described in the instructions above. Note that even if you purchased a set of infrared film warm floor Caleo, controller and sensor must be purchased separately.

If you want to put heat the floor under the linoleum or carpet, it is the substrate to use materials such as izolon, Intraflex and penoterm. Here is the structure: