Most traditional houses have a so-called single-pole light switch most of the controls that are used for lighting. These types of switches have only two choices: on or off. However, the replacement of one pole control dimmer, can give you much more opportunities to control the atmosphere in your home.

Dimmers typically use a sliding lever or turning a dial. To increase or decrease the voltage, set the chain, which transmits only part of the bulb with energy. It can provide a number of advantages.
The benefits of light dimmers in the house ↑
Control lights have many advantages over their single pole counterparts.
- Environmentally friendly: reduces your monthly electricity bill by 4-9%;
- allows you to create the atmosphere in the room which will fit everything that happens in the moment, for example, children playing or you are watching a movie;
- light bulbs used with dimmers last longer: the lights went dim, which will allow, at least 25% savings;
- fluorescent lamps that are connected to this unit, give softness and prohlednete colours.
Tips for buying dimmable: make sure you buy the device, which is designed for a total capacity of lamp. For example, the light over the kitchen table with 10 bulbs of 100 watts is too much on standard 600 W-s ‘ dimmer.
Rotary models of this device look like standard switches that slide up or down to control the light.
They have their own button on and off, so that you can turn on the light at the level you want.
Dimmers for ceiling fans ↑

If you connect a dimmer to control a ceiling fan, do not set the standard, because it will burn out the fan and significantly reduce the life-time. Here are some common types of controlled switches that can be installed with ceiling fans:
- with a fully-variable fan speed – used for controlling paddle fans or exhaust fans;
- quiet 3-speed plus no noise of the fan motor;
- quiet 7 speed plus the lack of the hum of the fan motor;
- the four ceiling fans with one module for each.
Dimmers for led lamps ↑
Led bulbs are becoming more and more common in homes, so it’s worth the time to discuss some of the issues that will arise if you encounter a connection of dimmer for led lamps.

To buy a dimmer that will control led lamp, more time is required than for incandescent bulbs, because most are not compatible with this type of switches. You will need a special device designed to transfer power and control signals for each type of electronic led driver. However, some led lamps are not intended to be dimmed and can’t be connected to a dimmer.

Before installing any dimmer switch, make sure you have a place for the bulb in the mount. Be it led, incandescent or fluorescent, you have to make sure that it is placed in the fixture and you will be able to install it. It must have the correct shape, size and socket type. The amount of voltage is critical, because the LEDs operate from low voltage DC. Each led lamp includes a driver that converts the high voltage AC from the power company into low voltage DC current required.
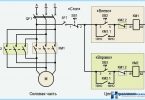
Below is the wiring diagram of the dimmer switch to the led lamp.

One of the most important things when buying any type of bulb is the brightness. LEDs are measured in lumens, not watts. The more lumens, the brighter the light.
Led bulbs come in different variations of white such as warm white and neutral white. Warm white is often used in the home, and neutral white – traditionally see in high light commercial spaces such as offices and other.

The dimmer switch ↑
When choosing an adjustable switch, many are wondering how to connect dimmer to mains. This process is absolutely not difficult. Like a standard switch, the dimmer must be connected to the circuit power light sources.
Before you begin the process of replacing or installing a new dimmer, make sure you use the right dimmer for the settings.
- Turn off the power;
Remember that you are dealing with electricity, so you need to turn the power off at the switch or at the fuse block.
-
make sure the power is turned off by clicking the switch;

-
remove the cover and set aside (make sure you don’t lose the screws);


After the plate is removed, remove the screws holding the electrical box in place. Carefully pull out the body of the switch. Some devices do not correspond to the traditional black-and-white transaction. If you buy a new dimmer, it can have only two black wires and one green for grounding. However, the black wire to the standard dimmer are interchangeable. Delete existing wired nuts at the connections.
-
attach the ground wire from the new outlet;
Use adhesive tape to mark the wire connected to the switch. These wires must be connected to a new outlet.
If you are replacing the three-way switch, use masking tape to mark the common wire. It is usually one that is connected to a darker terminal on the switch than the other two. Disconnect all wires from the old switch by loosening the screws and disconnecting them. Further pairs connect the wires to the dimmer switch, wrapped the joint with electrical tape.
Then test the dimmer switch and if that works, tight fit the unit back into the wall, being careful not to twist and bend wires. Attach the mounting box in the wall, then install the mounting plate.
Also, you can connect a dimmer instead of a regular switch. Make it pretty easy. Initially, you must disconnect the line voltage and remove the switch. Then remove the bezel and Unscrew the mounting screws of the legs. Further, the switch must be removed from the box and disconnect the wires. Only after that you can proceed to the dimmer switch. All of the above operations are done in reverse order, starting with connecting the device to the wires.

Install three-way dimmer ↑
If you establish a tripartite light control device, you must mark the existing lead wires to connect the new the same way as the old one. If only one cable enters the box, attach the black wire to the common terminal, and the other two wires to the traveler terminals.

If you are installing a three-way toggle dimmer, then you need to mark the wires that lead to the common terminal. The other two wires are interchangeable.

The scheme of installing two dimmer switches ↑
There are moments when adjust lighting is necessary from two different points. In such cases, use a scheme with two dimmers. Then the first and second terminals of the dimmer switches you need to interconnect.

The phase wire is connected to the remaining third terminal of one of the dimmers, and the third terminal of the second device wire should be on the load. In the end, of each junction box dimming out the three wires.
The right light can create the atmosphere for any occasion. Do you have traditional incandescent, fluorescent or led, you can find and install the right dimmer to create the desired mood and save 5 – 10% per month for electricity.