To make high-quality plaster walls is not possible without the installation of the beacons. The main purpose of their application is to achieve a perfectly flat surface with minimum material consumption. What are lighthouses and what are the ways to install them with their hands, consider the details. Proposed at the end of the article the video will help to fill knowledge gaps.

The types of beacons ↑
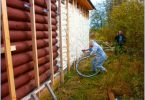
The market of building materials has not always been filled with product, which greatly simplifies the process of conducting repairs. Therefore, initially, for forming a smooth surface of the wall used wooden lighthouses, or guides, made independently from the solution of the plaster. Later for installation on the walls of the guidance the manufacturers suggested fabricated metal products.
Beacons for plaster are available in thickness of 6 and 10 mm. Usually in a situation when you want to create a minimal layer of plaster, apply «six». If necessary, the subsequent extraction of metal products, also it is better to turn to this size. If after the plaster wall will be tiled, and there is no necessity of extracting foreign objects to the installation of beacons with their hands is preferable to choose «top ten». This is due to less deformation of the product in the process and the ease of fixing to the wall. Focusing on the standard height of most apartments of 2.5 m, the guides are produced exactly of this size, although sometimes there are instances and 3 M. Perforated profile has an L – or T-shaped, as the material for the manufacture of stands galvanized metal. Despite the protection provided, during installation, the surface of the product may be damaged, and therefore rely on the absence of further corrosion should not.

What are the advantages and shortcomings of different types of beacons for plaster walls you should consider when preparing to install your own hands:
- Fixation of metal beacons is a short period of time. In most cases, after achieving the desired result of aligning them requires removing and the wall needs additional defects. Comment! Abandoned lighthouses are prone to corrosion over time on the wall may appear rusty spots. With sudden temperature drops along the metal rails, there is a risk of cracking.
- Beacons, formed of a solution of plaster yourself, a laborious process. But in the final stage of the work, you don’t have to remove them and fix indentations.
- The wooden beacons is not true due to the ability of a material to absorb moisture and deform. This can significantly degrade the quality of the work on the plaster walls. Actively used these slides when finishing a clay solution wooden houses.
When purchasing lighthouses ensure sufficient rigidity, and no deformation. Thin metal can bend in the process of wall plaster and does not provide the desired result of smooth surface.
Amateur method ↑
To install the rails with their hands with no unnecessary delays will help prepared tools and material to work with.
The preparatory stage ↑
The required number of beacons and the step of their installation is determined, based on size rules:
- If the instrument has a meter size, the distance between the rails must be between 0.8 m;
- At six-foot length rules installation step is equal to 1.8 m.

Spare distance of 20 cm is a place for traffic rules right and left. For installation on wall lighthouses need a solution, its quality can be used:
- ready mix plaster;
- the composition of cement and sand with addition of alabaster;
- adhesive for plasterboards thick dough.
Of the tools at hand should be:
- painting spatula;
- a bucket of water;
- meter level;
- an aluminum rod (rule).
In the absence of rules may be replaced by a smooth planed Board, having throughout its length the same width. Failure to comply with these conditions, the quality of plaster may be affected. For convenience, the level can be locked in the middle of the aluminum strips with mounting tape.

The installation process ↑
Installation guide for plaster walls with their hands begins with attachment of the far beacons. This will require:
- Beginners the place of fixation of the better to mark a vertical line with a pencil. The distance between the corner of the wall and the first beacon is 10-15 cm.
- According to the planned boundaries of small pellets plaster is applied (or another solution) with a spatula. The distance between the groups approximately 30 cm.
- Lighthouse is applied to the pellets on the wall and lightly pressed down with your fingers.
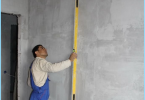
- Then you need to use the rail level, pressing it along the entire length of metal product and controlling evidence. The main task at this stage is to achieve a perfectly flat vertical position.
- Then with a spatula tweak the mortar plaster, the excess if necessary, and remove.

After installation on the wall of the far beacons, and a subsequent phase of work should take at least hours for gelation of the solution. Then proceed to stretch the threads. To do this, between the guide, recorded near the corners are stretched three strong threads: top, bottom and middle. Their function was to create a single plane for the future walls with plaster. You want to pull tight, hence the need for high-quality drying of the solution under the corner beacons.
The third step is to install intermediate guides. Action is almost similar to the first stage with a slight difference in the technique of leveling. After throwing on the wall mortar plastering and penetration of a beacon, a landmark to define the vertical plane are thread. They should only lightly touch the surface of the metal profiles. Application threads for installation on the wall of the intermediate beacons under the plaster with their hands significantly faster compared to using the level on all phases of the installation.
Professional approach ↑
Professionals use for installation of beacons under the plaster of the walls method «spider». Its name it owes a distant resemblance to the real web. This is an advanced way to apply threads to find the vertical level with your hands. The key difference is two items:
- Instead of the level applies the plumb, the readings of which are more accurate.
- A quick move to the plane of the rails against the wall. This ensures accurate determination of the necessary layer of plaster.

The whole process contains the following stages:
- Mounting on the wall fixing to plummet. With a punch, equipped with an 8 mm drill, under the ceiling and drilled two holes. The distance from the corner of the wall is still the same 10-15 cm, as in the first embodiment, the installation of beacons under the plaster. Are driven into the recesses of the tube, then inserted long dowel. From the wall must look at least 5 cm fasteners. ?Attention! Often the ceiling is an electric wire. Therefore, when drilling the wall, be extremely careful not to disrupt the supply of housing and not to suffer himself.
- For pitches on the wall, you need to put the clips. Their function is performed by the same anchors, the installation of which is over each other.
- The weights are recorded and are offset in position.
- Another couple of pitches tied to the top of the dowels. This vertical can be moved closer or farther from the wall, which will be covered with plaster. At this stage, the distance to the wall must be in the range of 1.5-2.0 cm After the weights clear the vertical position, the lower fasteners is their location. Then a plumb line is stretched and fixed on the lower dowel.
- The next stage of training your hands of the wall under the plaster, using beacons – installation of sliding horizontal orientation. No complicated manipulations do not have enough between the vertical plumb lines to pull three horizontal strings. Tying them, you get another moving reference points for installation under plaster walls and lighthouses. Scrupulous wizards add more diagonal thread for perfect definition the vertical plane.
With this «spider» just install the correct plane for fixing the beacons, which will provide a minimum consumption of material in the plaster walls.

In addition to these two methods, there is also the option to install a beacon with a laser level and leveling. However, expensive tools far from each host is available, and the proposed options guaranteed to provide a smooth surface with the plaster walls. Watching videos will help closer look with the above material.