The contents
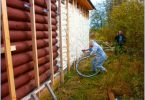
Competent organization of finishing works in the repair includes an obligatory alignment of walls with plaster. To achieve the desired result without the use of beacons is almost impossible. To replace the outdated fixtures came modern products, which greatly facilitate the task. What are beacons and how to expose them to further plaster the walls, take a look at details.

Feature plaster beacons ↑
Until the market is ready vertical guides, master on construction independently produced devices that facilitate the process of surfacing plaster. Mainly used two variant – shaped beacons directly on the wall from a solution or resorted to the help of wooden planks. For both methods characterized by the absence of additional financial costs, the benefits of improvised beacons for plaster walls over.
The process of making guides from a solution of different complexity. The wooden beacons is impractical due to the likelihood of deformation of a material under the influence of moisture absorbed from the plaster. Therefore, the proposed manufacturers of finished profiles, perforated metal quickly gained popularity among the masters finishers. What are the parameters and characteristics of the metal beacons:
- The length of the articles are focused on the standard height of the rooms and there is a 2.5 or 3.0 m.
- Thickness instance 6 and 10 mm.
- The width of the lighthouse from 10 to 20 mm.
- Metal profile release of T – and L-shaped. The second option is intended primarily for the treatment of plaster corners.
When choosing the size of the beacons are guided by the thickness of the layer of plaster that must be applied to the wall.

For the manufacture of vertical rails under the plaster of the walls using galvanized metal. However, this is not a 100% guarantee of protection against corrosion. To properly expose the beacons, this work has used an aluminum rod that periodically damages the protective layer. Therefore, the final stage of the plaster walls of the metal profiles are recommended to be removed, otherwise over time, on the surface may appear unsightly rust stains. The remaining cavities dub with finished wall surface.
The preparatory process ↑
In the process, you will need the following tools:
- putty knife, trowel;
- building level;
- drill for mixing mortar and the perforator;
- 2 rules: the length of one slightly less than the height of the wall, the second shorter, for leveling the plaster;
- capacity for dilutions.
Make inspection of the walls to identify the protruding sections. Various peeling of the old coating in the form of plaster or paint are removed with a chisel. Also need to get rid of the SAG solution. Before starting work, the wall surface is treated with primer to improve adhesion with plaster.
There are two common ways to set beacons under the plaster: the installation is carried out using fixtures or using the solution. What are the features of the process, we consider in detail.

Application for installation of vertical rails of the solution ↑
As the solution is used in the composition of cement and sand, for quick setting add gypsum or alabaster in the amount of 10 % of the total. To properly install the beacons will help the following algorithm:
- Work begin, departing from the left angle of 10-15 cm Under the ceiling, hammer a dowel to be embedded to the end should not be. As fasteners suitable nails.
- A small portion of the fastener protrudes above the surface. The size of this plot is approximately equal to the planned layer of plaster on the wall, with a relatively flat surface it is at least 10 mm.
- Similarly, the dowel is fixed in the lower part of the wall. Then, using the plumb line between them, you need to set the vertical.
- Repeated actions carried out in the right corner of the wall.
- After graduating with a vertical, you want to put a horizontal line, pulling the threads at the top and bottom of the wall.
- In conclusion, with the help of threads draw the plane along the diagonal. Then on the wall has the convex portion, which will be the starting point for the formation of the layer of plaster. To save consumption of the solution plane of yarn moves to the marked point as close as possible, with all relevant vertical and horizontal levels must be met. ?Attention! Wall irregularities must not be outside the plane of the decorated plaster.
- Received the vertical line mark a pencil, these places will be assigned beacons.
- Securely install the guide will help the mortar, applied on the boundaries of small groups at a distance of 30 cm from each other.
- Metal lighthouse is applied to the locking part, and gently pressed over the entire length, so as not to cause deformation of the profile.
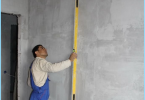
- To set a guide will help rule level, for the convenience of the latter can be fixed on a metal rail with adhesive tape or mounting tape.
- After removing the vertical remnants of the solution are smoothed and the excess removed from the lighthouse with a spatula.

To put intermediate beacons will be easier. The distance between them depends on the length of the second rule and must be 20 cm smaller. That is, when the amount of aluminum strips of 2 m, the spacing between beacons is 1.8 m, with a four-foot length of the tool beacons must be put through the 1.3 m Small gap designed to run on the wall to the right and to the left in the process of leveling the plaster. For beginners it is better to buy a small tool.
Fixing the intermediate beacon, for determining the vertical plane-use level is not necessarily enough to make a stretched thread barely touched the edges. This will be a guide to properly expose guide. After solidification of the solution under beacons you can jump to the plaster walls. Original a way as possible to set beacons under the plaster quickly and properly set out the following video:
Installation with attachments ↑
Properly set beacons with the help of the solution and further the plastering of walls newcomer will be a little difficult. Much easier to use for fixing rails with special fastening elements, which are presented in two main versions:
- This can be a plastic plate with a fixed end on one side, the opposite side has a cutout for installing a plug. Securing the screw with such detail to the desired height, the metal profile is introduced by one part in a fixed protrusion, the second side is held by the retainer.
- Even easier to put beacons with «ushastik». This is a plate of steel with two tabs on the sides and a hole for a screw. After mounting on the wall, these lugs are pressed against the sides of the lighthouse.

Plaster walls with the installation of beacons with the help of fasteners is much faster, because you don’t have to wait for the solidification of the solution under the beacons. Another advantage of the proposed method – reduction of material consumption, reduction «dirty» works. So, the procedure is the following:
- Stepping back from the corner 200 mm, mark vertical line for accuracy, use a level or plumb.
- Depending on the length of rules intended for leveling the plaster on the wall, make markings intermediate beacons.
- Lines near the corners of the walls, drilled holes with a diameter of 6 or 8 mm with a step of 30-35 cm.
- Appropriate dowels with a length of 60-80 mm are driven into the holes.
- The cap screws should be set plumb or level.
- Then they dress up fasteners, after which the lighthouse plaster walls snaps.
- By mounting the extreme metal sections, between them stretched the cord or strong thread. This will reveal the dimples and bulges of the wall.
- To adjust the layer of plaster on the wall, enough to expose screws on the side beacons by screwing or unscrewing.
- After touching the thread to the most prominent point of the wall, you can move on to mounting the intermediate vertical rails.

As you can see, at observance of technology of installation, prepare the wall under the plaster is not particularly difficult. Submitted videos will help to ensure ease of process.