The contents
Meet clay walls not only in older homes. The desire to become the owner of environmentally friendly housing have revived the trend to use old technology. Use in the construction of new techniques allows to build strong and durable buildings with clay walls. Their advantage is keeping cool in the heat and long heat retention at low temperatures. How to decorate with his own hands the clay surface with plaster, examine the details.

Selection and preparation of materials for work ↑
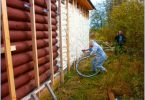
Feature clay walls includes not only the positive properties, these surfaces have a number of features in finishing. Choosing the material for stucco, be aware that clay surfaces suitable composition, which has a lower weight. Therefore, the work on the plaster of the exterior walls is performed with solutions containing lime, the interior recommended a plaster or clay mixture. It is not recommended to clay plastering the surface with cement mortar. This will lead to the destruction of otlochno layer due to its severity.
The technology of finishing involves the application of three layers: rough, finish and decorative. For the initial phase of the plaster walls will need:
- Clay. The parameters of plasticity it is divided into light, whose performance is in the range of 0.17 and 0.27, and heavy, for which the number of plasticity lies outside of 0.27. Also has the meaning of its color. Red is most common, although common material of white, gray, yellow, and black colors. Comment! Despite the natural origin of the clay, sometimes in its composition contains minerals (quartz, magnetite, etc.), having elevated levels of radioactivity.
- Sawdust. For a rough plaster of clay walls are applied only thoroughly dried sawdust. It is important to ensure lack of fungal diseases. Fresh material for finishing clay walls cannot be used since receiving them must be at least years.
- Sand. To ensure high-quality plaster walls will help the average material fraction of large inclusions is better to weed out.
To prepare the mortar for rough plaster, sawdust is first mixed with sand then gradually added to clay and water.

For the second layer of plaster will need cement, clay and sand. Because of the different properties of clay, the optimum proportions for mortar have to pick up yourself, depending on its fat content and plasticity. The approximate ratio is 1:1:3. The willingness of plaster for finishing clay walls with his hands is determined in various ways:
- You can roll a small ball that doesn’t stick to the skin and crush it on a level surface. Under ideal ratio cracks on the sides should not appear.
- The second option is to form a flagellum length of 20 cm with a diameter of 2 cm, and roll the ring. The correct plasticity of the mortar for plastering the walls is again determined by the absence of cracks.

The following video will help to determine the correct consistency of mortar plaster for finishing clay walls.
The formation of the rough layer ↑
The sawdust provides the reliability solution. In their absence, to be applied on the plaster surface of the sub structure will need to attach a reinforcing nylon mesh. Fixing is best done directly with a solution, when used for fixing nails, violated the integrity of the wall and deteriorates the strength. Processing of clay wall plaster with a practical assistant, which will point to areas in need of improvement. The process includes the following steps:
- You’ll need Board-grater or the spatula.
- On a working tool is applied two or three slides plaster.
- A tool with a solution firmly pressed and distributed over the surface.
- Direction – from the bottom up. Need to try to spread the plaster as evenly as possible.
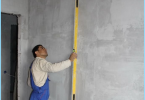
- Smooth surface of the wall check with a level. Eliminate identified irregularities immediately after detection.
If the wall is relatively smooth, for the initial layer of sufficient thickness in 1 see If there are significant irregularities on the surface of the clay, the plaster may increase to 3-5 cm.

After applying a rough layer of mortar of plaster need time to dry completely. The whole process takes on average 4-6 weeks. The approximate drying period of the layer thickness of 1 cm at room temperature is 5 days, to speed up the process by using technical a hair dryer or heaters is not recommended. Therefore, the works better to plan for the warm period. Optimally, when the starting finish begins in late spring and early summer, although it depends on the region where is located the house with clay walls. Professional actions for applying the plaster on the walls you can see in the following video:
Fine finish ↑
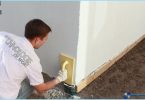
The final alignment of the walls of the clay occurs at the stage of finishing plaster. After bringing the surface to a smooth condition, you will need to do the grout. It requires a mixture of sand, clay and cement. Of sawdust should be abandoned in view of their swelling and disturbance of the smoothness of the wall. The approximate ratio of these components of 3:1:1, it all depends on the quality of the clay, sometimes the amount of sand required to increase up to 4 units. Mortar finishing plaster should be liquid, such a composition easier to apply to the clay wall. The absence in the composition of the sand is the coarse fraction will provide a more even surface for finishing. It is recommended to use exclusively a dry material. The procedure for preparation of a solution of plaster following:
- the clay is soaked for a day before cooking composition;
- after softening the excess liquid is removed and the clay is kneaded, to avoid large lumps;
- dry sand is mated with a cement;
- all components are thoroughly mixed gradually add clean water.
The period of drying, finishing plaster, applied on mud wall is from 1 to 3 weeks, it all depends on the ambient microclimate. Natural process – a prerequisite, any artificial acceleration will cause cracking of the clay walls.

Finish the decoration ↑
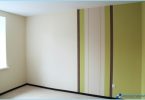
In the final phase, after drying the finishing layer, the walls are treated with lime. Traditionally, the procedure involves applying several layers. Alternatively, the surface of the clay walls can be handled with fine-grained sandpaper. After sanding sandpaper is a required application of the primer composition. Better to do it twice with intervals for drying. On the clay walls covered with plaster mixture. The prepared surface can be finished with paint or Wallpaper.

Conclusion ↑
Variants and nuances of finishing clay walls a lot. In some cases, for finishing plaster using mortar with lime content but without cement. In addition to the gypsum mixture, can use asbestos. The quality of the clay largely determines the proportions of plaster solutions at all stages. It is very important when it is selected to exclude the presence of minerals with high radioactivity.
Compliance with all recommendations will allow you to arrange housing with environmentally friendly materials that can independently form the indoor climate and reduce the costs for the use of additional installations, cooling or heating the air.