The contents
To live beautifully and comfortably – the dream of any sane person. To make this comfort, many do not spare effort and money investing in their homes. Repair has become commonplace, allowing to make their living space beautiful, comfortable and modern. To save money, many perform all work with their hands. A common problem faced by both masters and novices – uneven walls. They spoil the overall picture. In addition, the bumps do not allow to make the decorative layer. That’s why the walls need to align for further work.

How to do it right? Using a conventional plaster can align any unevenness. If you don’t know how to align the wall with plaster, this article will be useful for you. We consider the leveling of the walls required tools and materials. The article will also be instructional videos showing how to correctly align the wall with plaster to make it easier for you to navigate. Now everything in order.
Work on the preparation ↑
Ask any expert how to align the wall with plaster, and he will tell you that you first need to prepare the surface, and then proceed to the alignment of walls with plaster. What this includes? First you need to inspect the surface and assess the wall. If it has an old veneer in the form of Wallpaper, old plaster or other material, they should be removed. Take the spatula or brush on metal and remove the layer. All the bumps, cracks and defects should also be removed, so the surface was strong, cleared of a dust, dirt and other substances. They can weaken the adhesion of the walls with plaster.

Now, look at the bumps. How to align the old plaster on the walls? If it is loose and it’s not very hard, it is better to completely remove that in the end all your work was not in vain. In the presence of deep depressions, pre-fill them with plaster to level with the wall level. Height variations should be in the range of 5 to 12 mm. otherwise, the projections and the bumps are cut. Diamond eyes is a good thing, but to be sure you correctly use a laser level or a plumb easy.

To this end, the walls at the edges of tighten the screws. Just link him the thread with the load and pull down. So you can tell how uneven walls and align them.
Tools ↑
Of course, alignment of walls plaster can not be done without the appropriate tools. What are they? Prepare the following equipment:

- putty knife, hawk, trowel or trowel;
- lighthouse profile;
- capacity for the mixture and the mixer for mixing;
- plaster corner;
- plumb and level;
- rule;
- roller;
- sandpaper.
With such Arsenal, you can easily cope with the task, and level uneven wall plaster.
Step 1 – applying the primer ↑
To ensure perfect adhesion with the surface, you need to treat the wall with primer deep penetration. You will need to buy the primer and use a roller. Soak it in the mixture and apply a generous layer to the surface of a fully processed surface. Work roller easily and quickly. This step will not take much time.

What gives this treatment? A property of priming is that it strengthens the layer of material, gives it better adhesion and helps to repel moisture. Therefore, without such mixtures in construction not do.
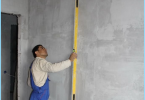
Step 2 – installation of beacons ↑
Alignment of walls with plaster with the help of the beacons. They will serve as a guide showing which layer of plaster needs to be done. Beacons are exposed strictly on the level, so as to align the wall with plaster is not difficult. How to install them?

You will need a drill, anchors, screws, level, pencil and rope lighthouse itself profile. To understand how to align the walls with plaster under the beacons, first look video. From it you learn fast, simple and reliable way to install the beacons under the plaster.
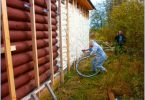
How to prepare wooden walls ↑
From the video, you learned how to prepare the brick surface. But what if you need to line the walls of wooden houses? In this case, the wall obryvayutsya shingled. It is a narrow little slats with a thickness of 3-5 mm. Standard length of shingles is equal to 1 m or 2.5 m for a width of 15-20 mm., the Cloaks must be integers, not rotten and fungus-free. What is the problem?

Working with shingles, you will have to spend your time. The process is labor intensive and not the fastest. Although, nothing complicated to work there. No shingles to align the wooden walls fail. You can use reinforcing mesh, but it will cost you significantly more. If you do the repairs yourself and want to save money, you will not regret the time and effort. The cloaks stuffed across the surface at an angle in 45? to the floor in two rows. The first layer can fill of curves and narrow plates with a minimum thickness of 3 mm. When the thickness is smaller, it will prevent quality adhesion of plaster to lathing.
A second layer of shingles is stuffed in exactly the same way at an angle of 45?, only in the opposite direction. Plates must be smooth and free of defects. The required thickness of 5 mm is not more. How to align walls plaster with a shingle and fill it, you can see from this video.
After a shingle or beacons are installed, the surface can be easily leveled with plaster. How to do it?
Step 3 – applying the plaster ↑
Now, when all preparatory work is completed, you can proceed to the main part to align curves of walls with plaster. The task is to apply the mixture on the surface and align it with the right tools. For starters, you need to prepare the plaster. Cement mixture suitable for exterior use or in areas with different levels of humidity. Gypsum plasters are ideal for living spaces inside. They are harmless, keep a good microclimate in the room and clean.
Usually, on the packaging of the purchased products, there are instructions for the preparation of ready mix. It’s pretty simple:
- Fill the tank with the desired amount of water (indicated on the package).
- Pour the contents into the water.
- Mix thoroughly until smooth with a mixer.
- To withstand technological break (5-10 min) to the solution matured and acquired all the necessary qualities.
- Mix again.

Plaster ready to use. Now with the spatula, apply mixture to the base by spraying or spreading, upward motion. You should start from the bottom of the wall, causing the solution from one lighthouse to another.
Now go rule is a long narrow rail of aluminum, which is easy to align the wall with plaster on beacons. Apply the rule to the base and movement from the bottom-up spread the plaster on the wall. Do not attempt to level the surface for the 1st time. The recommended layer of plaster is indicated on the packaging. To make the wall smooth need several layers. Thanks to the beacons for which moving is usually possible to achieve a perfectly flat surface. The operation is repeated until then, until the space between the beacons will not be filled. Then you can proceed to the next section.

If you do this kind of work, check out our video where you will see how to correctly align the curves of the walls with plaster. So you can clearly understand what is your task.
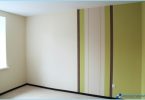
Now everything is ready for applying finish. Wall remains to be luted to the surface was perfectly smooth. You can then make the veneer, which is selected according to the.
And what about the walls with shingles? Watch the video how to level a wooden wall with plaster using shingles.
Conclusion ↑
Now, if you want to align the wall to make them nice and prepared for further processing, if desired, and following the advice you will succeed. So you will be able to acquire skills and save money on repairs.