The contents
- The creation of the project
- Site preparation
- Installation of supports
- The collection and installation of frame
- Installation of polycarbonate sheets
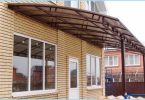
Polycarbonate is a very popular building material. It is used to construct lightweight and inexpensive designs. It is most commonly used for canopies, shelters and greenhouses.

How to choose the material of the visor ↑
Polycarbonate is very popular in cottages and country construction. It can be used to build your hands safe and beautiful canopy over the porch, carport or greenhouse, which is nothing to worry about any cold weather. Large selection of colors and ease of installation is also spoken in favor of the choice of this material.
Currently on the market are a large number of types of the polycarbonate. The first thing you need to pay attention to is the thickness. This parameter determines how the material may be used. There are a number of thickness values of the polycarbonate:
- 4 mm is most often used for the construction of greenhouses;
- 6 mm suitable for arranging various canopies, awnings can be used for the construction of greenhouses;
- 8 mm are used for canopies and roofs;
- 10 mm – for installation of partition walls and noise barriers;
- 16 mm – for the roof of a large square.

Distinguish by color transparent (sometimes called white) and coloured polycarbonate. Choose material suitable to the external design of the house easy. So, blue polycarbonate would be appropriate to look over the pool, green and brown country on the visor etc.
What you need to keep in mind when calculations ↑
When building a shed you must consider snow and wind loads. This will determine the frequency of the pitch of the sheathing frame and the thickness of the sheets themselves. So, too thin polycarbonate may break, so you will need additional reinforcement of the structure. Thick leaves are harder to bend, have a smaller bending radius, weigh more, and cost more.
The stages of construction ↑
The construction can be divided into stages. First, preliminary work: by design, defines the appearance of the designs, chosen colors, etc., the draft of the visor. Calculated number of materials. Then buy everything you need for a visor.
Then proceed to the actual construction: made the frame, mounted the supports if necessary, fixed design, sheathe it with polycarbonate.
The new project ↑
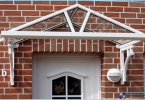
You first need to determine the placement of the visor. As a rule, they are installed over the porch. The visor should be slightly wider than the surface that it covers.

The design is a necessary stage. He should begin any construction. It is at this stage determined the final size of the visor, its appearance. At this stage, calculated the required amount of building materials, decided how many will need consumables and tools. Drawings of the visor made of polycarbonate will help yourself to accurately calculate. Also at the design stage to calculate all types of loads. And those who will experience the canopy, and those which he would himself create.
First measure the porch or the part of the building, which will cover the visor. Canopy size may be slightly smaller, larger, or equal to that surface which it protects.
During the project design must take into account the characteristics of the materials used. The fact that the polycarbonate not only distributes the load, but he takes it on himself. Therefore, the visors won’t fit thin sheets, it is better to use a material with a thickness of 6 to 10 mm. At the smaller value of the polycarbonate is too brittle, at most – not enough elastic and heavy.
For sheets with thickness up to 8 mm optimal step of sheathing the frame for visor is made of polycarbonate from 60 to 70 cm. Possible to make squares of 60×60 cm or 70×70 cm For panels with thickness more than 8 mm is permitted a wider step from 70 to 80 cm in the longitudinal direction and 100 cm in the transverse.

Site preparation ↑
First, prepare the construction site. To do this, using a tape measure and pencil, make their own hands the markings on the wall of the building, where presumably there will be a visor. Mark where would be the fasteners.
Also note on the land border of the visor is made of polycarbonate. Preferred for this use pegs or cords. If you intend to install additional supports, note their location. It is also possible to use pegs. Construction site it is desirable to align.
Installation of supports ↑
Many types of visors provide extra supports with your hands, so you need to consider how they are doing.
First, note where there will be stands for visor made of polycarbonate. Then in these places, dig holes under the posts, which can be made from wooden planks or logs or metal pipes. Supports should be buried about a meter into the ground. If the soil is loose, you can increase this value. Stand under the hood is aligned and fixated in the ground. They can be concreted or secured with mortgages.
In order to fasten the concrete will take 2-3 days. The same term is necessary and mortgages to support established. Only then can lead to further construction work in the vicinity of the porch. Now you can proceed to mounting the visor.
The collection and installation of the frame ↑
Frame generally installs fully or partially assembled. It will depend on its final size and weight. It is most convenient with your hands to make one – or gable hood. The frame in this case will have a triangular shape.

If there is any extra support that connect them with the mortgage. Usually first collect the perimeter. When the harness is finished, it is complemented by longitudinal and transverse beams. For thin sheets the optimum step width – 60-70cm, fat – not more than a meter. When working with wood for mounting is better to use screws if using metal – ideal welding. It will make the connections are secure and hardly noticeable. To best mask the seams, they must be cleaned and sanded, then paint. From the rapid destruction of their will save only the processing of specific primers.

Finished the frame of the visor is attached to the mortgage details on the wall. For these purposes, you can use brackets. The rise of ready-made designs with your own hands can have complex and time consuming process.
Installation of polycarbonate sheets ↑
Installation of polycarbonate with their hands is performed on the finished frame. The quality of this work will depend on the reliability of the overall structure, so all work needs to be done well, thoroughly and carefully.

The need for the construction:
- Building a knife or a circular saw for cutting sheets;
- Drill or screw gun for mounting using screws;
- Thermowashers;
- The screws to complete the fastener, it is better to use with a wide hat.
Thin sheets are easily cut with a knife for thicker (over 10 mm) will fit a circular saw. This should be used the drive with small teeth, so as not to crumble and crush the edges of the polycarbonate. To get a good result, work should be carried out on a hard flat surface.
Polycarbonate cuts, not only due to the size and shape of the visor, but the orientation of the air channels of the worksheets themselves: they must be parallel curves or lines slope.
Material with one side covered with a special film, which protects it from ultraviolet radiation. Her manufacturers often apply different image: quality marks, trademarks, instructions, warnings. The protective film is not recommended to remove before mounting works. It will save polycarbonate not only from radiation but also from dirt and minor damage. Film easily removed after the sheet is attached to the bottom.
Pieces cut polycarbonate adjust to each other and fastened to the frame. Their prosverlivayut screws. For sealing use a special thermowashers, which have thick rubber or silicone lining. The optimum diameter for the work is 30 mm. Holes for fasteners should be a couple mm bigger than they are. Screws should be placed every 30 cm Fastening elements placed between the ribs.

Between the polycarbonate sheets need to leave a small gap of 2-3 mm. Is the so-called reserve for expansion. At temperature of polycarbonate varies slightly in size. This allowance is necessary to compensate. It also allows the sheets to shift relative to each other in the further shrinkage of the house.
It is important to securely seal the polycarbonate panels to each other. For this purpose special profiles. They are fixed on the inner side.
To avoid getting dirt, dust, seeds, etc. in the cavity of the polycarbonate, cut the part you must close the special lining which is inserted a miniature filters. For fixing – glued edge sealant. It will also make the installation more reliable. Thanks to this simple and straightforward measure will significantly reduce the amount of condensation and contamination.
Conclusion ↑
Manufacture and installation of the visor made of polycarbonate with their hands will not take much time. Forces on it will also need a little. Only it is necessary to carefully prepare and correctly calculate. Later replacement of individual items will be as simple as possible.