The contents
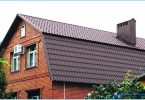
Metal is a popular option for covering the roof. It not only provides excellent protection from moisture, but also protects the building itself from the damaging effects of the environment. Having a high strength and durability, metal is the best option coating that is used everywhere.
But metal, like many other coatings, requires appropriate crates, able to securely lock it and prevent the destruction of the structure. However, for sheathing under such material you need to learn some technical basics, which in the future will significantly simplify the work.
The types of crates and their device ↑

Before preparing and installing sheathing under the material, choose the appropriate option. There are several types of such base, based on the type of flooring. As it is solid and lattice device sheathing varies based on the length of the wave of the future profile.
For a solid layer of sheathing materials are used, providing a solid surface coating. To do this, fit edging boards, the size of which is roughly equal to 32х100 mm.

The Foundation is laid very closely among themselves, it is only necessary to leave small gaps, the size of which does not exceed 10 mm. It provide easy ventilation, preventing the formation of mold and mildew. Also, such a coating provides good protection of the roof and is recommended for use in regions with strong winds.
Grating requires a different Foundation. Although its installation is more complicated, this approach requires much less material. Given the high price of the timber diagrid is optimal for such problems. He is in a cell the installation of a small timber that will ensure fixing of the coating only in those areas where it is needed.
For metal you can use both coverages, but most use the second option. Because it provides a significant saving of materials, which affects the final cost of the roofing works.
Features of installation of the metal on the crate ↑
The basis of any of the crates is a step. It allows you to do any installation and placement of boards, improving the reliability of the design. The step size is calculated on the basis of the metal, namely in its wavelength. This is a fixed value depending on the type of profile used.

For different sizes of the coatings are different boards. This step defines the future of design and pre-calculates the anchor location. For simple structures, the height of the roof which is small, and the thickness of the sheet is not exceeding 0.45 mm, fit the Board with a cross section of 25х100 mm. It is the best option for cost and reliability, because the best crate for such coverage makes no sense to do.
For more complicated roofs, it is recommended to use a Board with a cross section of 32х100 mm. It is optimal in cases when the metal has a large thickness or height of the wave. Regardless of boards is calculated rafter step. Often it is equal to 0,6-0,9 m, depending on the design features.
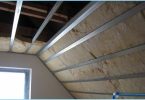
It is worth considering other layers of roofing. They are visible on the published image. You should consider that design involves not only a single layer sheathing, but also additional aspects like the initial sheathing, waterproofing and other things.
Among the other highlights of the device crates worth noting:
- The step of sheathing can vary based on roof pitch.
- In the calculation of a roof batten spacing is taken into account the presence of a drain and its form.
- The reference guide starts from the frontal Board or rafter cut.
- The first Board should be thicker than the other to improve the reliability of fastenings.
This will take into account some of the nuances of installation, ensuring the reliability of the design in the future.
Installation of lathing ↑
The Assembly of such construction is in several stages. It is quite difficult process, to simplify that you want to create a preliminary work plan which is used for the purchase of materials. The entire installation process consists of several steps, namely:
The preparation of the plan and preliminary calculations
- The trim boards under the future design.
- Laying of waterproofing.
- Laying the primary beam 30×30 mm along the slope of the roof and mounting it to the rafters.
- Laying decking trim boards across the primary beam.

For uniform distribution of an edging Board without additional measurements it is recommended to cut two boards the length of which corresponds to the step. It further should be guided in the installation. The image specified fixed template size 370 mm, but you can change it to fit your requirements.
It is necessary to consider many nuances, like setting the eaves plank, boards, and location of the siding and drains.
The step of sheathing is selected on the basis of shear waves, as seen in the image below. Also here we have other details of the design that will later be needed for effective installation.

Also worth noting is the density of the sheathing. Although she has done a big step, is to make whole sites in areas of different outputs. These include the chimney, vents and other similar places. Also the whole crate to do above the side Windows, tight to the roof.
The crate on the joints ↑
The roof structure is not solid, it consists of many elements. These include various skylights, gutters, pipes, and other items. Therefore, in such joints it is necessary to install solid sheathing, the width of which varies in the range of 180-200 mm. Also, these places can complement the truss system, which increases the reliability of the connection.
To simplify the fasteners will allow a strap connection connecting the different designs. It looks something like this:

Used in various connections, it greatly increases their reliability, as a simple and convenient method of fastening.
The consequences of wrong installation of lathing ↑
It is important to take into account all the nuances of installation and to act according to a predetermined schedule. The correct installation of such grounds defines the efficiency of the coating. When basic mistakes can cause the following problems:
- The inefficiency of the drainage
- Water penetration under wood
- A bad roof insulation
- Violation of the integrity of the coating
As a result, the roof covering may come out crooked and do not perform basic functions. This leads to constant leaks, damage to the roof with frequent winds and precipitation, unpleasant appearance design and many other effects.

The crate is extremely important for the further installation of metal. Although this coating is very reliable, no basis will minimize all the technical characteristics and advantages. Therefore it is necessary to take responsibility for such tasks, to perform all in accordance with the regulations and to consider the basic mistakes of newcomers in the sheathing of the roof with his hands. Or you can hire masters who will quickly make a solid Foundation for the metal.
And for the more visual demonstration of this process, it is recommended to watch the presented video. Here is the entire process of lathing and clarifies all the nuances that will allow you to avoid popular mistakes and make a good basis with your hands. Listening to this video, the novice wizard will surely be able to put metal roofing on your house, making it secure and beautiful.