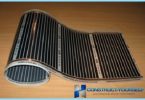
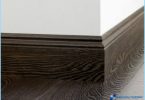
Recently in the repair of apartments, many citizens are trying to change the flooring to a more modern, such as laminate flooring or if it’s a bathroom, on the floor imported ceramic tile. However, all these types of coatings are very demanding ground on which you plan to run any coating. Laminate flooring and ceramic tiles should be placed on a fairly smooth surface. If the base is cement screed or concrete floor, then surely its surface is far from the requirements for laying laminate flooring.

Now this problem is easily solved by using a technology called self-leveling floor, it is called self-leveling. These floors perform as in housing construction and industrial sites, as well as in offices and other premises. The only difference is in the composition of the material used.
Materials for levelling floors ↑
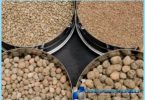
In the building materials market has a large variety of materials for leveling floors, as the eminent firms and domestic producers. In practice, this floor is a dry mix, packaged in bags of 25 kg. it Remains only to stir the mix with water and you can pour the floor. Each bag is printed instructions for preparation of the solution and fill the floor. It is very important to observe the proportion of water and powder, it affects not only drying time, but subsequent strength self-leveling floor. And yet it is worth noting, if you are not familiar with such works, should give preference to self-leveling floor, the most well-known brands such as Vetonit 3000 or similar. On the material cost saving is very risky, as the products of many lesser-known producers leaves much to be desired. The mixture of the floor covering includes gypsum and cement composition floors for industrial facilities is characterized in that it consists of polyurethane, epoxy resin and other synthetic ingredients.
You will also need primer of deep penetration for priming the surface before pouring the floor. For this purpose, suitable Ceresit CT 17. You will also need damping tape of length equal to the perimeter of the room.
The types of screed ↑
Its composition self-leveling floors are divided into mineral and polymer. At the moment, the existing floors are divided into five groups:
- on the basis of epoxy binders;

- polyurethane;

- metilmetakrilata;

- acrylic cement;
- self-leveling floors 3D.


Mineral floors serve as a base for the floor covering and used in homes. Polymer floors are finished as an independent kind of coverage and used in commercial and exhibition halls, and various social and cultural institutions. We should say about liquid floors 3D. This is probably the most attractive type of flooring, which is gaining now in popularity. It consists of a bottom layer in the form of a drawing or photograph and the upper transparent layer, which serves as a protective coating. It is not just an independent floor covering, and the whole work of art.
A necessary tool ↑
To perform work on pouring self-leveling floor will need a list of necessary tools, professionals it is mandatory:
- plastic container or bucket with 20 liters of mixing solution;
- electric drill, hammer drill or mixer with attachments;
- laser level;
- roller for priming;
- needle roller with a handle;
- a squeegee or notched trowel for leveling mixture on the floor;
- vacuum cleaner;
- tips on shoes with spikes so you can walk without leaving traces;
- an angle grinder with a diamond head to remove the nodules of the concrete;
- roulette marker;
- a regular spatula;
- building level.
This is a list of required instrument in every particular case, you may need something additionally.

The preparatory stage ↑
Before beginning work to prepare the ground for self-leveling floor. If the top has an old tie, and on it the remains of the mortar, the old ceramic tiles or old paint all need to be scraped off, disassemble and clean. Use a hammer, putty knife or an angle grinder with a special attachment in the form of a Cup with diamond edges. Then all we need to sweep and remove dust with a vacuum cleaner. Definitely work in the room you need, when it is freed from furniture and anything that might interfere with the quality floor pouring. If there is a gap between wall and floor must be repaired with cement mortar. The perimeter of the room damper is glued to the tape. And in the doorway as a nut, preventing leakage of the solution, you can install the profile from the drywall, securing it with dowels to the floor.
Marking with a laser level ↑
One of the most important moments in the device self – leveling floor is the definition of the zero point and, consequently, the evaluation of the thickness of the floor and, on this basis, calculate the consumption and cost of materials. For this purpose is the laser level or as it is called, laser level. It allows you to determine the highest point of the floor level in the room. Using it, we will find all the other marks in the room. In practice, this is done this way. Put the laser level on a tripod at a height of about one meter and is included sight the horizontal plane. Then with the help of roulette primeryayut all points of the floor and choose the high. This will be the zero point.
Then proceed as follows: in this highest point give a 2-3 mm thickness of self-leveling floor. Make a pattern: first, measure the length of the tape measure from the laser beam to the highest point, take 2-3 mm and transfer this size on the rail, marking her at risk. This will be the template. Now with his mark level self-leveling floor along the walls. Combining the risk with the laser beam, the lower edge of the rack on the wall make a mark. Then all of these tags are connected to each other via a building level. The drawn line indicates the level at which you want to pour self-leveling floor.
How to pour self-leveling floor you can see in the video:
The video describes in detail the whole sequence of performance of works on pouring self-leveling floor surface preparation before casting, and how to perform marking with a laser.

Primer floor ↑
Before pouring the floor the entire surface of the concrete substrate must be primed, preferably 2 times. Primer is required in order to prevent moisture from filling the floor soaked into the concrete Foundation, and the hardening process had occurred uniformly throughout the thickness of self-leveling floor, also to increase the strength of the connection base and the floor. Nomenclature of primers at the moment is very large in price and quality. Should give an example of the primer of deep penetration Ceresit CT17, which is time-tested, and is in the medium price category.
Technology pouring self-leveling floor ↑
After completed all the preparatory work, installed the damper tape, determined the level of the floor and produced a primer, you can proceed to the main stage – floor pouring self-leveling mixture.

In a bucket poured the contents of a whole bag or half of it, if not lets you set the volume, and poured a certain quantity of cold water, according to the manufacturer’s instructions self-leveling floor. Using a mixer or the nozzle is made by thorough mixing until a homogeneous mass. After a few minutes to stir again until completely smooth. Should strictly remember that the mixture must be consumed within 30-40 minutes. The first bucket results in a far corner of the room evenly along the wall. In parallel, prepare the following mixtures, the whole process must go continuously.

After leveling the first portion with a notched trowel, next pour in the same way the second bucket. You must make sure that the mixture is spread evenly throughout the floor. After pouring the entire area a few times to walk a spiked roller to remove air bubbles. Shoes should be with spikes. After careful leveling roller and achieve the top-level self-leveling floor required labels, floor is flooded. Now you need to wait about 4 hours. It is necessary to ensure that the room was not draft and falling to the floor in direct sunlight. We examined the process of how to pour self-leveling floor self-leveling.
Upon completion of 4 hours to conduct the analysis is performed of sex. Using a level, check the floor surface. If all milestones completed properly, the two-meter level will not detect any light. Will just have to be cut with a knife damping tape. In a week you can start to laying laminate or wood flooring.
How to pour self-leveling floor you can see in the video: