The contents
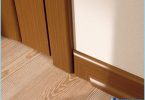
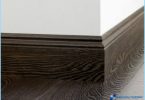
Skirting boards is a decorative strip that is installed around the perimeter of the flooring in the room. Its main function is to give the floor a finished appearance, the baseboard can act as a standalone decor item. In addition, the skirting hides the space adjoining perpendicular surfaces (floor and walls) and the gap between them, and allows you to discreetly route the wires.
Manufacturers offer profiles of various materials: traditional wood, MDF, aluminum and ceramic, polyurethane and cork. However, outdoor plastic moldings are the most popular and in demand due to its versatility, functionality, huge variety in form, color and surface texture, cost.


Properties and dimensions of plastic moldings ↑
The profile is made of plastic with a cable channel or solid. The cable channel arranged in the main part is closed and a decorative strap. Route the wires or replace them at any time without dismantling the product. It only requires to remove the decorative fittings, perform work on the replacement, attach the plate to snap in.


Have whole (deaf) profile on the back side there are grooves where you can place the wires. On the back side there are also places for the mounting clips.

Profile properties of plastic ↑
Made of foamed polyvinyl chloride (PVC) moldings have a number of differences:
- They are easy to install and are light weight. Flexible edge strips are pressed nice and tight to any walls. To install these profiles in different ways.
- Ready to install without the need for pre-processing.
- They are durable and strong enough.
- Are resistant to UV and humidity resistance.
- Non-toxic, which allows to install them in any room in the apartment.
- Do not require special care during operation.
- We offer a choice of textures, colors and patterns allows you to choose a plinth for most types of flooring. The profiles are produced with the imitation of the surface of stone, metal, wood.


Dimensions plastic plinth ↑
The plastic profiles have a standard length of 2.5 meters. This product is convenient for installation and allows you to carry it in transport. In cross-section of the plinth can be from 15 to 22-25 mm, and the height from 30 to 100 and even 150 mm.
The most popular profiles have a height in the range of 50-60 mm. This baseboard can be installed in most areas, so they are called universal.

For small square rooms with low ceilings will only fit narrow plinths, but for large rooms with good ceiling height is required to buy profile 80 mm.
- The ceiling in the room until 2.5 m – profile height up to 70 mm.
- The ceiling in the room up to 3.0 meters – a profile height of 70 to 90 mm.
- The ceiling in the room over 3.0 meters – profile height 90 mm.
Following this rule, you almost always select for the optimal height of the plinth. However, rules are rules, but if you have a room with a ceiling height of 3 meters a ceiling baguette 100 mm or more, mount the same height, baseboard.


Installation of plastic skirting boards ↑
Profile for floor from plastic can be installed in the following ways:
- Glue or liquid nails.
- On hidden mounting clips.
- On the dowel-screws.
The choice of method of installation depends on the design of the profile and the surface condition of the walls. If the walls are not aligned, then the first two methods should be abandoned. Choose a product with a flexible upper edge and install the dowel-screws. Save time, nerves, and the reliability of mounting will win.
Accessories for the installation ↑
Installation outdoor plastic floor greatly simplifies the production of the component manufacturers, the use of which allows to do without cutting the profile angle and the ease with which the plinth of plastic can be cut with a hacksaw with fine teeth.
Hardware sold separately. You’ll need the stub side (left and right plugs are sold by the pair), connecting elements and inner and outer corners. By means of a connecting element increasing the length of the profile in cases when the wall along the length of the more standard-length baseboard. Plugs are installed in places where for some reason the profile cannot be laid in the ground near the doorways.


Tool for work ↑
For installation of plastic skirting boards professional tool you will not need. The process is fairly simple and will cost you quite a tool that you have at home:
- Punch you’ll need, there is a need to drill concrete or brick wall dowel. For plasterboard walls it will be enough drills.
- Screwdriver or screwdriver. Even a small number of dowels, screws that need to screw for fixing the profile, it is better to tighten a drill than a normal screwdriver.
- Hacksaw with fine teeth for cutting profile.
- Awl. The skirting will need to do through hole dowel-screw.
- Small hammer.
- A tape measure and pencil.
- Level of the building. He needs to verify the horizontal location of mounting clips.
- Depending on the chosen installation method the floor will still need glue or liquid nails, mounting clips, dowel-screws.
Check straps ↑
Outdoor plastic moldings do not need to withstand 48 hours in the room to adapt to humidity and temperature. And spread out all the strips before laying to check the shade of each – a must. It happens that in the same package profiles have different shades of one color. Select strips of a darker shade and plan their packing in front of the light source. The difference in shade will not be visible.
Features of the unit ↑
The work is recommended to start with the far corner of the longest wall. The profile is worn the inner corner, and a plank attached to the wall. The bar enters into the corners, stubs and the connecting element by 3-5 mm on each side. This should be taken into account when installing.
To set the profile of the adhesive can be provided that the walls in the room flat. Otherwise you will have problems with the fit of the planks in some places. Glue suitable for plastic, or liquid nails applied to the back side of the profile, after which it is pressed against the wall. Then it is necessary to follow the manufacturer’s instructions – do I need to take a break for a few minutes to let the glue slightly dry. Push the profile to the wall should be with force. Excess glue removed immediately with a cloth or sponge. Remember that this method means that you cannot later remove the profile without damage.
For attachment to the clips or dowels-screws on the wall with a space from corner to 40-50 mm is marked under the first dowel.

A punch in the wall is drilled a hole and inserted a plastic dowel. If necessary, it just egged with a hammer. For mounting on the first fastening clip fastened to the wall with screws. To install the dowel screws in the placement of the dowels in the baseboard with an awl made a hole under the screw. The screw is twisted, but so that his hat was damaged profile.
If the wall is longer than the profile, to tightening the last screw on the bar puts on the connecting element, which is on the opposite side is cut to the size.
Profile with cable canal screw is screwed through the channel and is covered with a decorative strap.


In solid plinth closing cap screw decorative cap.
Depending on the condition of the walls, the holes for the dowels are drilled with an interval of 300-500 mm. If the walls are uneven step better to reduce. Drill all the holes on one wall, just remove dust with a vacuum cleaner, you will also be easier and nicer to work.

Wires are routed in the routing channel. You can do this at any time simply by removing the decorative fittings. But if you install the skirting without a cable channel, and wire to hold their need to navigate or to tightening the screws (in this case, they will be under the screws), or after you screwed in the dowels. Express the distance between the wall and the profile in the range of 10 mm, put the wires and tighten the screws until they stop. The wires will be lying on them. To access the wires you will need to again loosen the screws. Of course, plinth with cable channel a lot easier.


At the conclusion ↑
The work on laying flooring plastic skirting does not pose a problem for any person, though time holding a drill and screwdriver. This is one reason for their popularity. When performing the installation, be attentive and careful, and you make the last beautiful touch in the decoration of flooring.