The contents
- The advantages of dry floor screed
- Disadvantages
- Possible options for dry screed
- Tools
- Materials for dry screed floor and their number
- Substrate preparation
- Damper sticker tape
- Marking the level of the screed
- Waterproofing
- The laying of a leveling profile-beacons
- Backfilling and leveling of expanded clay

Dry screed floor or precast refers to the base «floating floors». This method of alignment using rigidly interconnected gipsovolokonnyh sheets of Knauf (gypsum fiber Board) in a monolithic canvas, lying loose on the insulation layer of granular material.
Alignment produce expanded clay and gypsum fiber Board form a durable rough coating, which you can lay laminate, parquet, carpet, linoleum, and other flooring materials. One of its advantages is the fact that the dry screed floor with their hands can be performed efficiently on a wooden or concrete Foundation even those who do not have sufficient experience in the construction and decoration.
The advantages of dry floor screed ↑
- Used for large roughnesses reason to hide communication and electrical wiring, and if you want to lay the flooring on a single level throughout the room.
- The simplicity and speed of execution. In one day you can lay up to 100 mTwo tie whole or in part.
- No «wet and dirty» works, you do not need time for drying, is ready for operation directly after installation.
- Is durable and smooth base, resistant to loads up to 500 kg/mTwo, which is easy to install plasterboard partitions.
- Provides additional heat and sound insulation of the room.
- The perfect base for laminate, parquet, tiles.
Deficiencies ↑
Along with the advantages there are also disadvantages:
- not suitable for low areas, as the layer of expanded clay and gipsovolokonnyh plates thick enough,
- not recommended under radiant floors, inside them laying the screed does not make sense,
- not recommended for areas with high humidity,
- more expensive coating in comparison with cement screed.
The main elements of dry screed floor is shown in figure.

Possible options dry screed ↑
At various irregularities of a wooden or concrete base to mount the dry screed can be different.
- Significant irregularities, pipes and communications. Installation on the leveled layer of expanded clay with a thickness of 3-8 cm.
- A smooth base. Laying of the waterproofing directly on the base.
- Irregularities 1-3 see laying on the foam, put on the waterproofing aligned on the base.
- The uneven ground requires additional heat and sound insulation. For waterproofing material poured concrete, align, stack of single sheets on them a layer of foam material, it is a twin plate.
The principle of the erection of a prefabricated ground made of gipsovolokonnyh sheets are the same in all the given options. We consider the classic method the device dry screed floor-filling with expanded clay.
Dry screed Knauf floor mounted on a well drained base at a temperature not below 10onC and relative humidity above 60%. All materials should be dried and survive for at least a day in the room where they will be used for temperature and humidity adaptation.
Tools ↑
You’ll need:
- screwdriver,
- construction knife,
- jigsaw,
- planer,
- a rule or an alignment rack,
- laser level, level,
- metal ruler and tape measure,
- mask for respiratory protection,
- gloves.
Materials for dry screed floor and their number ↑
- Gipsovolokonnyh sheets single or double in an amount equal to area (double leaf) or two squares (single) with a margin of 15%;
- U-shaped metal profiles with a wall height of 27 mm, length 3 m, the number depends on the length of the room and the distance between the profiles;
- polyethylene film for waterproofing with a minimum thickness of 200 µm, in an amount equal to the area of the premises with a margin of 15%;
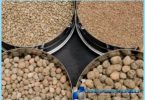
- expanded clay for dry floor screed any fraction from 0.5 to 40 mm (1-5, 5-10, 10-20, 20-40), the number is determined by the volume of the layer (floor area times the layer thickness) with a small margin of the bumps;
- damping tape (thickness 8-10 mm) of polyurethane foam or polyethylene foam, with a length equal to the perimeter of the premises;
- Scotch,
- screws with a length of 19-25 mm, at the rate of 6-7 pieces on one small sheet;
- PVA glue at the rate of 50 g per 1 sq. m. floor of the double plates, and 500 g per 1 mTwo the floor of the single sheet.
Equipment for dry screed floor includes a table with a horizontal surface. It is convenient to make the layout and cutting of cloths GVL.
Some of GVL to use? ↑

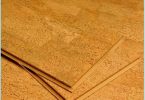
For works convenient small-format paintings (1,5×0,6 m) with a thickness of 10-12 mm. In the sale offering single-fiber and dual glued plate.
Single-fiber placed in two layers, gluing them together throughout the area with PVA glue and fastening with screws.
Dual plates are at the ends of the folds, they are mounted on the type of laminate flooring, fastening with screws at the seam.
For waterproofing, apply a polyethylene film, roofing felt or asphalt.
The procedure for the device dry screed ↑
Installation of a dry floor screed, a video of which is presented below, starting with training grounds.
Laying instructions shown on this video.
Substrate preparation ↑
- The basis clear of a dust and dirt,
- mounds, nodules possibly remove,
- large depressions and holes filled with cement or lime mortar and dried.
- level, long profile or a rule and a ruler to calculate the size of deviations of areas of the base from the horizontal.
Damper sticker tape ↑

On the walls on the perimeter of the floor glued damping tape, which is used to compensate the thermal expansion of the sub-floor. The width of the tape is chosen such that it acted on a collective basis of GVL.
Marking the level of the screed ↑

With the help of the laser level around the perimeter of the walls with a pencil mark the upper boundary of the layer of insulation thus, to eliminate all the irregularities of the floor with a minimum thickness of filling layer of expanded clay 3 cm It is possible to make off up the wall 3 cm from the elevated areas of the base.
If the laser level is not, markup can be done with the help of cords, screws and a level, as shown in figure.
Waterproofing ↑

Thoroughly cleaned from dust and dirt the floor is veiled with plastic wrap with overlapping strips of at least 20 cm, and the overlap of the walls so that the edges of the film towered over the plates GVL. Place overlapping strips of film glued with tape, to get the solid fabric without cracks and cuts. To the wall attach the tape construction tape. Polyethylene smooth under his hands, removing him out of the air
The laying of a leveling profile-beacons ↑

- On a polyethylene film with a solution of gypsum putty install leveling strips of U-shaped profile at a distance apart not less than the length of the rules. Experts recommend installing profiles from the sharp edges up. It provides the best soundproofing. If the provision of sound insulation is not required, the slats can be put Vice versa.
- First profile put against the wall so that its upper edge exactly coincides with the marking of the boundary layer of expanded clay on the wall. Out the bar, adding or removing from under her putty.
- The following straps placed parallel to the first, aligning them on the wall with the level and rules. Profiles can be installed directly on the floor, if the area is small, or only part of it.
- Setting the profiles, check their position on the level.
Backfilling and leveling of claydite ↑

The alignment layer of insulation on beacons is an important step in the installation of dry screed. This is where you need to follow the principle «check it seven times».
- On the floor is poured concrete block layer is not less than 3 cm with a small surplus and carefully align the rule, moving it on themselves to beacons. The rule should not push, it should slide easily across profiles. In places where there are holes, add a bit of clay again and carefully smooth down. If the thickness is more than 5 cm, the expanded clay should be further sealed with a wooden or plastic float or T-rule.
It is very important that the surface of the expanded clay was smooth without pits and mounds perfectly horizontal, not extending beyond the guide profiles and the marks on the wall.
On the leveled concrete block is placed for walking the islets of gypsum fiber Board (50×50 cm or more).
How to lay and connect the elements of GVL ↑
Single sheets ↑

The scheme of installing a single-fiber cloths are presented in the figure (first row of dark, one lighter).
Laying begins from right to left, moving from the entrance to the opposite wall so that subsequent sheets can be put standing on stacked and bonded to each other.
On the levelled surface of the expanded clay is laid the first row of leaves, densely pressing them to the ribbon damper and to one another. Next, the surface of the laid some GVL coat with PVA glue and apply the second layer with a shift of at least 35 cm Leaves are fastened together with screws every 15-20 see Changes in all directions, so the first painting of the second layer are cut at 35-50 cm from the end and along the length.
Dual plate ↑

The styling of the finished double plates GVL are the same as a single, begin from a wall with a doorway.
- The plates of the first row adjacent to the wall, using a jigsaw, cut along the length of the face and folds to the thickness of the walls were double;
- cleaned the cut plane;
- put a sheet against the wall, tightly clutching his sides with cut edges for damping the ribbon, and checking again a horizontal line along the length, width and diagonals;
- the Pfalz at the end of the sheet is smeared with PVA glue wavelike movements;
- put the second sheet, screwing it in the notch to the first with screws through 10-15 cm buried them at 1mm (shown in photo).
Paintings of GVL should be stacked tightly to the cracks at the joints was less than 1 mm. So lay out the first row. The last sheet cut to size. For cutting cloths use a construction knife and a metal ruler.
Each subsequent row begins with laying of a cloth, remaining from the previous one. This will provide the desired offset plates.

Preparation for dry screed floor finish ↑
After laying the tiles gypsum fiber Board, damping tape and plastic sheeting cut construction with a knife flush with the surface of GVL. The joints with putty plaster or cement plaster, polished. For laying tiles to putty the joints of plates GVL is not required.
The surface before the flooring topcoat on primed twice with primer deep penetration. The thus prepared dry screed after the primer has dried ready to laminate flooring, wood flooring or carpeting.
The main contribution to the cost of dry floor screed makes the layer thickness of the filling and GVL. When the layer of expanded clay 7cm materials will cost about 600 $ /mTwo, services of experts from 300 RUB/mTwo, therefore, performing work on the installation of dry screed floor with their hands, you can save a significant amount of money.