The contents
Different ways of applying textured plaster can achieve a beautiful finish. This material allows you to hide minor wall defects, so its popularity is constantly growing.
Varieties of textured plasters ↑
With this plaster you can not just change the color of the walls, but to make substantial changes in its relief. Professionals use various types of plaster mixtures, the algorithm is applied to the wall is identical, despite differences in the composition of.

The composition of the textured plaster include fillers, dyes, and knitting based. Depending on the type of substrate, there are the following types of textured plaster:
- mineral, representing a mixture of cement and granules of marble, granite, quartz;
- acrylic, ready to use, do not lose their original characteristics during the maintenance period;
- silicone, resistant to moisture, having a high price;
- silicate, is made on the basis of liquid glass. Characterized by resistance and Protocolo.

Surface preparation ↑
Before you apply the plaster, it is necessary to perform the following steps.
- To clean the wall from paint, remove the old materials. If necessary to remove from the wall oily or greasy spots, additionally, the wall is treated with a solvent, then washed with a solution of soap.
- The wall is primed.
How to hold the primer base ↑
- If necessary, it is necessary to embroider cracks (enlarge) to fill them with gypsum or cement working solution.
- On the wall is applied to the base layer. As this layer is applied acrylic primer.
There are several decorating options and the application of textured plaster:
- smooth surface with colored stains, and pigments;
- die drawing;
- arbitrary application of the relief.
Features choice:
- Textured plaster to absorb dust, moisture, many smells, so the kitchen is better to choose smooth pattern.
- In rooms with high humidity (bathroom) surface, it is desirable to cover a thick layer of lacquer or polymer.
Specifics of work ↑
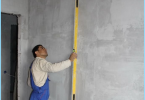
- Before applying on the wall of a layer of textured plaster perform the leveling beacons.
- Further treated with a primer of deep penetration.
- The wall is dried.
- The solution is distributed over the surface of the desired layer using a weatherstrip tool. No need to make the layer perfectly smooth, it is sufficient to distribute the solution evenly. The thickness of the layer should comply with the instructions offered by the manufacturer of the plaster, take into account the specifics of the planned project (1.5 – 2mm).
- Applied plaster dries fairly long, so there is time to adjust the thickness of the layer, patterning. Please note that cement and plaster printing cement formulations have a short period of setting, you need to consider before applying the paste on the wall about the thickness of the layer, characteristics of the relief pattern.
To perform such action will require:
- trowel;
- plastering trowel;
- spatulas of different sizes;
- plumb
- water level;
- construction rule.
How to apply the texture ↑

The original variety of patterns on the walls can be done using special equipment in the application of textured plaster.
Most cases, the following methods of application:
- need special rollers having textured tips (you can use regular rollers with a long NAP). The pattern is applied with a roller over the entire length of the surface or movements in opposite directions. The intricate topography, the finished pattern gently smooth construction with a spatula;
- the texture can be done using ready-made stamps with pictures or a fancy ornament. Stamps, pre-soaked in water, applied to the surface of the wall tightly, get the desired imprint on the damp plaster. The package of the stamp includes rigid stamps and soft rubber mould that is used on inaccessible parts of the surface;
- a long simulation on the walls of natural stone, use a trowel, spatula, brush. With a spatula make chaotic traffic, getting messy on the wall of the furrow. When driving on the wall with brush or trowel, you can make wavy divorce;
- rotational movement of the sponge are the easiest way of applying a plaster pattern.


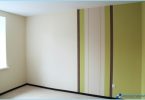
Option decorating ↑
To give a textured finish a complete look, you can use the paints. The surface is covered with a dark tone foundations, the wall is dried. Next on the wall of a rubber roller is applied bright paint. When choosing a color for decorating the plaster with pigments composition, you need to cover the wall of colorless protective varnish.
The application features a textured finish ↑
In addition to the decorative plaster you can also use a variety of modern fillers, allowing you to make the picture more vivid and original:
- to make the option «woodworm», in the plaster add granite chips or plastic granules. On the wall the composition is applied with a trowel as soon as the plaster solidifies, the wall is treated with a grater. Due to scratching of the granules in the layer of plaster, on the wall there are original bands (striations);
- the plaster mixture is added pellets of paint. When carrying out them with a brush, squeezed paint, wall painted in the desired color;
- to obtain the effect of additional stains using the liquid composition.

The technique of splashes ↑
This method is the easiest way to get plastered on the surface of the original relief. You need to take in one hand and a whisk in the other stick. The broom dipped in a solution of plaster, a broom hit with a stick, guiding the broom on the wall. On the plastered surface will spray the flakes. The value depends on the density of the initial solution, the size of the broom, the force of impact. Wall, which is applied to the spray wet plaster, previously painted. Spray have a contrasting color, the result is a raised mottled wall.
The same technique «Italian finish». On a surface put nakryvochnyj a layer, spread it to dry placed on top of the second layer of plaster. The layers have different color, the new layer overlaps the previous one, forming an interesting pattern. If you take several layers of different colors, you can get the original decorative panels.

The method of obtaining relief with a trowel ↑
After performing nakryvochnogo a layer, a small amount of a solution of plaster is applied to the trowel, gently transfer the solution on the basis of getting an interesting picture:
- invoice option allows you to draw the walls in the room in antique style. On a surface put a few layers of solution, carry out coloring;
- bouffant – hatching. When such option on the fresh plaster to create a decorative finish. Treat the wall with a wire brush, dried for 24 hours, then with a rag or putty knife to clean the grains of plaster, which is fragile hold on the wall;
- stamping construction roller. Can cause the relief image roller, which has a picture. If it is not available, a simple roller reel rope roller is carried out on wet surface, leave marks, reminiscent of grass.
In the video you can see the technology of application of textured plaster:
In addition to the above methods is applied to the surface decoration, there are many other techniques. In addition, DIY stores offer ready-mixed, creating the effect of the relief on the wall. In the end, the trim should be the decoration of your room, the pride of the owner of the premises.