The contents
- Fastening the lining in different ways
- How to nail the crate
- The methods of installation of lining
- There are four ways of attaching the lining
- How to nail siding nails
- How to nail the paneling to the wall with screws
- How to nail wooden battens of kleinerem
- How to nail the battens with screws
Siding is a popular material for lining many of the residential and non-residential premises, and in order to save cash on the installation of the product is possible through their own efforts. For this you need to familiarize yourself with the basic subtleties of the work, to determine the frame for lining and mounting tools.
Fastening the lining in different ways ↑
What are the stages of installation of the cladding material?
Crate. It will be the wrong decision to nail the siding directly to the space, to do this, experts advise to make a frame or crate. Because the surface should be smooth, contain a warming layer, all of its elements need to be nailed down carefully, on one level, so that the lining is formed correctly and beautifully.
The frame creates an air space between the two layers, is formed ventilation as one of the foundations for quality management of the product. Lumber for sheathing properly dried, Gubellini nailed with nails to the walls. You can use the corners with vertical holes, for sliding type of design in a wooden house. If the walls are crooked, then you need to fix the frame using nails, bolts, or screws. During the installation process, it is desirable to use a level, for the implementation of horizontal and vertical control of the plane.

How to nail the crate ↑
Frame rails must be installed perpendicular to the lining, they attach to the wall with screws and casings, can be targeted with dowels. To ensure perfect evenness of the design, placed the pieces under the wooden slats. Between the extreme bars of the stretched rope and sets the level at which positions the items.
The methods of installation of lining ↑
How to nail the paneling to the basis of design? What devices?
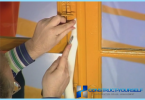
- You can use nails or a staple gun, in this case, you will need a nail set, which will help evenly drown hats facing the Board.
- Still used a special bracket – claimer, suitable for installation of lining of small thickness. Bracket top fixed nails or screws. The fastener is closed overlaps the strap, and to hide the cap screw – use application.
- Siding with wide inner latch lock clips, staples, and nails and screws. At the end of the process, all protruding parts are cut and surface polished.


There are three ways of attaching the lining.
Vertical, rails are mounted on the center of the working surface, and the casing frame lining is made from the corner of the structure. In this case, for fixing a Board better suited nails with a small cap, as well as staples or screws.
Where to start?
- With the left edge of the working space is set the comb to the corner of the siding and nailed the easy way.
- In the grooves are attached to the nails (or other element), the second Board is placed in the first and so on until the very end.
- The final strip of lining to fit a certain size and is secured with the right edge of the basics.


Horizontal installation, need to strengthen the lining ridge up, in order to avoid condensation of moisture inside the structure. Installation it is better to lead from the top down, to avoid visible gaps between the bands finishing boards.
- First mounted the paneling in the ceiling, the second from the bottom is inserted in the first groove, fastened with nails or screws.
- The final boards shall be cut according to desired size and fastened in the step of the last strip.
Diagonal involves the installation of the first boards from the corner, and the ends of the lining are trimmed according to the given sketch.
There are four ways of attaching the lining ↑
How to nail siding nails ↑

Here you need skill and accuracy to cover the cap fasteners, they are placed in the grooves. You can drill a thin drill holes for the stem of the nail, so as not to split the wood.
How to nail the paneling to the wall with screws ↑
Its essence is that you need to make holes for screws in the spike strip. After this hole is closed with a peg.
How to nail wooden battens of kleinerem ↑

Brackets are attached to the back of the lining and fixed on the wall with nails. To the following Board is attached to the first claimer, and after it is joined and fixed.
How to nail the battens with screws ↑
If the material is plastic, then it will fit the screws, it is inserted into the upper part of the Board, and the hat is on the same level with a spike. And so successively until the last Board.
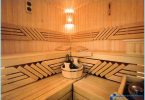
Coated lining steam room ↑
There is a perception experienced bath attendants that the vertical mounting of the lining the temperature of the boards at the top and bottom is different, it affects the life of the product. When the horizontal position of the boards drying and less broadening occurs, this method of lining even makes the bath more spacious and brighter.
But vertical stacking of the lining will fit for saunas (with dry air and high temperature performance). For efficient air circulation in the boards, made holes, and the problem with the condensation is solved.
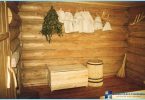
How to nail the paneling in the steam room properly and efficiently? The method of plating kleinerem. This method allows in the future easy to dismantle when replacing the plates. Budget option would be the nails. Galvanized steel elements driven into the mounting rails, and caps recessed with a nail set. However, in this case, there is a high probability to make a mistake and ruin the material.
For installation of the lining on the shelves and the seats use screws, the coating surface is polished, facing the Board rests firmly and looks nice. And for the lining of the old type of plate apertures, the chamfer goes under the bonnet and screws are screwed into the frame flush. Using this method you can attach plates on the walls of the steam room.
The baseboards are nailed on the facing Board nails (hats removed in advance), and then place erased skin.
All these methods allow to quickly and soundly to sheathe the steam room and washing room paneling. Follow proven methods and enjoy the primary features of this cladding material.

Watch videos of experienced craftsmen, how to nail siding. Let Your finish will last for many years, delighting with its wonderful view of all residents and guests of the house.