The contents
The range of finishing materials allows to choose the appropriate option for the wall design according to the request, budget and operating environment. To navigate in the flow of products offered and creative opportunities in decorating will help a brief overview of popular options for the walls.
Finish of the stone ↑
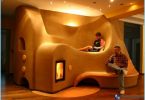
 Interior brick and stone look great on the walls of the spacious areas and bring the opposite visual effect in a limited area of space. Particularly interesting segments lined with them near the fireplace, the window niches and door openings. It is permissible to replace the stylized brick tiles, popular in the decoration of the walls for modern interiors.
The preparatory stage involves the relative alignment of the walls with valid points to negligence. The reason is the lack of the need to bring the working surface to the reference state. Given the weight of the stone and the corresponding load, increased requirements to reliability of vertical structures.
Offered:
- execute the plaster with tension, reinforced with wire mesh
- if you are using drywall to select sheets of limited thickness (up to 12.5 mm with reinforced mounting scheme in 3 horizontally)
Variations on the theme of attachment include the choice of:
- Tile or silicone adhesive;
- Liquid nails;
- Special formula for sticking stone;
- Cement-sand mortar with the addition of plasticizer and PVA glue.
Before starting work it is advisable to create a project for mapping the geometry of the surfacing material and the walls, also the method of installation, as the presence or absence of a seam. The sketch is transferred to the wall where indicated by the symmetry of the working area, and set the limiters in the embodiment of fragmentary cladding your walls.
The technology of laying of stone ↑
 Ready composition is distributed with a spatula on the width of the first row. When you butt version of the veneer walls, it is sufficient to fasten the stone to the glue, to scroll left-right for uniform adhesion, and to press for better fixation.
The option of a decorative seam in the Arsenal of the Builder prepared a few tricks:
- Band of GK. The consequence of this technology will be wide welds, perfectly complement certain types of stones.
- GK strips of different widths. The line is more graceful with the possibility of correction parameters.
- Tile crosses. Will form a clear line, supporting the configuration of the material.
The thickness of 15 mm requires attention in the bracket. Should be to suspend 3-4 range for the purpose of recording the result of adhesion and anticipation of the likelihood of the offset of the array down.
The stone cut with a grinder or machine for tiles. In the variant with very strong textures granite and marble, it is better to trust a professional cutting.
After about a couple of days after the stage of drying, the cleaned support elements, the remains of the mortar and the seams are rubbing.
Revetted wall plastic panels ↑
 The choice of finishing products from plastic quality imitation of natural textures and palette of colors that allows you to select panels in accordance with the design. For walls, use a GIMP version.
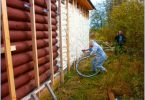
Installation of lathing involves the use of strips 25 x 60 mm. Should get acquainted with the version of placing the panels with aspiration upwards.
In this case, the metal rails are arranged perpendicular to the vertical. Profiles, with parallel placement up and down, aligned, and clamped to the wall with dowels. Provided clearly expressed unevenness lining are used from any solid material.
At this stage, are mounted rails associated with pre-attachment of the step to 60 cm, are set in relation to the first. The final fixing is carried out after final alignment in the plane of the sheathing. Given the structural feature of the tree, is the meaning of the treatment strips antiseptic composition.
Moldings ↑
Details for the lining, involved in the organization of the mounting panel and giving completeness to the design wall. There are several types of profiles with different function:
- Start – the starting point of the process.
- Finishing – the final touch before installing the last panel
- External corner – mounted on the edge of the speaker angle.
- Inner corner – identical to the previous one with the opposite arrangement on the plane.
- Docking – demand in two positions: connects 2 panels and is used with a design target for inserting a mirror or the hood.
 Starter strip is installed vertically in the top corner. Detail is fastened with a stapler with staples or guidami. At the same time the profiles are mounted on the floor and the ceiling, delineating the boundaries of work.
The first panel is inserted into the first design and it ranks line up following items.
Smooth the walls with drywall ↑
 Material for internal furnish of GC sheets called dry plaster according to its contents: the filling plaster with double-sided framing of the cardboard. The minimum cost of time and energy resources allow to cope with the decoration of the walls. The principle of walls is based on the perpendicular junction of the guides and profiles, recorded remotely.
The only difficulty was that the dimensions of the sheets, and this fact requires presence of assistant in the process. Ledger panels are allowed to simply stick to the wall. But to improve sound insulating properties and at the uneven walls make the frame. Covering the wooden surface was originally smooth walls of foam blocks and gasbeton frame does not require.
One popular version is recognized as the products of the company KNAUF, which manufactures complete systems 4 types:
- Standard thickness 9, 5 -12, 5 mm
- Water-resistant is a remarkable hydrophobic additives, allowing the wall «breathe» with the parameters of thickness 12.5 mm.
- Anastaska – with the inclusion of the plaster reinforcing substances, which significantly increases the resistance (12,2 mm).
- Vlagopoglascheniem – a combination of the above mentioned characteristics with similar thickness.
When working with the system KRAUF all actions are conducted in support of the original components.
The principle of working with Ledger sheets ↑
In order to avoid deformation of the plate is set to start from the corner or center. Fixing is with screws. Special attachment for tightening follows the penetration of the screw to a predetermined depth. Technical point is important in the putty. The leaves cling tight, eliminating gaps.
- Diagram of the mount due to the presence of the frame of the 2 profiles: – wall (UD) and guide (CD). To optimize consumable outlines installation instructions. On leaves mechuda areas of the outlets and moldings.
- The variant of wall mounted plugs horizontally every 50 cm, the position of the profiles is adjusted to a level.
- On the wall surface are transferred by direct passage of the CD with a frequency step of 60 cm ( using a plumb Bob). Perimeter mounted direct suspensions with the rhythm up to half a meter and fixing guides.
 Action on the formation and reinforcement of joints are decorative and functional value. Need to putty in the mounting points, treating the location of the screws.
The joints are Packed with tape from fiberglass and covered with plaster. When using the system, KNAUF joints are filled with proprietary filler mass. They withstand cracking the joint, and securely fix the sheets.
Diagram for laying ceramic tiles ↑
 The dignity and the aesthetics of the walls, lined with tiles, known to all. If you wish to save money on its installation it is possible to master the technology of laying. In the Bank a Pro there are many versions of finishing, but use primitive technology.
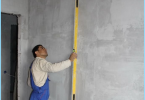
Smooth wall is a guarantee of quality veneer, and the leveling layer of plaster is always appropriate.
- The process starts with long strips, laid with level, nailed horizontally to the wall. It will support the second row, and ensure a smooth veneer.
- Adhesive distributed over the surface, notched with a trowel and the tile with the force to fall off. The correctness of its position is controlled by the level. For the identity of the sutures are inserted TIC.
- Styling is completed with grouting.
The variety of textured Venetian plaster ↑
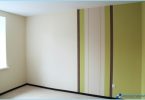
 Venetian plaster is presented in the form of chips ( marble, granite or limestone) and the composition with acrylic substance in different range of colors.
Ornate title does not imply a complex technology and it is available for self-fulfillment.
The idea of decorative coatings in the formation of a glossy effect created by a special mixture. It covers 2 of the applied layer of plaster, and textured patterns are evident at the combination of the third layer, force pushes, and shapes tools. In the absence of skills desirable practice on the part of the wall.
Scheme of application is designated as:
- The main condition – smooth wall. It is impregnated with a double polymer coating and only in an absolutely dry form ready for plastering;
- Add Kohler. Primer layer of play framework. After 4-5 hours, grind the surface with abrasive cloth «nulevkoy»;
- The second layer is applied in small portions of the solution in random order. The buildup of extra plaster at the edges of the spatula are removed – they will spoil the effect of;
- The third approach will ensure that the planned results. The characteristic layering of stolarki is formed in the geometry of the figure, and repeating grinding with a spatula, under pressure will lead to the gloss;
Assistants – trowel or spatula. Their size depends on the texture of the surface. The plaster is applied neatly and each layer requires drying.
After a week’s interval is applied a clearcoat that can enhance the visual perception by creating optical illusions of volume on the background refraction.
Experiment with materials, combine techniques, create his design projects, clad the walls themselves. Bonus your efforts will be a unique design and a good mood.