The contents
Trim is a widespread attribute of the window frames. They perform as an ornamental function and a protective, insulating the gap between the window and wall from the environment. One of the most convenient materials for this task is a tree, characterized by environmental friendliness, durability and ease of installation.
The choice of wood for frames ↑

If the design of the wooden frames always approximately the same, then by the type of wood may vary considerably. It depends on the durability, convenience in work, the complexity of processing, and many other factors. It is therefore important to choose the right grade of wood that will be optimal for this task.
For casings used several varieties of wood:
- Lime;
- Birch;
- Pine;
- Oak.
It is worth noting the difference between hard and soft rocks. Linden belongs to the second, while the oak is to the first. Birch and pine are placed between them so often for work choose their.
Soft woods are better treated. This advantage is extremely important if the frames will be decorated with various carvings. If you use other options, the task will be more difficult. But the harder the wood, the longer it will serve, so here you should choose balance. Oak is extremely durable, and Lipa has no such dignity.
Solid wood should choose in the following cases:
- The humid climate;
- With regular jumps in temperature;
- In dry air.
The alternative will be the choice of the middle option like birch or pine. They are optimal for the casing, do not require special care, have a great life and are very easy to thread.
You can use other wood. It is important to take into account their behavior under high humidity or high temperatures, and conduct the appropriate preparatory procedures. This will ensure a long life casings.
The decoration of the architrave ↑

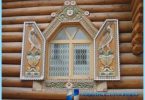
An important caveat in the casing — its decoration. Often the wooden frames are complemented by a variety of patterns and decorative elements to improve their appearance and to make beautiful Windows. All this is done by carving.
Here point to two directions: Welt and trim. The first option involves carving the Board, and gradually form a common pattern. For the second the same are made separate elements that are later glued or nailed on the General Board.
Each option has its benefits, but that’s just a matter of taste. Welt thread more beautiful and interesting, but requires a lot of work and difficult to clean. Slip more easily generates three-dimensional image, but short-lived and can be destroyed in a few years.
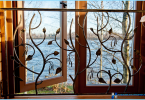
It is worth noting that often the upper part of the casing different from the rest. It concentrates on the attention, krasas shade, images of the sun and much more. It all depends on the imagination of the Carver, although it is worth to pay tribute to the traditions.
To increase the lifetime of the pattern recommended pattern along the grain of the wood. This will reduce the rate of cracking, which is especially important for conifers. In the process, it is not recommended to do thin ends and bends, as they suffer from time the first. The best solution would be a simple pattern with a drill and rounded elements at the edges.
How to make trim with your hands ↑

Independent production of the clypeus is not so difficult, the problems can arise only with the creation of patterns. For this you need to choose the wood that you need to buy blanks and start working. The whole process consists of the following stages:
- The measurement Windows;
- Trimming boards;
- Sawing patterns.
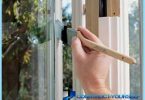
Pre-need to make measurements from the window to which a prepared casing. It is worth remembering that the measurement is carried out on a frame and not on glass. In addition, it will be only a line, so the size should take between 15 and 20 cm more.
After that you need to find boards. Should take them a bit more in order to eliminate a bad slice or other problems. The thickness of plates should not exceed 3 cm. The height is chosen individually, but is guided by 2.5-5 cm. Although sometimes wide frames fit old buildings made of wood.
Then begins the stage of pruning and training boards. It is important to cut unnecessary parts and sanded the edges, if they in the future will be untouched. But they are often pruned in the process thread.
The decoration of the architrave ↑

Cutting out patterns is an important step in decorating the casing. For this task, you need some tools and pre-drawn sketch, on which work will be carried out. And so, for the next stages may be useful:
- Chisels of various shapes and sizes;
- The jigsaw;
- Knife with wedge-shaped blade.
And also will need a pencil to mark thumbnails. It is worth noting that you do not make your design unique. There are many ready-made templates of the frames, which you can find on the web. They are all similar, so not much difference.
After preparation of all instruments and the selection of the sketch you need to transfer it to the wood. It is possible to print it out, and then redrawn with a pencil. The task is simple, but at this stage it is important to do the outline with high accuracy. Because a small mistake will lead to deterioration of the overall result. It is also not recommended to make the distance between the patterns is too narrow, because it can reduce the overall strength of the casing.

Then begins the stage of cutting out. First you need to walk through the elements of the casing of the jigsaw. This is the most important part that will determine the working region, and eliminate unnecessary pieces of wood. The cut is neat without effort. Better not to hurry, because it can affect the result.

After completing this stage with a knife eliminated the gaps in the job starts the decorating. All the little details, the lines and details of the image. If the employee lacks the skills of carving, it is better to give this job to the master. Because the high-quality casing will delight the eye for a long time.
After completion of the work necessary to conduct final processing. This stage includes the final touches. Need to sand some places of the casing, but at the same time without spoiling the picture. This will improve the results and make the wood more pleasant to the touch.
It continues through all stages protect the wood from the environment. Impregnation, varnish and other protective compounds. If necessary — painting of the individual elements of the picture with a special paint.
The connection parts of the casing ↑
Next you need to connect components of the casing into one common frame for the window. This is done by a deaf or a through tenon. The first option is more convenient because it does not spoil the appearance of the product.

The connection spike is as follows: on one side is formed a hole through a drill or a jigsaw. Its depth should exceed the depth of the future of the stud by a few millimeters. Then on the other side is set to spike by means of pins. Glue you can use, but it will help only a few years. After a few temperature changes it will lose all its properties.
Such notches and spikes need to form on each part of the casing. Spike needs fits into the recess, but without the use of brute force. It is important to ensure a good fixation that, in future, design has not collapsed.
After connecting all the parts of the casing ready. You can start the installation using the same conventional studs or nails. For a better understanding of the process, it is recommended to watch this video. Here is an example of the set design on the casing by means of a saw.