The contents
If you have the desire to transform the interior, to add refinement and originality, you should think how to make multi-level suspended or plasterboard ceiling with his hands. With the current diversity of materials and design solutions to perform the installation of multilevel ceiling really in almost any room.

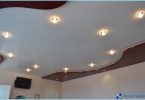
Multilevel variant formed of two or three planes, combined with each other, additional lighting, decorated in the style of the room. The most common variants of multi-level ceilings – plasterboard, suspended multilevel, as well as mutual combination.

Choose a multilevel ceiling ↑
Advantages of multi-level ceilings:
- the ability to mask defects, to conceal wiring, air ducts and chimneys;
- the change in the space inside the separation zone, the implementation of interesting design solutions.
- the use of lighting options.
With the selected order and the task should define the variant of multi – level ceilings or plasterboard, better to stay.
For confidence in the decision is to see the finished multi-level ceilings with friends masters, making repairs to plasterboard multi-level ceiling, take a look in person for installation of multilevel ceiling of plasterboard with their hands.
Universal approach is to collect available clues, how to make a multi-level tension ceilings with their hands, the Internet. You must consider how it will blend with the walls, room arrangement.
The complexity of the installation depends on the room where it is installed. Living in a multi-tier version of the ceiling will help to underline individuality of the interior, to show imagination and sense of style, and to accentuate the situation. Multilevel ceiling will be durable, beautiful and practical, which will further save on its repair. View photos and videos about installation of multilevel ceiling, it will prompt new ideas.

In the bedroom you can use a simple multi-level option with soft illumination and flowing sinuous lines.

In the kitchen multilevel ceiling will be very useful – will help to hide domestic communications, hoods and ventilation chimneys, to give your kitchen personality.

If you decide to perform the installation of multilevel ceiling in the bathroom, do not forget that in this case, the drywall should be moisture resistant.

Installation of multilevel stretch ceilings or drywall you can perform with your hands, if you have the skills to perform such work. Before starting the installation, you need to weigh your possibilities, as you will have to use for installation of multilevel ceiling of costly materials, and in case of failure, instead of saving for the wizards to be at a loss.
To begin with, determine the design features of the installation of multilevel ceiling, what are the challenges of installing it. Make sketches, consider options for the location of lighting, the placement of the levels. After that you need to perform drawing and arrangement of multi-level design, use computer program. For curved surfaces, determine the centers and radii of the multilevel surface.

If you select design, you need to define your multi-level ceiling, he will be suspended, plasterboard or a combination of both materials. This will depend on arrangement.
If you decided to plasterboard, be tools: building level (or laser level), hammer, tape measure, pencil or marker, drill, with a cord, a hacksaw. In addition, it is necessary to buy with a stock plasterboard sheet with a thickness of 8 to 9.5 mm and metal profiles.
Choosing plasterboard and profiles, pay attention to the quality of the materials. Defective material after installation can lead to sagging tiered ceiling.
Sealing tape is used for close contact of the frame plasterboard concrete ceiling of the original and the best sound insulation.
Preparing ↑
Initially, the ceiling is cleaned from old plaster, is treated with an antifungal compound. Check cutouts tiered ceiling in the drawing the ceiling and the mounting arrangement. With the help of drawing, you can make an estimate of quantities of materials required for installation of multilevel ceiling.

Work start with the execution of the marking of fixing points. Measure the height of the lowest corner in the room, retreat not less than 8cm from the ceiling level, in the absence of built-in lamps, and 12cm in the case that the design provides recessed lighting.

The procedure works by the installation of multilevel ceiling ↑
Next are, in order:
- Put the marks on the other corners at the same level, make space, connect the dots with a line across;
- Dowels 40 and 65 mm fix the profile along the line on the walls;
- Main profiles (CD) going into the frame, fixed with screws in sections, mounted previously on the walls;
- Installed suspensions-distancer for drywall to strengthen the structure and to avoid deflection of the ceiling, install them using 40cm from each other with dowels, and bent twice at right angles;
- Trim basic profiles (CD) to the required length and attach to the profile, made in p. 3 and p. 4. If you want to lengthen the profile, apply the coupling.
- For short joints of drywall mounted filling profiles rails are cut with a length of 12 cm and fastened with screws to 3.5?9 to the lateral surface of the main profile (CD). These segments attach CD profile with a length of 55cm. One sheet of drywall attached to one side of the profile, next to the second.
Preparation of mortgages under the chandelier ↑
For lamp make additional support from UD profile – cut pieces 20 cm are fixed with screws to the side shelf CD profile. Two CD profile, which is attached to the chandelier, insert into the guide segments, previously it screwed in paragraph 3. Then attached the drywall on the first level. Sheets is recommended to strengthen the vrazbezhku. A sheet is attached at the beginning of the first row, the next row of a sheet is attached on the opposite side dowels 2.5 cm.
Before covering with plasterboard first level, mark the fixing points of the second tier. The ceiling space in locations of the second level it is possible not to sew up the drywall.

Installation of the second level ↑
CD profile is cut and fixed at the desired radius with screws. If you have purchased a perforated profile can be bended along the contour of the design, you can make it out of the ordinary, cut into the side walls of the snips in 4-6cm.
Attach on the wall guide UD profile, which will be fixed to the frame of the second level, after completing the retreat in the 80-100mm from the first level. CD profile at one end strengthen in wall profile, the other fixed with P-prominent profile-hangers. The sheet of drywall is cut with a margin of 6 cm and is fixed on the frame. Cut off the excess with a jigsaw.
To bend the drywall to the desired shape, make a strip of drywall holes and treated with a solution of PVA with water. After 50-60 min bar it will be possible to create the desired shape and fasten it with screws to the metal profile.

After completing the laying of drywall, you need to putty the seams and start painting surfaces. So over time, joints are cracks, you can use the canvas climbing frame.
Alternative to plasterboard multi-level ceiling ↑
Alternative to plasterboard multi-level ceiling can serve as a multi-level stretch ceiling. Multi-level stretch ceilings is possible to divide the types of fabric and PVC film. Each has its own features.
Fabric ceilings are made of polyester fabric on top is applied a protective layer of polyurethane. The ceiling can be painted with latex paint, and also pasted on top of a decorative elements. The advantages of such a ceiling include the relatively low price, easy to mount, extremely smooth surface.
The advantages of PVC ceilings:
- Resistance to high temperatures;
- Absence of allergic reactions and anti-static;
- Prevents the formation of condensate;
- Good quality films do not emit toxic substances, safe to use and it does not support combustion.
PVC ceilings are made of film that is installed by heating with hot air, cooling the filaments of the material shrink, stretch, pull and straighten the fabric surface, and with proper installation it turns out smooth and even coverage.
The main ways to consolidate the multi-level stretch ceilings – with the help of harpoon system used for the ceilings of PVC film, or using klinovo system is more complex, requiring skills in the installation of suspended ceilings, but more versatile.
Tools and materials for installation of suspended ceilings: spatula for pressing cloths in a baguette, construction line level, measuring tape and construction pencil, square, hacksaw frame, carrying, screwdriver, hammer, heat gun with a tank of gas.

Before installation of the ceiling of the room carry furniture, appliances and other items that are harmful high temperature, the floors covered with cardboard.
During installation follow the following instruction:
- The installation of a baguette. Determine the lowest corner of the ceiling, retreating some distance for mounting the lighting elements, causing a horizontal line, which will be set baguette.
- Check for hidden wiring, mark with a pencil to avoid damage during fixation of a baguette. The baguette is fixed tightly to the wall with plugs and dowels.
- The fixing points have not more than 7-8 cm from each other. The joints of moldings and angles necessary to secure the baguettes at a distance of 20-25 mm from the edge of the baguette.
- After fixing baguettes start the installation of the stands for the lamps.
- Before installation of multilevel ceiling need a good clean up dust and dirt, debris from the premises and the dust from the PVC film.
- Before you deploy the film warming the room for 7-10 min. the heat Source – place the gun in the doorway, distance from the fabric should be more than six meters, the gas bottle must be outside the room. If the area of the space is more 40mTwo, it is necessary to use two guns simultaneously.
- The ceiling stretched along the welds, then held the installation of blade clamps.
- First fixed angle with a special note, further located diagonally from it, the remaining angles are recorded similarly. In a room with exposed pipes first installation nearest corner.
- After fixing angles mounted on the blade for edging and seams of the fabric. To correct irregularities in the seams, you need to heat the fabric and to fix the place.

In the process you can do a little photo essay or video about the installation of multilevel ceiling and offer it for study friends online.